
Owner's Manual

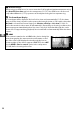


Table Of Contents
- Quick Start Guide
- Camera User Manual
- Restoring Default Settings
- Q&A Index
- Table of Contents
- For Your Safety
- Notices
- Supplied Accessories
- Parts & Controls
- Getting to Know the Camera
- Camera Menus
- First Steps
- Basic Photography and Playback
- Live View Photography
- Movie Live View
- P, S, A, and M Modes
- User Settings: U1 and U2 Modes
- Release Mode
- Image Recording Options
- Focus
- ISO Sensitivity
- Exposure
- White Balance
- Image Enhancement
- Flash Photography
- Other Shooting Options
- More on Playback
- Connections
- Menu Guide
- Navigating the Menus
- The Playback Menu: Managing Images
- The Shooting Menu: Shooting Options
- Custom Settings: Fine-Tuning Camera Settings
- The Setup Menu: Camera Setup
- The Retouch Menu: Creating Retouched Copies
- My Menu/Recent Settings
- Technical Notes
- Troubleshooting
- Error Messages
- Specs
- Index
- Lens User Manual
- Scan of CD-ROM
- Warranty

56
x
A Non-CPU Lenses
When using non-CPU lenses, be sure to enter the focal length and maximum aperture using
the Non-CPU lens data option in the setup menu (0 172).
Non-CPU lenses can be used
only in A and M modes (0 73); aperture can be adjusted using the lens aperture ring.
D The Count Down Display
A count down will be displayed 30 s before live view ends automatically (0 53; the timer
turns red if live view is about to end to protect the internal circuits or, if an option other than
No limit is selected for Custom Setting c4—Monitor off delay > Live view; 0 228—5 s
before the monitor is due to turn off automatically).
Depending on shooting conditions, the
timer may appear immediately when live view is selected.
Note that although the count
down does not appear during playback, live view will still end automatically when the timer
expires.
A HDMI
If the camera is attached to an HDMI video device during live
view photography, the camera monitor will remain on and
the video device will display the view through the lens as
shown at right.
If the device supports HDMI-CEC, select Off
for the HDMI > Device control option in the setup menu
(0 205) before shooting in live view.