
Owner's Manual
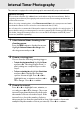
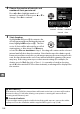
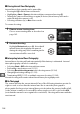

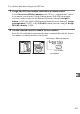
Table Of Contents
- D7100 Camera User Manual
- Where to Find It
- Memory Card Compatibility
- Q&A Index
- Quick Start Guide
- Menu Options
- Table of Contents
- Supplied Accessories
- Parts & Controls
- Introduction
- Basic Photography and Playback
- P, S, A, and M Modes
- User Settings: U1 and U2 Modes
- Release Mode
- Image Recording Options
- Focus
- ISO Sensitivity
- Exposure
- White Balance
- Image Enhancement
- Flash Photography
- Remote Control Photography
- Other Shooting Options
- Live View Photography
- Movie Live View
- Special Effects
- More on Playback
- Connections
- Menu Guide
- The Playback Menu: Managing Images
- The Shooting Menu: Shooting Options
- Custom Settings: Fine-Tuning Camera Settings
- The Setup Menu: Camera Setup
- The Retouch Menu: Creating Retouched Copies
- My Menu/Recent Settings
- Technical Notes
- Troubleshooting
- Error Messages
- Specs
- Index
- 18-140mm Lens User Manual
- 55-300mm Lens User Manual

145
t
Interval Timer Photography
The camera is equipped to take photographs automatically at preset intervals.
1 Select Interval timer shooting in the
shooting menu.
Press the G button to display the menus.
Highlight Interval timer shooting in the
shooting menu and press 2.
2 Choose a starting time.
Choose from the following starting triggers.
• To start shooting immediately, highlight Now
and press 2.
Shooting begins about 3 s
after settings are completed; proceed to
Step 3.
• To choose a starting time, highlight Start time
and press 2 to display the start time
options shown at right.
Press 4 or 2 to
highlight hours or minutes and press 1 or
3 to change.
Press 2 to continue.
3 Choose the interval.
Press 4 or 2 to highlight hours, minutes, or
seconds; press 1 or 3 to change.
Choose an
interval longer than the time needed to take
the number of shots selected in Step 4.
If the
interval is too short, the number of photos
taken may be less than the total listed in Step 4 (the number of intervals
multiplied by the number of shots per interval).
Press 2 to continue.
D Before Shooting
Do not select self-timer (E) or MUP release mode when using the interval timer.
Before
beginning interval timer photography, take a test shot at current settings and view the
results in the monitor.
Before choosing a starting time, select Time zone and date in the setup menu and make
sure that the camera clock is set to the correct time and date (0 265).
Use of a tripod is recommended.
Mount the camera on a tripod before shooting begins.
To
ensure that shooting is not interrupted, be sure the camera EN-EL15 battery is fully charged.
If in doubt, charge the battery before use or use an EH-5b AC adapter and EP-5B power
connector (available separately).
G button