
Owner's Manual
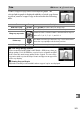
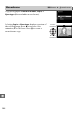
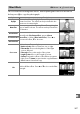
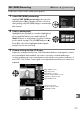
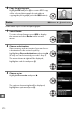
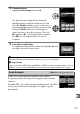
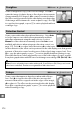
Table Of Contents
- Camera Users Manual
- Q&A Index
- Menu Options
- Memory Card Compatibility
- Table of Contents
- Supplied Accessories
- Parts & Controls
- Introduction
- Basic Photography and Playback
- Live View Photography
- Movie Live View
- P, S, A, and M Modes
- User Settings: U1 and U2 Modes
- Release Mode
- Image Recording Options
- Focus
- ISO Sensitivity
- Exposure
- White Balance
- Image Enhancement
- Flash Photography
- Other Shooting Options
- More on Playback
- Connections
- Menu Guide
- The Playback Menu: Managing Images
- The Shooting Menu: Shooting Options
- Custom Settings: Fine-Tuning Camera Settings
- The Setup Menu: Camera Setup
- The Retouch Menu: Creating Retouched Copies
- My Menu / Recent Settings
- Technical Notes
- Troubleshooting
- Specs
- Index
- 24-85mm Lens Documents
- 70-300mm Documents
- Owners Manual
- Supplied Accessories
- Parts & Controls
- Compatible Cameras / Available Functions
- Features
- Focusing
- Vibration Reduction Mode
- Focusing / Zooming / Depth of Field
- Variable Maximum Aperture
- Setting the Aperture
- Using Bayonet Hood
- Using Cameras with Built-In Flash
- Recommended Focusing Screens
- Lens Care
- Optional Accessories
- Incompatible Accessories
- Specs
- Depth of Field Charts
- Extended Warranty Offer
- Warranty
- Owners Manual
- Scan of CD-ROM
- Warranty

270
U
4 Adjust gain.
Highlight Image 1 or Image 2 and optimize
exposure for the overlay by pressing 1 or 3 to
select gain from values between 0.1 and 2.0.
Repeat for the second image.
The default value is
1.0; select 0.5 to halve gain or 2.0 to double it.
The
effects are visible in the Preview column.
5 Preview the overlay.
Press 4 or 2 to place the cursor in the Preview
column and press 1 or 3 to highlight Overlay.
Press J to preview the overlay as shown at right
(to save the overlay without displaying a preview,
select Save).
To return to Step 4 and select new
photos or adjust gain, press W (S).
6 Save the overlay.
Press J while the preview is displayed to save the
overlay.
After an overlay is created, the resulting
image will be displayed full-frame in the monitor.
D Image Overlay
Only NEF (RAW) photographs with the same image area and bit depth can be combined.
The overlay has the same photo info (including date of recording, metering, shutter speed,
aperture, shooting mode, exposure compensation, focal length, and image orientation), and
values for white balance and Picture Control as the photograph selected for Image 1.
The
current image comment is appended to the overlay when it is saved; copyright information,
however, is not copied.
Overlays saved in NEF (RAW) format use the compression selected
for Type in the NEF (RAW) recording menu and have the same bit depth as the original
images; JPEG overlays are saved using size-priority compression.