
Owner's Manual
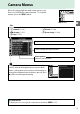
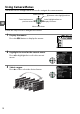
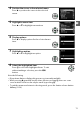
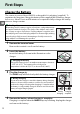
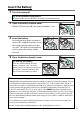
Table Of Contents
- Users Manual
- Table of Contents
- About Supplied Documentation
- Compatible Memory Cards
- Lens Compatibility
- Supplied Accessories
- Parts & Controls
- Getting Started
- Basic Photography
- Playback and Deletion
- Guide Mode
- More on Photography
- P, S, A, and M Modes
- Live View
- Recording and Viewing Movies
- Camera Menus
- ViewNX2 Software
- Optional Accessories
- Maintenance
- Error Messages
- Specs
- Reference Manual (Supplied on CD-ROM)
- Compatible Memory Cards
- About This Manual
- Q & A Index
- Table of Contents
- Parts & Controls
- Getting Started
- Basic Photography
- Guide Mode
- More on Photography (All Modes)
- P, S, A, and M Modes
- Live View - Framing Photographs in the Monitor
- Recording and Viewing Movies
- Playback and Deletion
- Connections
- Camera Menus
- Navigating the Menus
- The Playback Menu
- The Shooting Menu
- The Setup Menu
- List of Menu Items
- Reset Setup Options
- Monitor Brightness
- Info Display Format
- Auto Info Display
- Video Mode
- Flicker Reduction
- Time Zone and Date
- Language
- Image Comment
- Auto Image Rotation
- Image Dust Off Ref Photo
- Auto Off Timers
- Self-Timer
- Remote on Duration
- Beep
- Rangefinder
- File Number Sequence
- Buttons
- Slot Empty Release Lock
- Print Date
- Storage Folder
- GPS
- Eye-Fi Upload
- Firmware Version
- The Retouch Menu
- Recent Settings
- Compatible Lenses
- Optional Flash Units
- Other Accessories
- Caring for the Camera
- Available Settings
- Memory Card Capacity
- Troubleshooting
- Error Messages
- Specs
- Index
- 18-55mm Lens Instruction Manual
- 55-200mm Lens Instruction Manual
- Scans of Supplied CD-ROMs
- Camera Warranty

X
16
Basic Setup
A language-selection dialog will be displayed the first time the camera is turned on.
Choose a language and set the time and date.
Photographs can not be taken until
you have set the time and date.
1 Turn the camera on.
A language-selection dialog will be displayed.
2 Select a language.
Press 1 or 3 to highlight the desired language
and press J.
3 Choose a time zone.
A time-zone selection dialog will be displayed.
Press 4 or 2 to highlight the local time zone (the
UTC field shows the difference between the
selected time zone and Coordinated Universal
Time, or UTC, in hours) and press J.
4 Choose a date format.
Press 1 or 3 to choose the order in which the
year, month, and day will be displayed.
Press J
to proceed to the next step.
5 Turn daylight saving time on or off.
Daylight saving time options will be displayed.
Daylight saving time is off by default; if daylight
saving time is in effect in the local time zone,
press 1 to highlight On and press J.
6 Set the date and time.
The dialog shown at right will be displayed.
Press 4 or 2 to select an item, 1 or 3 to change.
Press J to set the clock and exit to shooting
mode.