
Owner's Manual
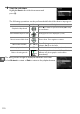

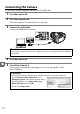
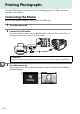
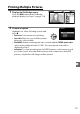
Table Of Contents
- Users Manual
- Table of Contents
- About Supplied Documentation
- Compatible Memory Cards
- Lens Compatibility
- Supplied Accessories
- Parts & Controls
- Getting Started
- Basic Photography
- Playback and Deletion
- Guide Mode
- More on Photography
- P, S, A, and M Modes
- Live View
- Recording and Viewing Movies
- Camera Menus
- ViewNX2 Software
- Optional Accessories
- Maintenance
- Error Messages
- Specs
- Reference Manual (Supplied on CD-ROM)
- Compatible Memory Cards
- About This Manual
- Q & A Index
- Table of Contents
- Parts & Controls
- Getting Started
- Basic Photography
- Guide Mode
- More on Photography (All Modes)
- P, S, A, and M Modes
- Live View - Framing Photographs in the Monitor
- Recording and Viewing Movies
- Playback and Deletion
- Connections
- Camera Menus
- Navigating the Menus
- The Playback Menu
- The Shooting Menu
- The Setup Menu
- List of Menu Items
- Reset Setup Options
- Monitor Brightness
- Info Display Format
- Auto Info Display
- Video Mode
- Flicker Reduction
- Time Zone and Date
- Language
- Image Comment
- Auto Image Rotation
- Image Dust Off Ref Photo
- Auto Off Timers
- Self-Timer
- Remote on Duration
- Beep
- Rangefinder
- File Number Sequence
- Buttons
- Slot Empty Release Lock
- Print Date
- Storage Folder
- GPS
- Eye-Fi Upload
- Firmware Version
- The Retouch Menu
- Recent Settings
- Compatible Lenses
- Optional Flash Units
- Other Accessories
- Caring for the Camera
- Available Settings
- Memory Card Capacity
- Troubleshooting
- Error Messages
- Specs
- Index
- 18-55mm Lens Instruction Manual
- 55-200mm Lens Instruction Manual
- Scans of Supplied CD-ROMs
- Camera Warranty

117
Q
Printing Multiple Pictures
1 Display the PictBridge menu.
Press the G button in the PictBridge
playback display (see Step 3 on page 114).
2 Choose an option.
Highlight one of the following options and
press 2.
• Print select: Select pictures for printing.
• Select date: Print one copy of all the pictures
taken on a selected date.
• Print (DPOF): Print an existing print order created with the DPOF print order
option in the playback menu (0 120).
The current print order will be
displayed in Step 3.
• Index print: To create an index print of all JPEG pictures on the memory card,
proceed to Step 4. Note that if the memory card contains more than 256
pictures, only the first 256 images will be printed.
G button