
Owner's Manual
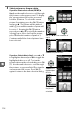
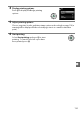

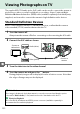
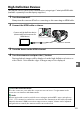
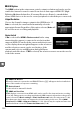
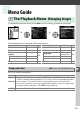

Table Of Contents
- Users Manual
- Table of Contents
- About Supplied Documentation
- Compatible Memory Cards
- Lens Compatibility
- Supplied Accessories
- Parts & Controls
- Getting Started
- Basic Photography
- Playback and Deletion
- Guide Mode
- More on Photography
- P, S, A, and M Modes
- Live View
- Recording and Viewing Movies
- Camera Menus
- ViewNX2 Software
- Optional Accessories
- Maintenance
- Error Messages
- Specs
- Reference Manual (Supplied on CD-ROM)
- Compatible Memory Cards
- About This Manual
- Q & A Index
- Table of Contents
- Parts & Controls
- Getting Started
- Basic Photography
- Guide Mode
- More on Photography (All Modes)
- P, S, A, and M Modes
- Live View - Framing Photographs in the Monitor
- Recording and Viewing Movies
- Playback and Deletion
- Connections
- Camera Menus
- Navigating the Menus
- The Playback Menu
- The Shooting Menu
- The Setup Menu
- List of Menu Items
- Reset Setup Options
- Monitor Brightness
- Info Display Format
- Auto Info Display
- Video Mode
- Flicker Reduction
- Time Zone and Date
- Language
- Image Comment
- Auto Image Rotation
- Image Dust Off Ref Photo
- Auto Off Timers
- Self-Timer
- Remote on Duration
- Beep
- Rangefinder
- File Number Sequence
- Buttons
- Slot Empty Release Lock
- Print Date
- Storage Folder
- GPS
- Eye-Fi Upload
- Firmware Version
- The Retouch Menu
- Recent Settings
- Compatible Lenses
- Optional Flash Units
- Other Accessories
- Caring for the Camera
- Available Settings
- Memory Card Capacity
- Troubleshooting
- Error Messages
- Specs
- Index
- 18-55mm Lens Instruction Manual
- 55-200mm Lens Instruction Manual
- Scans of Supplied CD-ROMs
- Camera Warranty

122
Q
Viewing Photographs on TV
The supplied EG-CP14 audio video (A/V) cable can be used to connect the camera to
a television or video recorder for playback or recording.
A type C mini-pin High-
Definition Multimedia Interface (HDMI) cable (available separately from third-party
suppliers) can be used to connect the camera to high-definition video devices.
Standard Definition Devices
Before connecting the camera to a standard television, confirm that the camera
video standard (0 136) matches that used in the TV.
1 Turn the camera off.
Always turn the camera off before connecting or disconnecting the A/V cable.
2 Connect the A/V cable as shown.
3 Tune the television to the video channel.
4 Turn the camera on and press the K button.
During playback, images will be displayed on the television screen.
Note that
the edges of images may not be displayed.
A Video Mode
If no image is displayed, check that camera is correctly connected and that the option
selected for Video mode (0 136) matches the video standard used in the TV.
A Television Playback
Use of an EH-5b AC adapter and EP-5A power connector (available separately) is
recommended for extended playback.
Connect to
video device
Connect to
camera
Audio (white)
Video (yellow)