
Owner's Manual
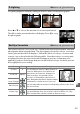
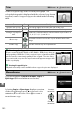
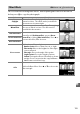
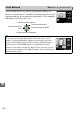
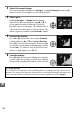
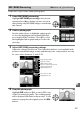
Table Of Contents
- Users Manual
- Table of Contents
- About Supplied Documentation
- Compatible Memory Cards
- Lens Compatibility
- Supplied Accessories
- Parts & Controls
- Getting Started
- Basic Photography
- Playback and Deletion
- Guide Mode
- More on Photography
- P, S, A, and M Modes
- Live View
- Recording and Viewing Movies
- Camera Menus
- ViewNX2 Software
- Optional Accessories
- Maintenance
- Error Messages
- Specs
- Reference Manual (Supplied on CD-ROM)
- Compatible Memory Cards
- About This Manual
- Q & A Index
- Table of Contents
- Parts & Controls
- Getting Started
- Basic Photography
- Guide Mode
- More on Photography (All Modes)
- P, S, A, and M Modes
- Live View - Framing Photographs in the Monitor
- Recording and Viewing Movies
- Playback and Deletion
- Connections
- Camera Menus
- Navigating the Menus
- The Playback Menu
- The Shooting Menu
- The Setup Menu
- List of Menu Items
- Reset Setup Options
- Monitor Brightness
- Info Display Format
- Auto Info Display
- Video Mode
- Flicker Reduction
- Time Zone and Date
- Language
- Image Comment
- Auto Image Rotation
- Image Dust Off Ref Photo
- Auto Off Timers
- Self-Timer
- Remote on Duration
- Beep
- Rangefinder
- File Number Sequence
- Buttons
- Slot Empty Release Lock
- Print Date
- Storage Folder
- GPS
- Eye-Fi Upload
- Firmware Version
- The Retouch Menu
- Recent Settings
- Compatible Lenses
- Optional Flash Units
- Other Accessories
- Caring for the Camera
- Available Settings
- Memory Card Capacity
- Troubleshooting
- Error Messages
- Specs
- Index
- 18-55mm Lens Instruction Manual
- 55-200mm Lens Instruction Manual
- Scans of Supplied CD-ROMs
- Camera Warranty

148
g
This option is displayed only when an Eye-Fi memory card (available separately from
third-party suppliers) is inserted in the camera.
Choose Enable to upload
photographs to a preselected destination.
Note that pictures will not be uploaded if
signal strength is insufficient.
Observe all local laws concerning wireless devices and choose Disable where
wireless devices are prohibited.
When an Eye-Fi card is inserted, its status is indicated by an icon
in the information display:
• 6: Eye-Fi upload disabled.
• 7: Eye-Fi upload enabled but no pictures available for
upload.
• 8 (static): Eye-Fi upload enabled; waiting to begin upload.
• 8 (animated): Eye-Fi upload enabled; uploading data.
• !: Error.
View the current camera firmware version.
Eye-Fi Upload
G button ➜ B setup menu
D Eye-Fi Cards
Eye-Fi cards may emit wireless signals when Disable is selected.
If a warning is displayed in
the monitor (0 193), turn the camera off and remove the card.
See the manual provided with the Eye-Fi card, and direct any inquiries to the manufacturer.
The camera can be used to turn Eye-Fi cards on and off, but may not support other Eye-Fi
functions.
A Supported Eye-Fi Cards
As of December 2011, the camera supports 8 GB SDHC Pro X2 Eye-Fi cards.
Some cards may
not be available in some countries or regions; consult the manufacturer for more
information.
Eye-Fi cards are for use only in the country of purchase.
Be sure the Eye-Fi card
firmware has been updated to the latest version.
A Using Eye-Fi Cards in Ad Hoc Mode
Additional time may be required when connecting using Eye-Fi cards that support ad hoc
mode.
Select longer values for Auto off timers > Standby timer in the setup menu (0 140).
Firmware Version
G button ➜ B setup menu