
Owner's Manual
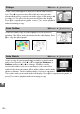
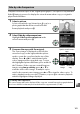
Table Of Contents
- Users Manual
- Table of Contents
- About Supplied Documentation
- Compatible Memory Cards
- Lens Compatibility
- Supplied Accessories
- Parts & Controls
- Getting Started
- Basic Photography
- Playback and Deletion
- Guide Mode
- More on Photography
- P, S, A, and M Modes
- Live View
- Recording and Viewing Movies
- Camera Menus
- ViewNX2 Software
- Optional Accessories
- Maintenance
- Error Messages
- Specs
- Reference Manual (Supplied on CD-ROM)
- Compatible Memory Cards
- About This Manual
- Q & A Index
- Table of Contents
- Parts & Controls
- Getting Started
- Basic Photography
- Guide Mode
- More on Photography (All Modes)
- P, S, A, and M Modes
- Live View - Framing Photographs in the Monitor
- Recording and Viewing Movies
- Playback and Deletion
- Connections
- Camera Menus
- Navigating the Menus
- The Playback Menu
- The Shooting Menu
- The Setup Menu
- List of Menu Items
- Reset Setup Options
- Monitor Brightness
- Info Display Format
- Auto Info Display
- Video Mode
- Flicker Reduction
- Time Zone and Date
- Language
- Image Comment
- Auto Image Rotation
- Image Dust Off Ref Photo
- Auto Off Timers
- Self-Timer
- Remote on Duration
- Beep
- Rangefinder
- File Number Sequence
- Buttons
- Slot Empty Release Lock
- Print Date
- Storage Folder
- GPS
- Eye-Fi Upload
- Firmware Version
- The Retouch Menu
- Recent Settings
- Compatible Lenses
- Optional Flash Units
- Other Accessories
- Caring for the Camera
- Available Settings
- Memory Card Capacity
- Troubleshooting
- Error Messages
- Specs
- Index
- 18-55mm Lens Instruction Manual
- 55-200mm Lens Instruction Manual
- Scans of Supplied CD-ROMs
- Camera Warranty

163
u
Create a copy in which only selected hues appear in color.
1 Select Selective color.
Highlight Selective color in the retouch menu
and press 2 to display a picture selection dialog.
2 Select a photograph.
Highlight a photograph (to view the highlighted
photograph full frame, press and hold the X
button).
Press J to select the highlighted
photograph and proceed to the next step.
3 Select a color.
Use the multi selector to position the cursor
over an object and press A (L) to select
the color of the object as one that will
remain in the final copy (the camera may
have difficulty detecting unsaturated colors;
choose a saturated color).
To zoom in on the
picture for precise color selection, press X.
Press W (Q) to zoom out.
4 Highlight the color range.
Rotate the command dial to highlight the color
range for the selected color.
Selective Color
G button ➜ N retouch menu
Selected color
A (L) button
Color range