
Owner's Manual
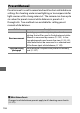

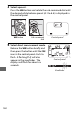
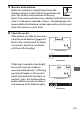
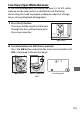
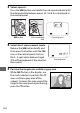
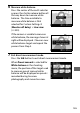
Table Of Contents
- D810 Camera Users Manual
- For Your Safety
- Compatible Lenses
- Approved Memory Cards
- Table of Contents
- Supplied Accessories
- Parts & Controls
- Introduction
- First Steps
- Camera Menus
- Basic Photography and Playback
- Live View Photography
- Movie Live View
- Image Recording Options
- Focus
- Release Mode
- ISO Sensitivity
- Exposure
- White Balance
- Image Enhancement
- Flash Photography
- Other Shooting Options
- More About Playback
- Connections
- Menu Guide
- Defaults
- The Playback Menu: Managing Images
- The Shooting Menu: Shooting Options
- Custom Settings: Fine-Tuning Camera Settings
- Custom Settings
- Custom Settings Bank
- a: Autofocus
- a1: AF-C Priority Selection
- a2: AF-S Priority Selection
- a3: Focus Tracking with Lock-On
- a4: AF Activation
- a5: Focus Point Illumination
- a6: AF Point Illumination
- a7: Focus Point Wrap-Around
- a8: Number of Focus Points
- a9: Store by Orientation
- a10: Built-in AF-assist Illuminator
- a11: Limit AF-Area Mode Selection
- a12: Autofocus Mode Restrictions
- b: Metering/Exposure
- c: Timers/AE Lock
- d: Shooting/Display
- d1: Beep
- d2: CL Mode Shooting Speed
- d3: Max. Continuous Release
- d4: Exposure Delay Mode
- d5: Electronic Front-Curtain Shutter
- d6: File Number Sequence
- d7: Viewfinder Grid Display
- d8: ISO Display and Adjustment
- d9: Screen Tips
- d10: Information Display
- d11: LCD Illumination
- d12: MB-D12 Battery Type
- d13: Battery Order
- e: Bracketing/Flash
- f: Controls
- f1: LCD Illuminator Switch
- f2: Multi Selector Center Button
- f3: Multi Selector
- f4: Assign Fn Button
- f5: Assign Preview Button
- f6: Assign AE-L/AF-L button
- f7: Shutter Spd & Aperture Lock
- f8: Assign BKT Button
- f9: Customize Command Dials
- f10: Release Button to Use Dial
- f11: Slot Empty Release Lock
- f12: Reverse Indicators
- f13: Assign Movie Record Button
- f14: Live View Button Options
- f15: Assign MB-D12 AF-ON
- f16: Assign Remote (WR) Fn Button
- f17: Lens Focus Function Buttons
- g: Movie
- Custom Settings
- The Setup Menu: Camera Setup
- The Retouch Menu: Creating Retouched Copies
- My Menu/Recent Settings
- Technical Notes
- Compatible Lenses
- Optional Flash Units (Speedlights)
- Other Accessories
- Caring for the Camera
- Caring for the Camera and Battery: Cautions
- Exposure Program
- Troubleshooting
- Error Messages
- Specifications
- Approved Memory Cards
- Memory Card Capacity
- Battery Life
- Lenses That May Block the Built-in Flash and AF-Assist Illuminator
- Index
- Troubleshooting
- Error Messages
- Specs
- Index
- AF-S Nikkor 35mm f/1.8G ED Lens Users Manual
- AF-S Nikkor 50mm f/1.8G Lens Users Manual
- AF-S Nikkor 85mm f/1.8G Lens Users Manual
- Atomos Ninja-2 Quick Start Guide
- Atomos Ninja-2 User Manual
- Table of Contents
- Warranty
- Introduction
- Supplied Accessories
- What Else is Needed
- Mounting disks in the Master Caddy
- Connecting the Ninja-2 and powering up
- Ninja-2 connections
- Other physical features
- Using the Ninja-2
- Monitoring and Recording
- Timecode
- Pulldown
- Playback & Playout
- Connecting and Editing
- Using Ninja-2 with external power supplies
- Using Ninja-2 with Atomos Connect Converters
- Software updates
- Specs

164
3 Select a preset.
Press the U button and rotate the sub-command dial until
the desired white balance preset (d-1 to d-6) is displayed in
the control panel.
4 Select direct measurement mode.
Release the U button briefly and
then press the button until the L
icon in the control panel starts to
flash.
A spot white balance target
(r) will be displayed at the selected
focus point.
5 Position the target over a white or grey area.
While L flashes in the display, use
the multi selector to position the r
over a white or grey area of the
subject.
To zoom the area around the
target in for more precise positioning,
press the X button.
U button Sub-command
dial
Control panel
Control panel