
Owner's Manual
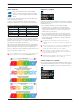
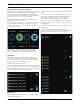
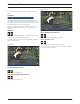
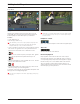

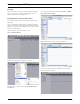
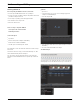
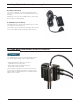
Table Of Contents
- D810 Camera Users Manual
- For Your Safety
- Compatible Lenses
- Approved Memory Cards
- Table of Contents
- Supplied Accessories
- Parts & Controls
- Introduction
- First Steps
- Camera Menus
- Basic Photography and Playback
- Live View Photography
- Movie Live View
- Image Recording Options
- Focus
- Release Mode
- ISO Sensitivity
- Exposure
- White Balance
- Image Enhancement
- Flash Photography
- Other Shooting Options
- More About Playback
- Connections
- Menu Guide
- Defaults
- The Playback Menu: Managing Images
- The Shooting Menu: Shooting Options
- Custom Settings: Fine-Tuning Camera Settings
- Custom Settings
- Custom Settings Bank
- a: Autofocus
- a1: AF-C Priority Selection
- a2: AF-S Priority Selection
- a3: Focus Tracking with Lock-On
- a4: AF Activation
- a5: Focus Point Illumination
- a6: AF Point Illumination
- a7: Focus Point Wrap-Around
- a8: Number of Focus Points
- a9: Store by Orientation
- a10: Built-in AF-assist Illuminator
- a11: Limit AF-Area Mode Selection
- a12: Autofocus Mode Restrictions
- b: Metering/Exposure
- c: Timers/AE Lock
- d: Shooting/Display
- d1: Beep
- d2: CL Mode Shooting Speed
- d3: Max. Continuous Release
- d4: Exposure Delay Mode
- d5: Electronic Front-Curtain Shutter
- d6: File Number Sequence
- d7: Viewfinder Grid Display
- d8: ISO Display and Adjustment
- d9: Screen Tips
- d10: Information Display
- d11: LCD Illumination
- d12: MB-D12 Battery Type
- d13: Battery Order
- e: Bracketing/Flash
- f: Controls
- f1: LCD Illuminator Switch
- f2: Multi Selector Center Button
- f3: Multi Selector
- f4: Assign Fn Button
- f5: Assign Preview Button
- f6: Assign AE-L/AF-L button
- f7: Shutter Spd & Aperture Lock
- f8: Assign BKT Button
- f9: Customize Command Dials
- f10: Release Button to Use Dial
- f11: Slot Empty Release Lock
- f12: Reverse Indicators
- f13: Assign Movie Record Button
- f14: Live View Button Options
- f15: Assign MB-D12 AF-ON
- f16: Assign Remote (WR) Fn Button
- f17: Lens Focus Function Buttons
- g: Movie
- Custom Settings
- The Setup Menu: Camera Setup
- The Retouch Menu: Creating Retouched Copies
- My Menu/Recent Settings
- Technical Notes
- Compatible Lenses
- Optional Flash Units (Speedlights)
- Other Accessories
- Caring for the Camera
- Caring for the Camera and Battery: Cautions
- Exposure Program
- Troubleshooting
- Error Messages
- Specifications
- Approved Memory Cards
- Memory Card Capacity
- Battery Life
- Lenses That May Block the Built-in Flash and AF-Assist Illuminator
- Index
- Troubleshooting
- Error Messages
- Specs
- Index
- AF-S Nikkor 35mm f/1.8G ED Lens Users Manual
- AF-S Nikkor 50mm f/1.8G Lens Users Manual
- AF-S Nikkor 85mm f/1.8G Lens Users Manual
- Atomos Ninja-2 Quick Start Guide
- Atomos Ninja-2 User Manual
- Table of Contents
- Warranty
- Introduction
- Supplied Accessories
- What Else is Needed
- Mounting disks in the Master Caddy
- Connecting the Ninja-2 and powering up
- Ninja-2 connections
- Other physical features
- Using the Ninja-2
- Monitoring and Recording
- Timecode
- Pulldown
- Playback & Playout
- Connecting and Editing
- Using Ninja-2 with external power supplies
- Using Ninja-2 with Atomos Connect Converters
- Software updates
- Specs

12. Connecting and Editing
Connect
To access and edit your recorded material, connect the Master Caddy
Docking Station to a Mac
®
or Windows
®
editing workstation via USB 2.0
and USB 3.0.
Eject the Master Caddy from your Ninja-2 and insert it into the Docking
Station. After a short wait, the recorded video will be accessible to the
target computer via a standard disk (exFAT) file system.
NLE supported
We have chosen the Apple ProRes
®
and Avid DNxHD
®
codecs as they are
both not only visually lossless, but also edit-ready formats. All major NLEs
support ProRes and DNxHD.
• Final Cut Pro (version 7)
• Final Cut X
• Adobe CS5 (with 5.51 update)
• EDIUS 6
• Sony Vegas 10
• Lightworks
• Avid Media Composer 6
Avid DNxHD
®
support requires online activation.
ExFAT compatibility
The Ninja-2 formats your disk as exFAT. We have chosen this file system to
overcome the 4GB file limitation of FAT32 and keep compatibility on both
Windows and MAC OS.
The Operating Systems that support exFAT are:
• Windows XP - install the following update :
http://www.microsoft.com/download/en/details.aspx?id=19364
• Windows Vista - install SP1 or higher
• Windows 7 (32/64bit)
• Snow Leopard 10.6.5 or higher
• Lion 10.7
The Master Caddy Docking Station is a sophisticated device
supporting two different data interfaces: USB 2 and USB 3. Note
that when using the Master Caddy Docking Station you may need
to connect an additional USB cable to the 5v power input. This is
because when it has to power a disk drive and its interface electronics,
the Docking Station may consume more power than is available from a
single USB port. We supply you with a USB to 5v Power Supply socket
for this purpose .
Transferring Files
Now your docking station is connected and your disk is recognised by
your operating system, you can edit directly from the drive or copy the
files to your own storage.
Windows
Open the disk in My Computer > Select all the files or just the ones you
wish to transfer, copy and paste them to your desired location.
(ctrl+c copy, ctrl+v paste).
Mac OS
Your Ninja-2 disk will show in Finder. Select the files you wish to transfer,
drag the files to your desired location or use the copy and paste
commands.(๏+c copy, ๏+v paste).
If you have used a FAT32 formatted disk in the Ninja-2 this will have a
folder structure Scene, Shot, Take. This will mean you either transfer all
the folders or utilise the Windows Search or MACs automate program
to transfer just the .mov files. There are instructions on this in our
knowledge base; visit www.atomos.com/support for more info.
Atomos Ninja-2 – User Manual Edition 3: May 2013 27
Attach Master Caddy Ensure disk is properly attached
USB 2.0 and 3.0 Connect to Laptop/
Workstation