
Owner's Manual
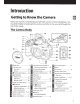

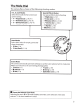
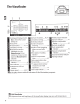

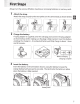
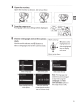
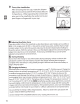
Table Of Contents
- Users Manual
- Table of Contents
- About Supplied Documentation
- Compatible Memory Cards
- Lens Compatibility
- Supplied Accessories
- Parts & Controls
- Getting Started
- Basic Photography
- Playback and Deletion
- More on Photography
- P, S, A, and M Modes
- Live View
- Recording and Viewing Movies
- Special Effects
- Camera Menus
- ViewNX2 Software
- Optional Accessories
- Maintenance
- Error Messages
- Specs
- Reference Manual (Supplied on CD-ROM)
- Q&A Index
- Table of Contents
- Supplied Accessories
- Parts & Controls
- First Steps
- Basic Photography
- More on Photography (All Modes)
- P, S, A, and M Modes
- Live View
- Recording and Viewing Movies
- Shooting with Special Effects
- Playback and Deletion
- Connections
- Camera Menus
- The Playback Menu: Managing Images
- The Shooting Menu: Shooting Options
- Custom Settings: Fine-Tuning Camera Settings
- The Setup Menu: Camera Setup
- The Retouch Menu: Creating Retouched Copies
- Recent Settings / My Menu
- Technical Notes
- Troubleshooting
- Error Messages
- Specs
- Index
- 18-55mmf/3.5-5.6 ED Lens Instruction Manual
- 55-200mmf/4-5.6 ED Lens Instruction Manual
- Scans of Supplied CD-ROMs
- Lens Warranty
- Camera Warranty

6 Open
the
monitor.
Open
the
monitor
as
shown.
Do
not
use force.
7
Turn
the
camera on.
A
language-selection dialog will be
displayed.
8
Choose
a language and set
the
camera
clock.
Move cursor up
Use
the
multi selector
and ® button
to
select
a
language and set the camera
clock.
®
button: select
highlighted item
Select
highlighted
item
or
display
sub-menu
Move cursor
down
Select language
Select
daylight
saving
time
option
Select time zone
Set time
and
date
(note
that
the camera
uses
a 24-hour clock)
Select date
format
Note:
The language
and
date/time
can
be
changed
at
any
time using the
Language
and
Time
zone
and
date
options in
the setup menu
(OJ
64).
9