
Owner's Manual

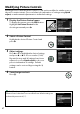
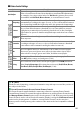

Table Of Contents
- Users Manual
- Table of Contents
- About Supplied Documentation
- Compatible Memory Cards
- Lens Compatibility
- Supplied Accessories
- Parts & Controls
- Getting Started
- Basic Photography
- Playback and Deletion
- More on Photography
- P, S, A, and M Modes
- Live View
- Recording and Viewing Movies
- Special Effects
- Camera Menus
- ViewNX2 Software
- Optional Accessories
- Maintenance
- Error Messages
- Specs
- Reference Manual (Supplied on CD-ROM)
- Q&A Index
- Table of Contents
- Supplied Accessories
- Parts & Controls
- First Steps
- Basic Photography
- More on Photography (All Modes)
- P, S, A, and M Modes
- Live View
- Recording and Viewing Movies
- Shooting with Special Effects
- Playback and Deletion
- Connections
- Camera Menus
- The Playback Menu: Managing Images
- The Shooting Menu: Shooting Options
- Custom Settings: Fine-Tuning Camera Settings
- The Setup Menu: Camera Setup
- The Retouch Menu: Creating Retouched Copies
- Recent Settings / My Menu
- Technical Notes
- Troubleshooting
- Error Messages
- Specs
- Index
- 18-55mmf/3.5-5.6 ED Lens Instruction Manual
- 55-200mmf/4-5.6 ED Lens Instruction Manual
- Scans of Supplied CD-ROMs
- Lens Warranty
- Camera Warranty

89
A The Picture Control Grid
Pressing the X button in Step 3 displays a Picture Control grid
showing the contrast and saturation for the selected Picture Control
in relation to the other Picture Controls (only contrast is displayed
when Monochrome is selected).
Release the X button to return to
the Picture Control menu.
The icons for Picture Controls that use auto contrast and saturation
are displayed in green in the Picture Control grid, and lines appear
parallel to the axes of the grid.
A Previous Settings
The line under the value display in the Picture Control setting menu
indicates the previous value for the setting.
Use this as a reference
when adjusting settings.
A Custom Picture Controls
The options available with custom picture controls are the same as those on which the
custom picture control was based.
A Filter Effects (Monochrome Only)
The options in this menu simulate the effect of color filters on monochrome photographs.
The following filter effects are available:
Option Description
Y Yellow
Enhances contrast.
Can be used to tone down the brightness of the sky in
landscape photographs.
Orange produces more contrast than yellow, red
more contrast than orange.
O Orange
R Red
G Green Softens skin tones.
Can be used for portraits.
Note that the effects achieved with Filter effects are more pronounced than those
produced by physical glass filters.
A Toning (Monochrome Only)
Pressing 3 when Toning is selected displays saturation options.
Press 4 or 2 to adjust saturation.
Saturation control is not available
when B&W (black-and-white) is selected.