
Owner's Manual
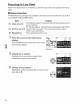

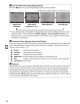
Table Of Contents
- Users Manual
- Table of Contents
- About Supplied Documentation
- Compatible Memory Cards
- Lens Compatibility
- Supplied Accessories
- Parts & Controls
- Getting Started
- Basic Photography
- Playback and Deletion
- More on Photography
- P, S, A, and M Modes
- Live View
- Recording and Viewing Movies
- Special Effects
- Camera Menus
- ViewNX2 Software
- Optional Accessories
- Maintenance
- Error Messages
- Specs
- Reference Manual (Supplied on CD-ROM)
- Q&A Index
- Table of Contents
- Supplied Accessories
- Parts & Controls
- First Steps
- Basic Photography
- More on Photography (All Modes)
- P, S, A, and M Modes
- Live View
- Recording and Viewing Movies
- Shooting with Special Effects
- Playback and Deletion
- Connections
- Camera Menus
- The Playback Menu: Managing Images
- The Shooting Menu: Shooting Options
- Custom Settings: Fine-Tuning Camera Settings
- The Setup Menu: Camera Setup
- The Retouch Menu: Creating Retouched Copies
- Recent Settings / My Menu
- Technical Notes
- Troubleshooting
- Error Messages
- Specs
- Index
- 18-55mmf/3.5-5.6 ED Lens Instruction Manual
- 55-200mmf/4-5.6 ED Lens Instruction Manual
- Scans of Supplied CD-ROMs
- Lens Warranty
- Camera Warranty

Live
View
Framing Photographs in
the
Monitor
Follow
the
steps
below
to
take
photographs in live view.
----------------
1 Rotate
the
live
view
switch.
The
mirror
will
be raised and
the
view
through
the
lens will be displayed in
the
camera
monitor
.
The subject will
no
longer
be visible in
the
viewfinder.
---··---
2 Position
the
focus
point
.
Position
the
focus
point
over
your
subject
as
described
on
page 46.
3 Focus.
Press
the
shutter-release
button
halfway. The
focus
point
will
flash green
while
the
camera
focuses.
If
the
camera
is
able
to
focus,
the
focus
Live
view switch
Focus
point
point
will be displayed
in
green;
if
the
camera
is
unable
to
focus,
the
focus point
will
flash red (note
that
pictures can be taken even
when
the
focus
point
flashes
red; check focus in
the
monitor
before shooting). Except
in~
and~
modes,
exposure can be locked
by
pressing
the
~~:t
(o-n)
button
.
--------
·
-----
--
-
4 Take
the
picture.
~~f-
Press
the
shutter-release
button
the
rest
of
the
'
.
way
down
. The
monitor
turns
off
and
the
lE
~
memory
card access
lamp
lights
during
T_
recording. Do
not
remove the battery
or
memory
card
or
unplug the
optional
AC
adapter
until
Memory card
access
lamp
®
®
0
@
@
'-
-
recording
is
complete. When
shooting
is
complete,
the
photograph
will
be displayed
in
the
monitor
for
a
few
seconds
or
until
the
shutter-release
button
is
pressed halfway.
The
camera will
then
return
to
live view
mode
. To exit, rotate
the
live
view
switch.
43