
Owner's Manual
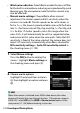
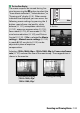

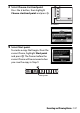
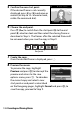
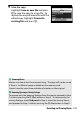
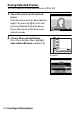
Table Of Contents
- User Manual
- Reference Manual
- Table of Contents
- For Your Safety
- Notices
- Bluetooth
- Introduction
- First Steps
- Tutorial
- Basic Photography and Playback
- Guide Mode
- Matching Settings to the Subject or Situation (Scene Mode)
- Special Effects
- More on Photography
- P, S, A, and M Modes
- Recording and Viewing Movies
- Playback and Deletion
- Connections
- Camera Menus
- The Playback Menu: Managing Images
- The Shooting Menu: Shooting Options
- The Setup Menu: Camera Setup
- Setup Menu Options
- Reset Setup Options
- Format Memory Card
- Date Stamp
- Time Zone and Date
- Language
- Monitor Brightness
- Info Display Format
- Auto Info Display
- Auto off Timers
- Self-Timer
- Remote on Duration (ML-L3)
- Image Dust Off Ref Photo
- Image Comment
- Copyright Information
- Beep
- Flicker Reduction
- Buttons
- Rangefinder
- Manual Focus Ring in AF Mode
- File Number Sequence
- Storage Folder
- File Naming
- Location Data
- Airplane Mode
- Connect to Smart Device
- Send to Smart Device (Auto)
- Bluetooth
- Eye-Fi Upload
- Conformity Marking
- Slot Empty Release Lock
- Reset All Settings
- Firmware Version
- Setup Menu Options
- The Retouch Menu: Creating Retouched Copies
- Recent Settings
- Technical Notes
- 18-55mm Lens User Manual
- 70-300mm Lens User manual
- 35mm f/1.8G User Manual
- Camera Warranty

142 Recording and Viewing Movies
• Wind noise reduction: Select On to enable the low-cut filter
for the built-in microphone, reducing noise produced by wind
blowing over the microphone (note that other sounds may
also be affected).
• Manual movie settings: Choose On to allow manual
adjustments to shutter speed and ISO sensitivity when the
camera is in mode M.
Shutter speed can be set to values as
fast as
1
/
4000 s; the slowest speed available varies with the frame
rate:
1
/
30 s for frame rates of 24p, 25p, and 30p,
1
/
50 s for 50p, and
1
/
60 s for 60p.
If shutter speed is not in this range when live
view starts, it will automatically be set to a supported value,
and remain at this value when live view ends.
Note that ISO
sensitivity is fixed at the value selected; the camera does not
adjust ISO sensitivity automatically when On is selected for
ISO sensitivity settings > Auto ISO sensitivity control in
the shooting menu (0 193).
1 Select Movie settings.
Press the G button to display the
menus.
Highlight Movie settings in
the shooting menu and press 2.
2 Choose movie options.
Highlight the desired item and press
2, then highlight an option and press
J.
A HDMI
When the camera is attached to an HDMI video device, the video
device will display the view through the lens.
If the device supports
HDMI-CEC, select Off for the HDMI > Device control option in the
setup menu (0 185) before shooting in live view.