
Owner's Manual
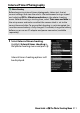
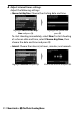
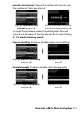
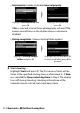
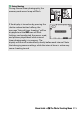

Table Of Contents
- User Manual
- Table of Contents
- Supplied Accessories
- Parts & Controls
- First Steps
- Basic Photography and Playback
- Basic Settings
- Shooting Controls
- The i Button
- Menu List
- Technical Notes
- The Camera Display and Control Panel
- The Nikon Creative Lighting System
- Other Accessories
- Caring for the Camera
- Caring for the Camera and Battery: Cautions
- Specifications
- NIKKOR Z 24–70mm f/4 S Lenses
- The FTZ Mount Adapter
- Approved Memory Cards
- Memory Card Capacity
- Battery Endurance
- Notices
- Bluetooth and Wi-Fi (Wireless LAN)
- Index
- Troubleshooting
- Specs
- Index
- Reference Manual
- Table of Contents
- Supplied Accessories
- Parts & Controls
- First Steps
- Basic Photography and Playback
- Basic Settings
- Shooting Controls
- The i Button
- More About Playback
- Menu Guide
- Defaults
- The Playback Menu: Managing Images
- The Photo Shooting Menu: Shooting Options
- Reset Photo Shooting Menu
- Storage Folder
- File Naming
- Choose Image Area
- Image Quality
- Image Size
- NEF (RAW) Recording
- ISO Sensitivity Settings
- White Balance
- Set Picture Control
- Manage Picture Control
- Color Space
- Active D-Lighting
- Long Exposure NR
- High ISO NR
- Vignette Control
- Diffraction Compensation
- Auto Distortion Control
- Flicker Reduction Shooting
- Metering
- Flash Control
- Flash Mode
- Flash Compensation
- Focus Mode
- AF-Area Mode
- Vibration Reduction
- Auto Bracketing
- Multiple Exposure
- HDR (High Dynamic Range)
- Interval Timer Shooting
- Time-Lapse Movie
- Focus Shift Shooting
- Silent Photography
- The Movie Shooting Menu: Movie Shooting Options
- Reset Movie Shooting Menu
- File Naming
- Choose Image Area
- Frame Size/Frame Rate
- Movie Quality
- Movie File Type
- ISO Sensitivity Settings
- White Balance
- Set Picture Control
- Manage Picture Control
- Active D-Lighting
- High ISO NR
- Vignette Control
- Diffraction Compensation
- Auto Distortion Control
- Flicker Reduction
- Metering
- Focus Mode
- AF-Area Mode
- Vibration Reduction
- Electronic VR
- Microphone Sensitivity
- Attenuator
- Frequency Response
- Wind Noise Reduction
- Headphone Volume
- Timecode
- Custom Settings: Fine-Tuning Camera Settings
- Reset Custom Settings
- a: Autofocus
- a1: AF-C Priority Selection
- a2: AF-S Priority Selection
- a3: Focus Tracking with Lock-On
- a4: Auto-Area AF Face Detection
- a5: Focus Points Used
- a6: Store Points by Orientation
- a7: AF Activation
- a8: Limit AF-Area Mode Selection
- a9: Focus Point Wrap-Around
- a10: Focus Point Options
- a11: Low-Light AF
- a12: Built-in AF-Assist Illuminator
- a13: Manual Focus Ring in AF Mode
- b: Metering/Exposure
- c: Timers/AE Lock
- d: Shooting/Display
- d1: CL Mode Shooting Speed
- d2: Max. Continuous Release
- d3: Sync. Release Mode Options
- d4: Exposure Delay Mode
- d5: Electronic Front-Curtain Shutter
- d6: Limit Selectable Image Area
- d7: File Number Sequence
- d8: Apply Settings to Live View
- d9: Framing Grid Display
- d10: Peaking Highlights
- d11: View All in Continuous Mode
- e: Bracketing/Flash
- f: Controls
- g: Movie
- The Setup Menu: Camera Setup
- Format Memory Card
- Save User Settings
- Reset User Settings
- Language
- Time Zone and Date
- Monitor Brightness
- Monitor Color Balance
- Viewfinder Brightness
- Viewfinder Color Balance
- Control Panel Brightness
- Limit Monitor Mode Selection
- Information Display
- AF Fine-Tune
- Non-CPU Lens Data
- Clean Image Sensor
- Image Dust Off Ref Photo
- Image Comment
- Copyright Information
- Beep Options
- Touch Controls
- HDMI
- Location Data
- Wireless Remote (WR) Options
- Assign Remote (WR) Fn Button
- Airplane Mode
- Connect to Smart Device
- Connect to PC
- Wireless Transmitter (WT-7)
- Conformity Marking
- Battery Info
- Slot Empty Release Lock
- Save/Load Settings
- Reset All Settings
- Firmware Version
- The Retouch Menu: Creating Retouched Copies
- My Menu/Recent Settings
- Connections
- On-Camera Flash Photography
- Remote Flash Photography
- Technical Notes
- Troubleshooting
- Specs
- Index
- Network Guide
- About This Guide
- Camera and Network System Chart
- What Networks Can Do for You
- Notices
- Table of Contents
- Connecting to Computers via Wi-Fi
- Connecting to Smart Devices
- Connecting to Networks Using the WT-7
- Menu Guide
- Troubleshooting
- Appendix
- Index

216 Menu Guide > C The Photo Shooting Menu
❚❚ Pausing Interval Timer Photography
Interval timer photography can be paused between intervals by
pressing J or selecting Pause in the interval timer menu.
❚❚ Resuming Interval Timer Photography
To resume shooting immediately, select Restart.
To resume shooting at a specified time:
❚❚ Ending Interval Timer Shooting
To end interval timer photography before all the photos are
taken, select Off in the interval timer menu.
Highlight Restart and
press J.
In the interval timer
menu, highlight
Choose day/time and
press 2.
Choose a starting date
and time and press J.
Highlight Restart and
press J.