
User Manual

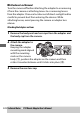
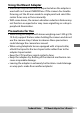
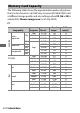
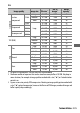
Table Of Contents
- Package Contents
- Table of Contents
- For Your Safety
- Notices
- Getting to Know the Camera
- First Steps
- Basic Photography and Playback
- Basic Settings
- Shooting Controls
- The i Button
- Menu List
- The Playback Menu: Managing Images
- The Photo Shooting Menu: Shooting Options
- Reset photo shooting menu
- Storage folder
- File naming
- Choose image area
- Image quality
- Image size
- NEF (RAW) recording
- ISO sensitivity settings
- White balance
- Set Picture Control
- Manage Picture Control
- Color space
- Active D-Lighting
- Long exposure NR
- High ISO NR
- Vignette control
- Diffraction compensation
- Auto distortion control
- Flicker reduction shooting
- Metering
- Flash control
- Flash mode
- Flash compensation
- Focus mode
- AF-area mode
- Vibration reduction
- Auto bracketing
- Multiple exposure
- HDR (high dynamic range)
- Interval timer shooting
- Time-lapse movie
- Focus shift shooting
- Silent photography
- The Movie Shooting Menu: Movie Shooting Options
- Reset movie shooting menu
- File naming
- Choose image area
- Frame size/frame rate
- Movie quality
- Movie file type
- ISO sensitivity settings
- White balance
- Set Picture Control
- Manage Picture Control
- Active D-Lighting
- High ISO NR
- Vignette control
- Diffraction compensation
- Auto distortion control
- Flicker reduction
- Metering
- Focus mode
- AF-area mode
- Vibration reduction
- Electronic VR
- Microphone sensitivity
- Attenuator
- Frequency response
- Wind noise reduction
- Headphone volume
- Timecode
- Custom Settings: Fine-Tuning Camera Settings
- Reset custom settings
- a Autofocus
- a1 AF-C priority selection
- a2 AF-S priority selection
- a3 Focus tracking with lock-on
- a4 Auto-area AF face detection
- a5 Focus points used
- a6 Store points by orientation
- a7 AF activation
- a8 Limit AF-area mode selection
- a9 Focus point wrap-around
- a10 Focus point options
- a11 Low-light AF
- a12 Built-in AF-assist illuminator
- a13 Manual focus ring in AF mode
- b Metering/exposure
- c Timers/AE lock
- d Shooting/display
- e Bracketing/flash
- f Controls
- g Movie
- The Setup Menu: Camera Setup
- Format memory card
- Save user settings
- Reset user settings
- Language
- Time zone and date
- Monitor brightness
- Monitor color balance
- Viewfinder brightness
- Viewfinder color balance
- Control panel brightness
- Limit monitor mode selection
- Information display
- AF fine-tune
- Non-CPU lens data
- Clean image sensor
- Image Dust Off ref photo
- Image comment
- Copyright information
- Beep options
- Touch controls
- HDMI
- Location data
- Wireless remote (WR) options
- Assign remote (WR) Fn button
- Airplane mode
- Connect to smart device
- Connect to PC
- Wireless transmitter (WT-7)
- Conformity marking
- Battery info
- Slot empty release lock
- Save/load settings
- Reset all settings
- Firmware version
- The Retouch Menu: Creating Retouched Copies
- My Menu/Recent Settings
- Troubleshooting
- Technical Notes
- The Camera Display and Control Panel
- The Nikon Creative Lighting System
- Other Accessories
- Caring for the Camera
- Caring for the Camera and Battery: Cautions
- Specifications
- NIKKOR Z 24–70mm f/4 S Lens User’s Manual
- FTZ Mount Adapter User’s Manual
- Approved Memory Cards
- Memory Card Capacity
- Battery Endurance
- Notices
- Bluetooth and Wi-Fi (Wireless LAN)
- Index

231Technical Notes ➜ FTZ Mount Adapter User’s Manual
Using the Mount Adapter
• Autofocus may not function as expected when the adapter is
used with an F mount NIKKOR lens. If the camera has trouble
focusing, set the AF-area mode to single point and select the
center focus area, or focus manually.
• With some lenses, the camera vibration reduction feature may
not function as expected or may cause vignetting or a drop in
peripheral illumination.
Precautions for Use
• When using the adapter with lenses weighing over 1300 g (2 lb
13.9 oz), support the lens when holding the camera and do not
use the camera strap. Failure to observe these precautions
could damage the camera lens mount.
• When using telephoto lenses equipped with a tripod collar,
attach the tripod to the lens tripod collar rather than to the
adapter tripod socket.
• Keep the CPU and lens signal contacts clean.
• Keep the adapter dry. Rusting of the internal mechanism can
cause irreparable damage.
• Leaving the adapter in extremely hot locations could damage
or warp parts made from reinforced plastic.