FOES Find what you're lacking for from: The Table of Contents » See pages v-vi Find items by function or menu name. EX The Q&A Index b See pages vii-ix Know what you want to do but don’t know the function name? Find it from the “question and answer” index. The index » See pages 123-125 Search by key word, Kl Error Messages » See pages 111-112 If 2 warning is displayed in the viewfinder or monitor, find the solution here.
RAE To prevent damage to your Nikon product of injury to yourself or to others, read the following safety precautions in their entirety before using this equipment. Keep these safety instructions where all those who use the product will re: The consequences that could result from Tail lure ww section are indicated by the following symbol “This icon marks wakings. To prevent possible injury, cad sil warnings before using product.
A Use appropriate cables When connecting cables to the input and output jacks, use ony the cables provided br sold by Nikon for the pur Ease 1 Tainan complacence with profs regulations. A Dr Oms CAROMS containing soft oe played back on audio ¢ ROM on an WiFi C3 play or damage the equipment, A void contact with liquid stay Should tie monitor break, ca dare or manuals should nor equipment.
EY gin For Your Safer Connecting to a Computer, Printer, or TV Notices. Connecting to a Computer Q4A Index acting the Camera USE introduction Lm. connecting ing tr ne Cos Priming gateposts First Steps Viewing Photographs on T ens Gaea Using Camera Menus. i The episcopacy Mani. Cheating end parting th Eatery Basic Set Tutorial i “Point-and-Shoot” Photography (5 Mode) Creative Photography (Digital Sari-Programs) Basic Playback Reference More on Photography (Alf Modes) The Shooting Information Display.
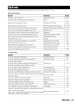
Find what you're looking for using th “guest ion and answer” index.
Taking Photographs Question Key phrase Page # is there an easy way 10 take snapshots? Auto mode 75 is there an easy way 10 lake mare creative shots Digital Var Program modes What flash photography is probity ute Flash off) mode 1 Howe do | bring cut a portrait subject? Part rat te © “ie can | get good landscape shots? [Landscape made How do T take snapshots of my kids? Child mode Howe do | "freeze a moving subject? Sports mode 5 ow do sate close ups of small inspects? Close-up mi Can |include night backgrou
Viewing, Printing, and Retouching Photographs Question Conviction my photo Can View moral ino mason about fi ” hoot info of my photos boink “ Phone info, highlight Firepower do | get rid of an unwanted photo Deleting maids Bolshoi Lan delete several photos at once! Delete Car M1 On pictures to make sure they're ir focus? Playback zoom Can i protect photos farm accidental deletion? Protect is there an automatic playback (3 Slice show A view my photos an TV] Television playback w do | copy photos To my comput
Introduction Thank you for your purchase of a Nikon D40 single-lens reflex (SLR) digital caner with interchangeable lenses. This manual has been written to help you enjoy taking pictures with your Nikon digital camera, Read this manual thoroughly before use, and keep it handy wham using the product.
2 Getting to Know the Camera Take a few moments to familiarize yourself with camera controls and displays. You may find it helpful to bookmark this section and refer to it as you read through the rest of the manual, Camera Body Lens taunting inch Mode dial Builtin flash...
TA Eyelet fOr Cameramen SIE nce snc 4 Multi selector” 12 Bed fete} MONET ee 13) (playback zoo) button J (setting) Barton ® (reset) butt ba Viewfinder eyepiece & Copter adjustment control CL ED button, on {protect Litton £1 Corn and dial... SL @ (menu) button LU @ (playback) button * Multi selector The milt s navigation and playback.
4 The Mode Dial ls The D40 offers.2 choice of the following twelve shooting modes: ot Advanced Modes (Exposure Modes) Select these modes for full control over camera settings.
The Viewfinder Display E01 Nuremberg of exposures remaining Number of shots remaining by memory:buffer fi Preset white balance recording Exposure compensation value. Flash compensation vial & PC coronation indicator. LL Flash-ready indicator Sd Battery indicator LE Electronic analog exposure display... Exposure compensation. 151 150 AUTO indicator SE — EE (appears when memory remains for over 1000 exposures) Warning indicator 15,116 .
The Shooting Information Display To view camera settings, press the €» button, The following shooting information will be BE displayed in the monitor. See page 22 for information on changing camera settings, ® poof Fl wl oars Ae fish shooting info exposure display LE Compensation.
Supplied Accessories The D-5 Viewfinder Eyepiece Cap Attach the D-5 viewfinder eyepiece cap for self-timer remote control photography @ 33). Before attaching the DKS or other viewfinder accessories {85 102), remove the D-16 viewfinder eyepiece cup. Hold the camera firmly when removing the cup. The Camera Strap Attach the camera strap as shown below. The MG-23 Quick Charger (8 122) The MG-23 is for use with the supplied EN-ES: battery.
Attaching a Lens Beauteous is supported with AF-S and AF lenses only. Care should be taken to prevent dust from entering the camera when exchanging lenses, 1 Turn the camera off and remove the body cap. Remove the rear lens cap from the fens. 2 Keeping the mounting Index on the lens aligned with the untiring index on the camera body, position the lens in the camera's bayonet mount and rotate the fens in the direction shown until it clicks into place.
Charging and Inserting the Battery The supplied EN-RELY battery is nat charged at shipment. Charge the battery using the supplied MG-23 battery charger as described below. 1 Charge the battery, 1.1 Remove the terminal cover from the battery. 1.2 Connect the power cord to the charge rand plug it in. 1.3 Place the battery in the charger. The CHARGE lamp will blink as the battery charges. About 90 minutes are required for an exhausted battery to fully charge.
2 Insert the battery. 2.1 After confirming that the power switch is in the off position, open the battery chamber cover. 2.2 Insert a fully charged battery as shown at right. Close the battery chamber cover. Removing the Battery Turn the camera off before removing cover when the battery is not in use. we battery.
Basic Setup The first time the camera is turned on, the language selection dialog shown in Step 1 will be displayed in the monitor, Follow the steps below to choose & language and set the time and date. No photographs can be taken until the camera clock has been set. 1 Select language, Turn camera Traci er No Display map of world time zones.® anted | tne difference between less reversal Time {UTC in Odin Er > Display daylight saving time options. Highlight On if daylight saving time is In effect.
Inserting Memory Cards The camera stores pictures an Secure Digital (SI) memory cards {available separately), : 1 Insert a memory card. 1.1 Before inserting or removing ornery cards, wm the caner off and open the card slot cover, 1.2 Slide the memory card in as shown at right until it clicks into place. The memory card access lamp will fight for about a second. Close the memory card slot cover. Removing Memory Cards 1. Confirm that the access amp is off. 2.
2 Memory cards must be formatted in the camera before first use. Note that formatting memory cards permanently deletes all photographs and other data they may contain, Be sure all data you wish to keep have been copied to another storage device before formatting the card rent Turn camera on. Display mend. If man elector sm is highlighted, press mi ft 10 highlight Highlight Yes. Format card. Do not tum camera off or remove card or battery until formatting is complete and setup menu is displayed.
Adjusting Viewfinder Focus E Photographs are framed in the viewfinder. Before shooting, make sure that the display in the viewfinder is in clear focus. 1 Remove the lens cap and turn the camera on. 2 Slide the dipterous adjustment control up and down until the faces brackets are in sharp focus. When operating the dipterous adjustment control with your eye to the viewfinder, be careful aot to put your fingers or fingernails in your eye.
Tutorial Photography and Playback “Point-and-Shoot” Photography (4 Mode) io This section describes how io take photographs in 4 (auto) mode, an automatic "point and-shoat” mode in which the majority of settings are contra lied by the camera in response 10 shooting conditions, 1 Turn the camera on. 1.1 Remove the lens cap and wim the camera on. The monitor will turn oh and the viewfinder display will tight, 1.2 If the monitor is off, press the € button: to display shooting information.
3 Ramie a photograph in the viewfinder. 3.1 Hold the camera as shown rand and cradle the camera Keep your elbows propped lightly lace one foot half a pace 3.2 frame a pot in the viewfinder with the main subject positioned in any of the three focus areas. EX Using a Zoom Lens — oo the 200m Frig to oor In on the subj of the farm, or zoom final photograph (se 7 facial lengths to zoom out. focal ¥ 4 Focus ard shoot, 4.1 Press the sutler-release button halfway.
4.2 Smoothly press the shutter-release button the rest of the way down to release the shutter and record the photograph. The access lamp next 10 the memory card slot cover will light. Do not elect the memory card or remove or disconnect the power source until the lamp has gone out and recording Is complete. 5 Turn the camera off when shooting Is complete.
yey Ina 1 10 4%, program automatic topography as the D40 offers a choice of seven phy (Digital Sari-Programs) ital Sari-Program modes.
LZ Child Use for snapshots of children! Clothing and background details Ji are vividly rendered while skin tones are given & soft, natural finish. the camera selects the focus ares containing the closest subject. & Sports High shutter speeds freeze motion for dynamic sports shots in which the main subject stands out clearly. The camera focuses continuously while the shutter-lease buttons pressed halfway, tracking the subject in the center focus area.
Basic Playback Photographs are automatically displayed after shooting, The bat trey level and number of exposures remaining are also displayed. if no photograph is displayed in the monitor, the rats recent puce true can be viewed by pressing the @ button (5 50). Additional pictures can be displayed by rotating the command dial or pressing the multi selector left or right. To end playback and rectum to shooting mode, press the shutter release button halfway.
Reference This section builds on the Tutorial to cover more advanced shooting and playback options.
More on Photography (All Modes) The Shooting Information Display Pressing the € button displays shooting information in the mini tor. Shorting information is also displayed she the Bb button is pressed (shooting mode only), the @/Fn, and A modes only) buttons are pressed, and immediately after the cam era Is muted on. The display format depends on the option selected for Info display format in the setup menu 81). The 4b button can be used ta change the setting shooting information display.
1d] Focus can be adjusted automatically {see “Focus Mode! below) or manually 88 28). The user can also select the focus area for aeronautic or manual focus use focus lock to focus ta recompose photographs after focusing 88 26). Focus Mode Ee] Choose how the camera focuses. AF-8 and AF-C are available only In B'S, A and Maddest. Focus moe Description Camera automatically selects single-versa auto focus when subject is judged 10 be stationary, continuous-serve auto focus when subject is judged to be moving.
AF-Area Mode Choose how the focus area Is selected in auto focus mode. This setting has no effect in manual focus made. Option Description oo } Camera automatically selects Locus area con t closest to caners. | Default a for BS, 4 and M modes; selected automatically wi on mode dial is rotated Gol User selects focus earn manually, but if subject leaves seeded focus earn even briefly, tel, Dynamic camera will focus based on information farm other focus areas. Use with erratically moving subjects.
Focus Area Selection Controls used The D40 offers a choice of three focus areas. At default settings, the camera chooses the focus area automatically or focuses on subject in the center focus area, but the focus area can also be selected manually to compose photographs with the main subject positioned at either side of the frame. 1 At default settings, the focus area is selected automatically and M modes.
2% Focus Lock Controls side Focus lock tan be used to change the composition after focusing, making it possible to focus on a subject that will not be in a focus area in the final composition. It can also be used when the auto focus system is unable to focus Single or dynamic area AF is rec: commended when using focus lock J 24).
£% Getting Good Results with Auto focus focus does nat perform we under the conj There between background e.g. the subject is the same color @3 the back: tithe or no contrast he subject and the [§ ground). 10 focus on ar The forts area contains objects at different distances from the Camera (eg, the subjects inside a cage). he camera is unable wo focus thee subject at the The subject is. dominated by regular geometric patterns fag. a raw of windows in ¢ skyscraper).
Manual Focus a] Use this option when you wish to adjust focus manually or when using a manual focus lens, To focus manually, select annual focus B mode and adjust the lens focusing ring until the image displayed an the clear matte field in the viewfinder is in focus. Photographs can be taken at any time, even when the image is not in focus, SHEA Her using a lens that offers A-M selection, select M when focusing manually.
Image Quality and Size Together, image quality and size determine haw much space each photograph occupies on the memory card. Larger, higher quality images can be printed at larger sizes but also require more memory, meaning that fewer such images can be stored an the memory card.
Image Quality Controls used The camera supports the following image quality options {listed in descending order by image quality and file size): {Option Format | Description Compressed raw data rom the image sensor are saved directly to memory card RAW NEF Choose for images that will be retouched on a computer, mages are compressed lass than NORM, producing higher-quality images. Com FINE regression ratio: toughly 1:4 WORM | PEG . J UR (default) Best choice in most situations.
NEF (RAWI/RAW+8 Capture N) 8 103) or the plied Picture Project software are required to view NEF {RAW} image: 5 0h a Computer. NEF (RAW) photographs can not be printed by most prong services or by direct USB connection; use Picture Project of true NX to print NEF RAW) photographs, When photographs taken at RAW-+B are viewed on the camera, only the JPEG image will be displayed.
FLEET Shooting mode determines how the cameraperson photographs: one gta time, in a continuous sequence, with a timed shutter-release delay, or with a remote control. Mode Description = ae pone Camera takes one photograph each time shutter-release button is pressed, Caroler records photographs at up 1 about 2.
Self-Timer and Remote Control Modes The self-timer or optional ML-L remote control] can be used for self-portraits. Mount the camera on a tripod or place the camera on a stable, level surface, 2 Select one of the following shorting dames: B Mode Description QBs {Self-timer Shutter released about 10s alter camera has focused. gs Delayed remote [Shutter released about 2s after camera has focused. = Quick response # emote Shutter released when camera focuses, 3 Frame the photograph.
pT » BR The camera supports & variety of flash modes for photographing poorly lit or backslid subjects. The flash modes available depend on the mode selected with the mode dial; ante B that the flash cen not be used ill mode. The default flash setting for Digital Var Using the Built-in Flash Program modes is automatically restored when the mode dial is rotated to a new setting or the camera is tuned off Using the Built-in %, &. $4 and Tg Modes 1 Rotate the mode dial Choose a flash mode.
Flash Mode The flash modes ava e with the mode dial, BEL 5 Auto Auto slow sync woe Go) CD) depend an the mode currently select Ato slow Off f Si, reduction i 5 SYR red-eye reduction BA 5M Sift flash Fill flash Rear 5 Red-eye curtain L 5 G reduction slow Red-eye fear-certain SYNC reduction (Ge) SYNC Slow syncs Slow sync red-eye reduction * SLOW is displayed after command dial is released. Flash modes are described below.
36 4 The Built-in Flash Use with CPU lenses with focal lengths of 18-300ram or non-CPU lenses with focal lengths of 18200mm: (88 97-98). Remove lens hoods 10 prevent shadows. Lenses that Block the subjects view of the AF-assist lamp may interfere with red-eye reduction.
Photographs taken at slow shutter speeds are pane to blurring. If ISO sensitivity Is raised above the base setting of 150 200 equivalent, the same exposures can be achieved at faster shutter speeds, preventing blur. 150 sensitivity can be set to values between 150 200 and 150 1660 in steps of TEV, with a further high sensitivity setting of HI 1 available for an 150 equivalent of roughly 3200.
Two-Button Reset Controls used € button + @ button The camera settings listed below can be restored to default vases by holding the € and @ buttons down together for more than wo seconds (these buttons are marked by a green dot). The Hla ier monster tums off briefly while settings are reset.
P.S, A, and M Modes PS, 4 and M modes offer control over a variety of advanced settings, including exposure (8 45), white balance, and image optimization. Each of these modes offers a different degree of control over shutter speed and aperture: Mode Description Camera sets Shutter speed and aperture for opt Solute. Monogrammed auto Pk [i En mended for snapshots inland other situations in which there is fettle tme to © adjust camera settings.
Mode P (Programmed Auto) In this mode, the camera automatically adjusts shutter speed and aperture for optimal exposure in most situations. This mode is recommended for snapshots and other situations in which you want to leave the camera in charge of shutter speed and aperture To take photographs in programmed auto: 1 Rotate the made dial Frame a photograph, focus, and shoot.
Mode S (Shutter-Priority Auto) In shutter-priority aura, you choose the shutter speed from values between 30s and Oms while the camera automatically selects the aperture that will produce the optimal exposure, Use slow shutter speeds 10 suggest motion by blurring moving subjects, high shutter speeds to “freeze” motion.
Mode A (Aperture-Priority Auto) In aperture-priority auto, you choose the aperture from values between the minimum and maximum far the lens while the camera automatically selects the shutter speed that will produce the optimal exposure. Small apertures thigh phi-numbers) increase depth of field, bringing both the main subject and background into focus. Large apertures {ow f-nursers} soften background details.
In manual exposure mode, you control both shutter speed and aperture, Shutter speed can be set to values between 305 and Ramos, or the shutter can be held open for indefinitely for longer exposures (as b By). Aperture can be set to values between the minimum and maximum values for the lens. io take photographs in manual exposure mode: 1 Rotate the made dial to M.
Long Time-Exposures Shutter speeds of “bulb” and can be used for long time-exposure photographs of moving lights, the stars, night scenery, or fireworks, To prevent blurring sed by camera shake, use a tripod or an optional nonvoter control (33, 103) Shutter speed Description Bulb Shutter remains open while the shutter release button is held down. Optional remote control required. Select mode M, choose a shutter speed of "bulb, and then select delayed remote or quick-response remote mode 88 331.
Metering Controls used The metering method determines how the camera sets exposure. The following options are available when the mode dial Is rotated (matrix metering is used in other modes): Method Description oo Recommended in most Stallions. Camera melees a wide area of the fame B BE matrix and instantly sets exposure according to distribution of brightness, color, dis acne, and composition for natural results = . Camera meters emir frame bur assigns greatest weight Ww center area.
Auto exposure Lock rar] If the subject is not in the metered area when center-weighted or spat metering is used, exposure will be based on lighting conditions in the background and the main subject may not be correctly exposed. This can be prevented by using auto exposure lock. 1 Select mode PS, of A and choose center-weighted ar spot metering (exposure lock has no effect in mode M).
Exposure Compensation Exposure compensation is used to alter exposure by up to £5EV in increments of ARV, making pictures brighter or darker. It is available holy in § A, and M modes and is most effective when used with center-weighted or spot metering 845). As a rule of thumb, positive compensation may be needed when the main subject is darker than the background, neg native values when the main subject is brighter than the background. Exposure compensation is shown in the shooting information display.
43 Flash Compensation aad y Flash compensation {available only in BS, A, and M modes) is used to alter flash output by from ~3EV to +1EV in increments of *4EV, changing the brightness of the main subject relative to the background. Flash output can be increased to make the main subject appear brighter, or reduced ta prevent unwanted highlights or reflections Flash compensation is shown in the shooting information display. Normal flash output can be restored by setting flash compensation to 0.0.
White Balance ©» a White balance ensures that colors are unaffected by the color of the light source. Alta white balance is recommended for mast light sources; if necessary, other values can be selected according to the type of source. The following options are available inB S, A and M modes (Auto is automatically selected in Digital Var-Program modes) Option Description Camera less whi nce automatically. Recommended for mast sit B A Auto nations.
More on Playback To play photographs back, press the @ button. The most recent 5 photograph will be displayed in the monitor, Photographs taken f 8 in “tall” {portrait orientation are displayed: in tall orientation shown at right. The following operations can be performed in full-frame playback: To Use Description i. Press milt selector Lo right of rotate command dial right ta view View additional tha In root recorded Paris elector Ih photographs photographs order recorded.
Photo Information Photo information is superimposed on images: displayed in full-frame playback. Press the multi selector up or down to cycle through the following information: File In formations Shooting Data Page Data Page History {retouched copies only) Highlights» RGR Histogram«File Information. File Information EJ Protect sta . i File name Pi Retouch indicator. 4 image quality El Frame number/total 4 Ate of recording ooh.
Highlights ate the brightest portions of th lost “washed out”) in areas of highlights 2 Protect stat v4 retouch indicator £1 Highlights {indicated by flashing border) 73 Drama number total number of images image. Details may be wat are overexposed. 54 Histogram A histogram is a graph showing the distribution of wines in the image.
Taking a Closer Look: Playback Zoom Press the @ button to roam in on a photograph in full-frame playback. The following operations can be performed: : To 1 Use Description Zooming and out QL es @ zoom in to maximum of approximately 19 {age images), 15x {medium images) or 10x {small images), Press @ to zoom out. While phone is zoomed iin, press rout select View either areas {on or up, down, lft, or right to view of image Na areas of image nat visible in monitor.
Protecting Photographs from Deletion In full-frame, zoom, and thumbnail playback, the €B button can be used 16 protect photo graphs from accidental deletion. Protected files can not be deleted using the @ button or the Delete option In the playback menu, and have DOS “read-only” status when viewed on 2 Windows computer. Note that protected files will be deleted when the memory card is formatted GB 13,81).
Connecting to a Computer, Printer, or TV The camera can bie connected ta computer using the supplied USS cable, The supplied Picture Project software can then be used to copy photographs 1 the computer, where they can be organized, retouched, and printed Before Connecting the Camera Install Picture Project from the supplied installer CD. To ensure that data transfer is not inter panted, be sure the camera battery is fully charged.
56 4 Turn the camera on. The computer will detect the camera automatically and display Picture Project Transfer. If Mass Storage is selected for USB, the monitor and viewfinder will display the indicators shown at right (when PTP is selected, the normal shooting indicators are displayed). Cores tof] a. 5 Transfer photographs to the computer using Picture Project.
Printing Photographs Photographs can be printed by any of the following methods: « Connect the camera to a printer and print JPEG photographs directly from the camera {see below). « Insert the camera memory card in a printer equipped with a card slot (see the printer manual for details). If the printer supports POOF: #8 117), photographs can be selected for printing using Print set (POOF) GH 41) «Take the camera memory card 10 a developer or digital printer center.
58 Connecting the Printer Before printing, check that the camera battery is fully charged. If in doubt, charge the battery or use an EH-5 AC adapter and E-5 AC adapter connector {available separately; 8 103) 1 Set the camera USB option to PTP #84) 7 Turn the printer on. 3 Tum the camera off. 4 Connect the supplied USB cable as shown. Do not use force or attempt 1 insert the connectors at an angle. Connect the camera directly to the printer; do not connect the cable via a USE hub ot keyboard.
Printing Pictures One at a Time To print the picture currently selected in the Pict Bridge playback display, press 0K. The menu shown at right will be displayed. Press the multi selector up or down to highlight an caption and press to the right to select ““Option Page size Description Sent shown tight wil be displayed. reds milt: selector up or down To choose page size firm Printer default {defaults page size for current printer), 3.5xSin, $x7in., 100x 150mm, 4x6in. 8X10in.
Printing Multiple Pictures To print multiple pictures or create an index print listing all JPEG photographs as small thumbnail images, press the @ button in the Pict Bridge playback display. The menu shown at right wilt be displayed, Press the milt selector up or down io highlight an option and press to the right 1o select. Option Description Print select Print selected picture below) Print (POOF} Print current POOF print order $61) Create index print of all PEG photos, to maximum of 256.
Creating a POOF Print Order: Print Set The Print set (POOF) option in the playback menu is used to create d for Pict Bridge-compatible printers and devices that support POOF Si {POOF} from the playback menu displays the menu shown in Step 1, 1 2 digital “print orders” electing Print set Highlight Select/set. Display selection dialog. 3 Select pictures and specify number of prints as described in Steps 1-3 an previous page. Note that RAW (NEF) photos can not be selected for printing. Display options.
Viewing Photographs on TV An EH-0100 video cable {available separately; 8 103) can be used to connect: the camera to a television or VCR for playback or recording. Use of an optional EH-5 AC adapter and E-5 AC adapter connector Is recommended for extended playback G8 103).
Menu Guide [EE LT Most shooting, playback, and setup options can be accessed from FE T if the camera menus.
64 To modify menu settings 1 Display options, SE] £3 mtn ume i mares 5 sai iy ini, Make selection. Menu rosters th gently BV N el Highlight icon for current many. SHEEN HE Sir xis Highlight option. are displayed in gray are nat cur Press the shutter-release button halfway 10 exit the menus and return to shooting made.
Playback Options: The Playback Menu The playback menu contains the following options (options dis played may differ if My menu is selected for the Setup menu option in the setup menu; 8 80). See "Using Camera Menus” 8 63) for more information on using the menus. Option Description Delete Delete alf or selected photos. Playback folder Louse folder for playback Rotate tall Rotate "tall" {portrait-orientation) photos during playback.
66 Playback Folder Choose a folder for playback: Option Description Ginny photos in the fared currently selected for Folders in the setup menu are displayed during playback, This option is Lament selected automatically when a photo is taken, fa memory card {default} is inserted and this option selected photos have been taken, d message stating that the folder Containing no Wades wall be displayed during playback.
Slide Show Create a slide show of the pictures in the current playback folder, The following options are available: Option Description Fragmentary Choose how long each picture will be displayed. Start Start slide show. The following operations can be performed dung a slide show: To description Skip backpacking ahead View phat info 55 MUL Selector TEFL to prelim © previous frame, fight ta ipo Pause slide show Pause slide show.
Shooting Options: The Shooting Menu The shooting menu contains the following options (options displayed may differ if My menu is selected for the Setup menu option in the setup menu; 88 80): See "Using Camera Menus” 8 53) for mots information on using the menus. Option Description Optimize image’ Optimize images according i scene. image quality Noose rage quality. “Age size Choose image Whitebalance™ Adjust clears according 10 1g light source.
Customizing Image Enhancement Options: Custom Select Custom to make separate adjustments to the following options, After adjusting set tings, highlight Done and press 0K. + image sharpening: Choose how much outlines are sharpened dur ing shooting. Choose high settings for sharp outlines, low settings for softer outlines, Default setting: Auto. Tone compensation: Control contrast Lower settings prevent loss of detail in highlights under harsh lighting or in direct sunlight.
Image Quality Select image quality $8 30). Image Size Choose Image size (8 30). White Balance (P, 5, A, and M Modes) Nine options are available for white balance. See "Reference: White Balance” GB 4%. Fine-Tuning White Balance Al settings other than White balance preset, white balance can be “fine tuned” by 3 in increments of one {see page 118 of the Appendix for color temperature equivalents).
Measuring a Value for Preset White Balance 1 Place a neutral gray or white abject under the lighting that will be used ir the final photograph. A standard gray card can be used as a reference In studio settings.
Copying White Balance from a Photograph A white balance value copied from an existing photograph can be used for preset white balance. Select White balance > White balance preset in the shooting menu. The menu shown in Step 1 will be displayed. 1 EN Highlight Use photo. last measured value (871, highlight Measure and press milt select sate, Highlight This image and press OF 5 NE NER Set preset white balance to value for high picture full frame, press and hold § button.
ISO Sensitivity Adjust ISO sensitivity (8 37). Noise Reduction Photographs taken at high sensitivities or at shutter speeds of 15 ar slower can be processed to reduce “anise” in the form of mottling or randomly-spaced, brightly-collared pixels. Chase from the following options: Option Description Off Noise turns off reduction at 50 sensitivities of 1600 or less.
Custom Settings Custom Settings are used to customize camera settings to slut individual preferences.
2:Focus Mode Select a focus mode @8 23) 3: AF-Area Mode Chase how the camera selects the focus area in auto focus mode 24). 4: Shooting Mode Select from single-frame, continuous, self-time, and remote convoy mode (832).
8: Flash Level (P, S, A, and M Modes Only} Adjust flash level E48). 9: AF-assist (All Modes Except gg and %) if On {the default setting) is selected and the subject is poorly Hit, the AF-assist illumination will it to assist the focus operation in single-servo AF (ARS or single-servo AF selected in AFA auto focus mode). Choose OFf to disable the AF-assist illumination. Nate that wham the illumination is off, the camera may not be able to focus ort pearly-lit subjects using auto focus.
11: 8Y/Fn Button Choose the function performed by the Fa button Option Description Eff-timer (default) Shooting reds the En born and rotate ihe command Gail to select Co mode shooting mode (8 32). Image Press the Bn butler and rotate the command dial to select quality/size image quality and size (88 29). $80 Tress the Fa button and rotate the command dial to select 50 sensitivity sensitivity (837).
a 78 14: Built-in Flash (P, S, A, and M Modes Only} Choose a flash control mode for the built-in flash or the optional SB-400 Speed light. TIL (default): Flash output is adjusted automatically in response to shooting conditions. Manual: “he flash fires at the level selected in the menu shown at right.
16: Self-Timer Chophouse the length of the shutter-release delay in seal-timer mode 8133). The default setting is 10s. 17: Remote On Duration Chase how long the camera will wait for a signal from the remote before canceling delayed or quick-response remote modes (33). Choose shorter times for longer battery life. The default setting is one minute.
Basic Camera Settings: The Setup Menu The setup menu contains the options listed below (options displayed may fifer if My menu is selected for Setup menu. See “Using Camera Menus” GF 63) for more information on using the menus, The following options are available when |To display the following additional options, Simple (the default option) is selected for | select Full for Setup menu Setup menu: Option Folders Setup menu File na.
Press the multi selector up or down to highlight items and then press to the right (0 select or deselect. Selected items are indicated by a sack mark, 4 Highlight Done and press 0K to return 1o the list of menu names shown in Step 1. Repeat steps 2-3 to edit additional menus 5 Highlight Done in the list of menu names and press 0K to fetus Setup menu. Format Memory Card Select Yes to format the memory card. Note that this permanently deletes all photographs and any other data the card may contain.
Classic format Is shown below, Mode Pd Shutter seep: =5 Auto 150 sens 2 Optimize Image focus area display AF-era mad: 13 Beep” indicator 2 Battery indicator... Number of exposures Prat white balance recording PC mode indicator. 24 Manual flash control indicator. Flash compensation indicator for optional Speeding Pod rage size, vr Image quality.
Auto Shooting Info Choose whether w automatically display shooting information in the monitor in Digital Programmer and 9) dames or BS, A and M modes. Select On to automatically display shooting information tare the shutter-release button is leased. If Customer Setting 7 termagant review) is off, shooting information will also be displayed after a photograph is taken. Tum Auto shooting info on if you find yourself frequently checking camera settings.
Language (LANG) Choose the language for camera menus and messages from: Ds Putsch nan Pt Portuguese Portuguese Tn English English Ru Fycaoit. Russian fx Espalier | Spanish Sv Sven ska Swedish A semi Finnish FE (EE) Traditional Chinese fr Franglais French JB ET CMR) Simplified Chinese it Praline affiance H BEE manganese NE Borderlands Dutch BB Korean Pi Pol ski Polish Image Comment Add a comment to photographs as they are taken.
Folders Create, rename, or delete folders or choose the folder in which new photographs will be stored, Select folder, Rouse the folder in which subsequent photo graphs will be stored Current folder DACRON (default folder) or Other folders (in alphabetical Borden) New: Create a new folder and name it as described in "Naming Folders! below, + Rename: Select a folder from a list and rename it as described in "Naming Folders,” below. + Delete: Delete all empty folders on the memory card.
86 File No. Sequence Choose how the camera names files.
Dust Off Ref Photo Acquire reference data for the Image Dust Off option in Capture NX {available separately; for more information, see the Capture NX manual). Highlight On and press 0K. The message shown at right will be displayed. With the lens ten centimeters (four inches) from a well-it, featureless white object, earner the object so that it fills the viewfinder amid then press the shutter-release but ton halfway.
Auto Image Rotation Photographs taken while On (the default option) Is selected con rain information on camera orientation, allowing them to be rotated automatically during playback 8 50) or when viewed in Capture NX (available separately; I 103) or Projectionist” The following orientations are recorded: FE i Tow Landscape {wide} Camera rotated 90° Samara rotated 90° orientation clockwise counterclockwise nous mode (88 32), orientation recorded for first shay applies to all Nonages in same burst, f camera o
Creating Retouched Copies: The Retouch Menu The options in the retouch menu are used 10 create trimmed, resized, or retouched copies of the photographs on the memory card. The following options are available (options displayed may differ if My menu is selected for the Setup menu option in the setup menu; 88 80). See “Using Camera Menus” &3) for more information on using the menus.
To create retouched copies from the retouch menu: Display retouch options. ted picture f * Pharaohs ran also be high ame, press and hoke @ bunion, Te exit 10 playback mode without ere ing modified co D-Lighting D-lighting brightens shadows, making iit ideal for dark or backbit photographs. Before Press the multi selector up or down 10 choose the amount of correction performed. The effect can be previewed in the edit display. Press OK to copy the photograph and return to full-frame playback.
Red-Eye Correction Selecting this option displays a preview image as Shawn below. Confirm the effects of red eye correction and create a corrected copy as described In the following table. Note that red-eye correction may not always produce the expected results and may in very rare cir cum stances be applied to portions of the image that are not affected by red eye; check the preview thoroughly before proceeding. Red-eye correction is available only with photos graphs taken using the flash.
92 Monochrome Choose from Black-and-white, Sepia, and Phenotype (blue and white monochrome). Selecting Sepia or Phenotype displays a preview of the selected image; press the mug selector up to increase color saturation, down to decrease. Press OK to create 8 monochrome copy and rectum te full-frame playback Filter Effects Choose from the following options. After adjusting filter effects as described below, press 0K to copy the photograph and rectum © full-frame playback.
Selecting Small picture from the retouch mine displays the menu shown in Step 1. Fol low the steps below to create small copies of multiple pictures. 2 Iz Highlight Defect im 9 Na Highlight Yes. * Copy photos and exit to full-frame playback, *To rerun to Step 7 without creating copies, highlight No and press OK. Press MENU to exit to retouch menu without creating copies. 2 Viewing Small Pictures Small pictures are indicated by a gray border during full-frame playback.
image Overlay image overlay combines two existing RAW: photographs to create a single picture that is saved separately from the originals. The new picture is saved at current image quality and size settings; before creating an overlay, set image quality and size §8 30; all options are available), To create a RAW carnage, choose an image quality of NEF (RAW). 1 Highlight image overlay in the retouch menu and press the ult selector right.
7 Press the muh selector left or right to highlight the Preview column, Press the multi selector up or down to highlight one of the following options and press 0K. « Overlay: Preview the overlay as shown at right. Press 0K to save the new image. To return to Step 6 and select new photos or adjust gain, press @. « Save: Save the overlay without viewing a preview, After an overlay Is created, the camera will enter full-frame play ack #8 50) with the new picture displayed in the monitor.
Technical Notes Optional Accessories One advantage of digital SLR cameras is the wide variety of accessories they support. See our web sites or product catalogs for up-to-date information on accessories for the D40 Flash units (Speed lights) Viewfinder accessories ML-L overemotional Lenses Only Nikon brand ace ed I» iE use with your Nikon dig engineered gnd pro i d safety requirement: AKIN OIE YOUR NIKON WARRANTY, {2X picture Angle and Focal Length 35-mm camera i.
Lenses Auto focus is supported only with AF-S and AF-f CPU lenses, which are. equipped with an auto focus mortar. IX Nikki CRU lenses can not be used; other CPU lenses (including AF lenses rot equipped with an auto focus motor) can be used in manual focus mode, CPU finises can be identified by the presence of CPU contacts (8 45), AF-S and AF-f lenses by “AF-S” or "AF-I° at the beginning of the lens name.
§% Incompatible Non-CPU Lenses and Accessories lenses gad ace sum biers 28000-30043 rial rigid AF-fist Reduction Illumination is not available with ti Kine #186 « ARSED ve AF-assist Eliminator and interfere « AF-S DXF Lenses that block the sis 4 the Batting Flash The builtin flash can be used with CPU fen: unable to light the entire subj er i with focal length lowing senses at range: 5 of 18-300mm.
Optional Flash Units (Speed lights) Speeding including the § © be mount The accessory shoe EL ows SB-series taking an opt tonal fish anti, remove the vin flash will not When used with comps! Speed lights or SBF Creative SB-400, SB-800, and 58-600 Speed lights These high-performs have Gul ile Nur ge), 53/174 (35-mm zoom head 1 position), and 42/13 {rf 150 200, 2070/68°F GNs at 150 1 The flash head can be rotated through 90° abe close-up photography.
The following features are available with CL-compatible flash units: Speed light] Advanced Wireless Lighting Commander Remote Flash mode/feature 58-400 | SB-800 | 58-600 | SE-800 [SU-800'| SB-800 SB-600 | SB-R200 HLS Auto aperture” vE Vv IZ Non-TEL auto Range-priority manual TTT TTT Manual vi Repeating flash Rear-curtain sync & Red-eye reduction Flash Color Information Communication AF-assist for multi-area AF Auto z00m v hy Auto 156 pos 1.
Notes on Optional Speed lights Speeding man! far detainee instructions. If the Speed light iis on CL-compatibie digital SLR cameras, TY 280%, and 58-5¢ nulls. overflight is attached with the camera mode the bulletin eed er a photograph is taken.
Other Accessories + Dipterous adjustment viewfinder lenses: Dle with adopters of 5, -4, +15, +1, +2, and +3m-1 Use dipterous adjustment lenses only if the desired focus can not ar adjustment control 0 +05 mL Test dipterous dustmen lenses before purchase to ensure that the desired focus can be achieved. Viewfinder « PG-2 magnifier. Magnify the scene displayed in the center of the viewfinder far close-up eyepiece photography, copying, telephoto senses, and other tasks that require added precision.
Accessories for the D40 At the time of wilting, the following accessories were available for the D40. Up to date information is available at Nikon websites or from our latest product catalogs. + EN-ES rechargeable Li-ion battery: Additional DELEON batteries are available from local Power retailers and Nikon service representatives, cures EH-5 AC adapter. Use to power the caner for extended periods.
Caring for the Camera Storage Her the camera will pot be used for an extended period, tm the camera off, remove the battery, and store the Battery in a cool, dry area with the terminal cover in place. To prevent mold or mildew, stretcher camera in a dry, well-ventilated area.
The Low-Pass Filter The Image sensor that acts as the cameras picture element is fitted with a low-pass filter to prevent empire. If you suspect that dirt or dust on the filter is appearing in photographs, you can clean the filter as described below. Note, however, that the filter is extremely delicate and easily damaged. Nikon recommends that the filter be cleaned only by Nikon-authorized service personnel.
Caring for the Camera and Battery: Cautions Ba nat drop: The product may malfunction € subleased strong shocks or visitation, Keep dry: Iris pellucid is pot waterproof, and may malfunction ton if immersed Tn water or exposed igh levels city.
Be sure the battery is ful dt exchange the two a5 Continuing to charge tie battery after it ly cg more battery performance, Batterer oy look or § Turn the pro The battery may become ot only batteries o > not expose the battery te flame o excessive heat batteries ire a achievable 2 recycle sed batteries in accord with local regulations {¥4 Foreign Matter on the Low-Pass Filter Nikon takes every possible precaution to prevent foreign matter don-pass filter daring production and shipping.
IT TTY if the camera fails to function as expect elf, check the list of common problems below before consulting your retailer or Nikon representative. Refer to the page numbers in the tight-mast column for more information. Problem Solution a Camera tke time 16 tum on Clientele files or folders. gene i out of fore ASE viewfinder BUS Gr use atonal dipterous adjust [00 men lenses, Displays tm off without warming. [Choose a longer aura aif delay. 78 .
Problem Destitution image in viewfinder is not in focus. Manual focus selected. if ARS or AF-lens is attached. choose auto focus mode. Otherwise focus manually, « Camera unable to focus using autonomous: use manual faces or focus lock. + Lens is not AF-S or AFL use manual focus. AF-assist Originator does not light Mode dial rotated to gor KR: select another mode. AF-assist lamp: does not light for manual focus or continuous-serve auto focus. Choose AF-S. + Choose On for Custom Setting 9 (AF-assist).
Problem Solution ww Hashing areas appear in Pres multi selector up or down to choose photo inform q data appear vi fair 51 EE mason displayed. A graph appears during playback RAW image is not played birch Plato was taken at carnage quality of NEF + JPEG. 30 Some photos are not displayed curing playback Select All for Playback folder. Nate that Car vent will “6 + Message displayed stating that rio [automatically be selected when next photo is token images are available for playback.
Camera Error Messages and Displays This section lists common warring indicators and error messages that appear in the viewfinder and monitor. Message Viewfinder Solution Bo “Sock lens paperer rng at EE mania aperture Largest 7-| (5 [Lock ing at minimum aperture (largest numbed. | 839 number) JUAN, ens not attached links |" No fens attached: attach lens 8 Fp At ached Ens is not CPU lens: select mode Attach a lines. (blinks) | Initialization error.
Message Viewfinder Solution Flash has fired at full power. View photo; if under ex-: 20, oh posed, adjust settings and try again. “a 50, 6.78 Built-in flash is lowered. raise built-in flash, 34 « Flash head on optional SB-600 Speeding 92 bounce-flash position. — + 58-400 is unable to fully illuminate subject at cue; 89 rent lens focal length. Increase distance to subject {this warning is not displayed with other optional Streetlights) Ash is in TTL mode.
The Appendix covers the following topics: + Available Settings and Defaults + The Command Dial « Memory Card Capacity and Image Quality/Size . + Exposure Program {Mode P}. « Flash Control... + Shutter Speeds Available with the Built « Aperture, Sensitivity, and Flash Range. + Supported Standards White Balance and Carol Temperature. Available Settings and Defaults The following table lists the settings that can be adjusted in each mode.
The Command Dial The command dial can be used tin alone or in combination with other controls w adjust the following settings. Changes to the affected setting are visible in the viewfinder and shooting information display. Choose a coordination of aperture and shutter spared flexible program, mode P BE 40). Choose a shutter speed (modes Sand M841, 43) “Set aperture {mod a2) Set aperture (mode MEE 43) sure compensation {modes BS, and A Chase a flash mode (4, W. BRS 4 and M modes; § 34-36).
Memory Card Capacity and Image Quality/Size The following table shows the approximate number of pictures that can be stored on a 512MB Panasonic Pro HIGH SPEED memory card at different image quality and size settings. image duality image size Fife size (MB) Number of images Buffer capacity’. RAW ed SOB of 5 i 2.908 137 100 FINE ia 1.6MB 235 00 5 G.8ME 503 300 L TOMB 260 100 NORMAL i GAME 444 108 $ IAMB 839 100 1 08MB 503 100 BASIC M DAME 755 100 5 0B 2K 100 Basically wf Sana 58 4 1.
Flash Control (3 99-101) The following types of flash control are supported when a CPU fens is used in combination with the built-in flash or optional $8-400, SB-800, or $8-600 Speed lights. « #171. Balanced ¥ill-Flash for Digital SLR: Flash output is adjusted for a natural balance between the main subject and the background. « Standard LITTLE Fill-Flash for Digital SLR: Flash output is adjusted for the main subject; the brightness of the background is not taken into account.
CT ERST TRE e, Russian, Spanish, Swedish Err hes Pee snd Eden expanse, Ore: Portly Power source © rechargeable Non NELDA Lion Tertiary, charging voyage (Wrap Gulch charger): 7.
USB ser memento, 53, 54 v side cay Vader dice, © Video mode i 82,53 VICED OUT, 2.82 Viewfinder 5, 14.16,1 i accessories, 02 ia ors, 5, 11-112 hora. Seo more, Ie balance. 40, 70-72.
Nikon No reproduction in any form of this manual, in whole or in part (except for brief quotation in critical articles or reviews), may be made without written authorization from NIKON CORPORATION, NIKON CORPORATION Fuji Bid, 2-3 Maraschino 3-some, y .
1 This guide provides first-time users with information on taking photographs with the D406, on copying photographs to a computer, and printing photographs. Complete information on using your Nikon digital camera can be found in the Nikon Guide to Digital Photography with the £40. Care should be taken to prevent dust from entering the camera when the lens or body cap is removed.
Telemarketing Card (Available Separately thready Keep your Hold the hand-grip elbows in with your right hand | Inserts shown Slide the memory card in as shown above until it dicks into place. Support the lens with your left hand Stand with one foot half a pace in front of the other Frame a photo in the viewfinder with the main subject positioned in any of the three focus areas. Memory cards must be formatted in the 040 before first use.
This section describes how to install Picture Project and copy photographs to a computer. Picture Project can also be used to view, edit, and organize photographs. See the Picture Project Reference Manual {on CO} Tor more information. Viewing the Picture Project Reference Manual 1 Start the computer and insert the silver reference C0 2 Double-click the CD icon. + Windows; Double-click the CD (Nikon icon in My CompuServe, + Intestate: Double-click the CO (Nikon) icon on the desktop.
Click Yes. Click Quit, LL onscreen Instructions to complete installation, Apple Quick Time if an easier. version .of Quick Time is installed, the Quick Time installer will start, Follow the on-screen in striations to complete installation. On some systems, the Quick Time installer may require considerable tme to complete installation. Click OK. IF a dialog is displayed directing you to restart the computer, follow the an-serene instructions.
3. Sake gn re a SUSE oF ‘OFS SWEEPSTAKES ROLES: NO) PURCHASE NECESSARY FI WIN. FURL Py Virgo dang Sev (EAST, ml wit 2: fo ice 5133.5 dins aide vd ao en LOM 271 Mrs. 300m 3 rst Name Initial Last Ease Street mall Address: Your date of birth: / Month Year Marital status: CT Marie 2.1) Single Date of purchase: / / Mort Day Year Mod purchased: (Le.
Please send products and other correspondence to: Nikon fc 1300 Walt Whitman Rd. Melville.
Please cheek ait that apply to your household. Plows fold here Have a Dig, £10 Own se Appalachian Computer Sep vin da Into Have n Cat Own a CAROM Bre Mulberry of Frequent Fierce Program 08, LI Own a Wireless Cellular Pho Home Workstation 16 Charitable Ci 9. 11 Subscribe to as Os insertions Se impact Disc: Piss 30.71 Speak Spanish Yourself “To ely us understand our customers” lifestyles, please Indicate (he interests and activities in which you or sour patisserie enjoy participating on & regal basis.
he AF-8 DX ED I Nikon YOU MUST PRESENT THE ATTACHED WARRANTY FORM (PART 1) TOGETHER WITH PROOF-OF-PURCHASE AND PROOF-OF PURCHASE DATE TO OBTAIN WARRANTY SERVICE.
Retain this Worldwide Wary with prof of purchase far tout adore Camcorder AFS DX ED IL ]ion ONE YEAR WORLDWIDE LIMITED WARRANTY {Excluding the Continental United States, Alaska, Hawaii. Puerto Rico, U.S. and LLS. Virgin islands} Welcome 10 the worldwide family of Nikon owners. Your Nikon equipment has bean manufactured fo the highest quality standards by NIKON CORPORATION, Tokyo, Japan. “This warranty loosen ho original consumer 10 worldwide warranty protection bn accordance with the terms snd conditions.
Nikon AUTHORIZED SERVICE STATIONS rey SER TEAR cumin fo Fn BE tin Gave Sie sos Ban Gen CoC bags? FECAL AEE ss sis eh ER raid Lame Cvs Coca ts fs sprays rin Simmer solemness sro op cove moms Soe RE Eh or Lav on Bn ana a i Bra ERI So Te Toc banshee parakeet EEE.
This is your Nikon inception Year Limited fo Warranty (valid in the Continental United States, Alaska, Hawaii, Puerto Rico, U.S. and AF-S DX ED i us. Virgin Islands). YOU MUST PRESENT THIS FORM (PART 1) TOGETHER WITH PROOF-OF PURCHASE AND PROSE-OF-PURCHASE DATE TO OBTAIN WARRANTY SERVICE. “This Mike odorous is warranted by Dominion Trio, 0 ba roa farm defects in materials and workmanship for a period of one (1) year from the date of purchase.
Nikon SERVICE FACILITIES (as of pain 2608) menses Sammie seg they EE Hans sor ER SE wa SER EEE poured EE Comdr ASE Bo BERRA os ESS BRL RR FE ase Fhe rems: Hho EE EAE EEE, Be je in EERIE Ini " hon Shr fin Uk sts Prt Sp ois ny Sea ETE es prs canon con Foals ig tuns. 1h Fe So Sle Coa ny Ban +4 Erma ar [or Nan: on sh lee Hens es cp, Ene SE Er ne, ari sn. Now bt Pres, RATE wore css Ean BEE ION CORPORATION, Tokyo, Japan picture tessellate nine EE 0 S00 RE Sem cab tomes i= Sie gasses Ee Spr on Soa.
Please send products and other correspondence to: Nikon Inc. 19601 Hamiltonian Avenue Torrance, CA 90502 I Nikon NIKKI LENS ESC REGISTRATION P. 0.
Nikki FAX Lens 1 Year Warranty + 4 Year Extended Se 5 Years OF PROTECTION ice Coverage = YOU MUST MAIL THE POSTCARD COPY OF THIS FORM WITHIN 10 DAYS OF Nikon. YOUR PURCHASE TG OBTAIN EXTENDED SECURE COVERAGE!!! Nam Ell 4 J of bol lob lle tr bpp bp bbe tbh Address Lf 1. beanpole Bret Ll deb dd City 1 Lb refer L111 of State Dealer Name poll Leno lb rod bt pd Its p41 Lg tr Lp bpd Sate 1 Zip Ill] Your Telephone # Your E-mail Lens Model mm ¥ Eats of Purchase Lens Serial Nikon SLR Owned: (1) FF. 2}FS .. (GULFS.
NIKON DIGITAL IMAGING LIMITED WARRANT THIS I$ YOUR NIKON ING. ONE YEAR LIMITED WARRANTY (VALID IN THE CONTINENTAL UNITED STATES, ALASKA, HAWAII, CENTRAL AND SOUTH AMERICA. AND THE CARIBBEAN. YOU MUST PRESENT THIS FORM TOGETHER WITH PROOF OF PURCHASE AND PROF OF PURCHASE DATE (BILL OF SALE} TO OBTAIN WARRANTY SERVICE. This Nikon Digital Imaging Product is warranted by Nisan Ino. to ba free from defects in material and workmanship for pre (1) year drum the date of purchase.