
Owner's Manual


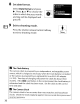


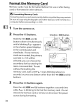
Table Of Contents
- Using the Supplied Manuals
- Quick Start Guide
- Owners Manual
- Two-Button Reset
- Memory Card Compatibility
- Setting Language / Time / Date
- Table of Contents
- Q & A Index
- Icons Used in This Manual
- Supplied Accessories
- Parts & Controls
- Getting Started
- Basic Operation
- Focus
- Release Mode
- ISO Sensitivity
- Exposure
- White Balance
- Image Enhancement
- Flash Photography
- Other Shooting Options
- More Playback Options
- Connecting to Other Devices
- Menu Guide
- Compatible Lenses
- Optional Flash Units
- Other Accessories
- Care / Maintenance
- Troubleshooting
- Error Messages
- Specs
- Index
- Software Installation Guide
- Scan of Software CD-ROM
- Warranty

3 Attach
the
lens.
Keeping
the
mounting
index
on
the
lens
aligned
with
the
mounting
index on
the
camera body,
position
the
lens in
the
camera/s
bayonet
mount
(CD).
Being
careful
not
to
press
the
lens-release
button/
rotate
the
lens
counter-
clockwise
until
it
clicks
into
place
(@).
Mounting
index
If
the
lens
is
equipped
with
an
A-M
or
M/A-M
switch, select A(autofocus)
or
M/
A(autofocus
with
manual priority).
A M
---.
r--
(D]]))
MIA
M
---.
r--
(D]]))
II
Detaching
the
Lens
Be
sure
the
camera
is
off
when
removing
or
exchanging lenses.
To
remove
the
lens,
press and
hold
the
lens release
button
(CD)
while
turning
the
lens clockwise
(@).
After
removing
the
lens, replace
the
lens caps
and camera
body
cap.
~
CPU
Lenses
with
Aperture
Rings
In
the
case
of
CPU
lenses
equipped
with
an
aperture
ring
(CD
340)/ lock
aperture
at
the
minimum
setting (highest f-number).
27