
Owner's Manual
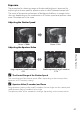
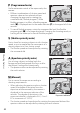
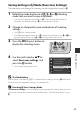
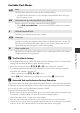
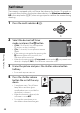
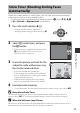
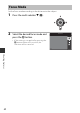
Table Of Contents
- Quick Start Guide
- Reference Manual
- Introduction
- Parts of the Camera
- Preparing for Shooting
- Basic Shooting and Playback Operations
- Shooting Features
- Auto Mode
- Scene Mode (Shooting Suited to Scenes)
- Special Effects Mode (Applying Effects When Shooting)
- P, S, A, M Modes (Setting the Exposure for Shooting)
- U (User Settings) Mode
- Flash Mode
- Self-timer
- Smile Timer (Shooting Smiling Faces Automatically)
- Focus Mode
- Exposure Compensation (Adjusting Brightness)
- Functions That Can Be Set with the Fn (Function) Button
- Functions That Cannot Be Used Simultaneously When Shooting
- Functions That Can Be Set with the MENU (Menu) Button
- Using Location Data Functions
- Using the Wi-Fi (Wireless LAN) Function
- Connecting the Camera to a TV, Printer, or Computer
- Reference Section
- Hints and Notes About the Scene Mode
- Default Settings (Flash, Focus mode, Etc.)
- Focusing
- The Control Range of the Shutter Speed (P, S, A, M Modes)
- Playback Zoom
- Thumbnail Playback/Calendar Display
- Viewing and Deleting Images Captured Continuously (Sequence)
- Editing Images (Still Images)
- Recording and Playing Back Movies
- Capturing Still Images While Recording Movies
- Operations During Movie Playback
- Editing Movies
- Recording the Location Data on the Image
- Recording the Log of Movement Information
- Connecting to a Smart Device (Wi-Fi)
- Preselecting Images in the Camera That You Want to Transfer to a Smart Device
- Connecting the Camera to a TV (Playback on a TV)
- Connecting the Camera to a Printer (Direct Print)
- Using ViewNX 2 (Transferring Images to a Computer)
- The Shooting Menu (The Common Shooting Options)
- The Shooting Menu (P, S, A or M Mode)
- Picture Control (COOLPIX Picture Control)
- Custom Picture Control (COOLPIX Custom Picture Control)
- White Balance (Adjusting Hue)
- Metering
- Continuous Shooting
- ISO Sensitivity
- Exposure Bracketing
- AF Area Mode
- Autofocus Mode
- Flash Exp. Comp.
- Noise Reduction Filter
- Active D-Lighting
- Multiple Exposure
- Zoom Memory
- Startup Zoom Position
- M Exposure Preview
- The Movie Menu
- The Playback Menu
- The Wi-Fi Options Menu
- The Location Data Options Menu
- The Setup Menu
- Time Zone and Date
- Slot Empty Release Lock
- Monitor Settings
- EVF Auto Toggle (Automatically Switching the Display to the Viewfinder)
- Date Stamp
- Vibration Reduction
- AF Assist
- Digital Zoom
- Assign Side Zoom Control
- Sound Settings
- Auto Off
- Format Card
- Language
- Charge by Computer
- Toggle Av/Tv Selection
- Reset File Numbering
- Peaking
- Reset All
- Firmware Version
- Error Messages
- File Names
- Optional Accessories
- Principle Functions of the Controls
- Technical Notes and Index
- Warranty

37
Shooting Features
Available Flash Modes
C The Flash Mode Setting
• The available flash modes differ depending on the shooting mode. The flash mode
setting may not be available in some shooting modes.
• When the shooting mode is j, k, l, m or M, Auto cannot be selected.
• The setting applied in the following situations is saved in the camera’s memory
even after the camera is turned off.
- When shooting mode j, k, l or m is used
- When V (auto with red-eye reduction) is selected in A (auto) mode
C Auto with Red-eye Reduction/Red-eye Reduction
The red-eye reduction lamp glows before the main flash to reduce the red-eye effect.
In addition, if the camera detects red-eye while saving an image, the affected area is
processed to reduce red-eye before the image is saved.
Note the following when shooting:
• Because the red-eye reduction lamp glows, more time than usual is required until
the shutter is released after you press the shutter-release button.
• More time than usual is required to save images.
• Red-eye reduction may not produce the desired results in some situations.
• In rare cases, red-eye reduction may be applied to areas of an image unnecessarily.
In these cases, select another flash mode and take the picture again.
U
Auto
The flash fires when necessary, such as in dim lighting.
• The flash mode indicator is only displayed immediately after setting in
the shooting screen.
V
Auto with red-eye reduction/Red-eye reduction
Reduce red-eye in portraits caused by the flash (A37).
• When Red-eye reduction is selected, the flash fires whenever a picture
is taken.
X
Fill flash/Standard flash
The flash fires whenever a picture is taken.
Y
Slow sync
Suited to evening and night portraits that include background scenery. Fill
flash fires to illuminate the main subject; slow shutter speeds are used to
capture background at night or under dim lighting.
Z
Rear-curtain sync
Fill flash fires just before the shutter closes, creating the effect of a stream
of light behind moving subjects.