
Owner's Manual
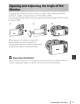
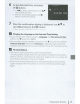
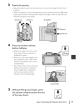
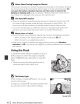
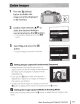
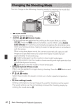
Table Of Contents
- Quick Start Guide
- Reference Manual
- Introduction
- Parts of the Camera
- Preparing for Shooting
- Basic Shooting and Playback Operations
- Shooting Features
- Auto Mode
- Scene Mode (Shooting Suited to Scenes)
- Special Effects Mode (Applying Effects When Shooting)
- P, S, A, M Modes (Setting the Exposure for Shooting)
- U (User Settings) Mode
- Flash Mode
- Self-timer
- Smile Timer (Shooting Smiling Faces Automatically)
- Focus Mode
- Exposure Compensation (Adjusting Brightness)
- Functions That Can Be Set with the Fn (Function) Button
- Functions That Cannot Be Used Simultaneously When Shooting
- Functions That Can Be Set with the MENU (Menu) Button
- Using Location Data Functions
- Using the Wi-Fi (Wireless LAN) Function
- Connecting the Camera to a TV, Printer, or Computer
- Reference Section
- Hints and Notes About the Scene Mode
- Default Settings (Flash, Focus mode, Etc.)
- Focusing
- The Control Range of the Shutter Speed (P, S, A, M Modes)
- Playback Zoom
- Thumbnail Playback/Calendar Display
- Viewing and Deleting Images Captured Continuously (Sequence)
- Editing Images (Still Images)
- Recording and Playing Back Movies
- Capturing Still Images While Recording Movies
- Operations During Movie Playback
- Editing Movies
- Recording the Location Data on the Image
- Recording the Log of Movement Information
- Connecting to a Smart Device (Wi-Fi)
- Preselecting Images in the Camera That You Want to Transfer to a Smart Device
- Connecting the Camera to a TV (Playback on a TV)
- Connecting the Camera to a Printer (Direct Print)
- Using ViewNX 2 (Transferring Images to a Computer)
- The Shooting Menu (The Common Shooting Options)
- The Shooting Menu (P, S, A or M Mode)
- Picture Control (COOLPIX Picture Control)
- Custom Picture Control (COOLPIX Custom Picture Control)
- White Balance (Adjusting Hue)
- Metering
- Continuous Shooting
- ISO Sensitivity
- Exposure Bracketing
- AF Area Mode
- Autofocus Mode
- Flash Exp. Comp.
- Noise Reduction Filter
- Active D-Lighting
- Multiple Exposure
- Zoom Memory
- Startup Zoom Position
- M Exposure Preview
- The Movie Menu
- The Playback Menu
- The Wi-Fi Options Menu
- The Location Data Options Menu
- The Setup Menu
- Time Zone and Date
- Slot Empty Release Lock
- Monitor Settings
- EVF Auto Toggle (Automatically Switching the Display to the Viewfinder)
- Date Stamp
- Vibration Reduction
- AF Assist
- Digital Zoom
- Assign Side Zoom Control
- Sound Settings
- Auto Off
- Format Card
- Language
- Charge by Computer
- Toggle Av/Tv Selection
- Reset File Numbering
- Peaking
- Reset All
- Firmware Version
- Error Messages
- File Names
- Optional Accessories
- Principle Functions of the Controls
- Technical Notes and Index
- Warranty

Changing
the orientation
of
the
monitor
is
useful when shooting
with
the
camera
in
a high or a
low
position, or when taking selfies.
For
normal shooting,
fold the
monitor
against the camera body
with
the screen
facing
out(@).
CD
When you
.are
not
using or carrying the
camera,
fold
the
monitor
against the
camera body
with
the screen facing inward
to
prevent scratches or contamination.
~
Notes About the Monitor
When moving the monitor,
do
not
apply
excessive force and turn
slowly
within the
monitor's adjustable range
so
that the connection
will
not
be damaged.
Preparing
for Shooting
I 1 1