
Owner's Manual
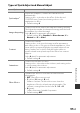
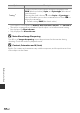
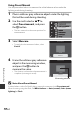
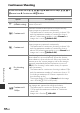
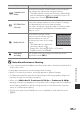
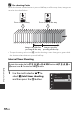
Table Of Contents
- Quick Start Guide
- Reference Manual
- Introduction
- Parts of the Camera
- Preparing for Shooting
- Basic Shooting and Playback Operations
- Shooting Features
- Auto Mode
- Scene Mode (Shooting Suited to Scenes)
- Special Effects Mode (Applying Effects When Shooting)
- P, S, A, M Modes (Setting the Exposure for Shooting)
- U (User Settings) Mode
- Flash Mode
- Self-timer
- Smile Timer (Shooting Smiling Faces Automatically)
- Focus Mode
- Exposure Compensation (Adjusting Brightness)
- Functions That Can Be Set with the Fn (Function) Button
- Functions That Cannot Be Used Simultaneously When Shooting
- Functions That Can Be Set with the MENU (Menu) Button
- Using Location Data Functions
- Using the Wi-Fi (Wireless LAN) Function
- Connecting the Camera to a TV, Printer, or Computer
- Reference Section
- Hints and Notes About the Scene Mode
- Default Settings (Flash, Focus mode, Etc.)
- Focusing
- The Control Range of the Shutter Speed (P, S, A, M Modes)
- Playback Zoom
- Thumbnail Playback/Calendar Display
- Viewing and Deleting Images Captured Continuously (Sequence)
- Editing Images (Still Images)
- Recording and Playing Back Movies
- Capturing Still Images While Recording Movies
- Operations During Movie Playback
- Editing Movies
- Recording the Location Data on the Image
- Recording the Log of Movement Information
- Connecting to a Smart Device (Wi-Fi)
- Preselecting Images in the Camera That You Want to Transfer to a Smart Device
- Connecting the Camera to a TV (Playback on a TV)
- Connecting the Camera to a Printer (Direct Print)
- Using ViewNX 2 (Transferring Images to a Computer)
- The Shooting Menu (The Common Shooting Options)
- The Shooting Menu (P, S, A or M Mode)
- Picture Control (COOLPIX Picture Control)
- Custom Picture Control (COOLPIX Custom Picture Control)
- White Balance (Adjusting Hue)
- Metering
- Continuous Shooting
- ISO Sensitivity
- Exposure Bracketing
- AF Area Mode
- Autofocus Mode
- Flash Exp. Comp.
- Noise Reduction Filter
- Active D-Lighting
- Multiple Exposure
- Zoom Memory
- Startup Zoom Position
- M Exposure Preview
- The Movie Menu
- The Playback Menu
- The Wi-Fi Options Menu
- The Location Data Options Menu
- The Setup Menu
- Time Zone and Date
- Slot Empty Release Lock
- Monitor Settings
- EVF Auto Toggle (Automatically Switching the Display to the Viewfinder)
- Date Stamp
- Vibration Reduction
- AF Assist
- Digital Zoom
- Assign Side Zoom Control
- Sound Settings
- Auto Off
- Format Card
- Language
- Charge by Computer
- Toggle Av/Tv Selection
- Reset File Numbering
- Peaking
- Reset All
- Firmware Version
- Error Messages
- File Names
- Optional Accessories
- Principle Functions of the Controls
- Technical Notes and Index
- Warranty

E65
Reference Section
Metering
The process of measuring the brightness of the subject to determine the
exposure is known as “metering.”
Use this option to set the method of how the camera meters exposure.
* To set focus and exposure for off-center subjects, change AF area mode to
manual and set the focus area to the center of the frame, and then use focus lock
(E21).
B Notes About Metering
• When digital zoom is in effect, Center-weighted or Spot is selected depending
on the magnification of an enlargement.
• This function may not be available to use in combination with other functions
(A46).
C Display on the Shooting Screen
When Center-weighted or Spot is selected, the metering range guide (A6) is
displayed (except when digital zoom is used).
Rotate the mode dial to j, k, l
,
m
or
M M d button M j, k, l
,
m or
M menu icon M Metering M k button
Option Description
G
Matrix
(default setting)
The camera uses a wide area of the screen for metering.
Recommended for typical shooting.
q
Center-weighted
The camera meters the entire frame but assigns greatest
weight to the subject in the center of the frame. The
classic metering for portraits; it preserves background
details while letting lighting conditions in the center of
the frame determine exposure.*
r
Spot
The camera meters the area shown by the circle in the
center of the frame. This can be used when the subject
is much lighter or darker than the background. Ensure
that the subject is within the area shown by the circle
when shooting.*