
Owner's Manual
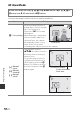


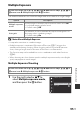
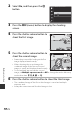
Table Of Contents
- Quick Start Guide
- Reference Manual
- Introduction
- Parts of the Camera
- Preparing for Shooting
- Basic Shooting and Playback Operations
- Shooting Features
- Auto Mode
- Scene Mode (Shooting Suited to Scenes)
- Special Effects Mode (Applying Effects When Shooting)
- P, S, A, M Modes (Setting the Exposure for Shooting)
- U (User Settings) Mode
- Flash Mode
- Self-timer
- Smile Timer (Shooting Smiling Faces Automatically)
- Focus Mode
- Exposure Compensation (Adjusting Brightness)
- Functions That Can Be Set with the Fn (Function) Button
- Functions That Cannot Be Used Simultaneously When Shooting
- Functions That Can Be Set with the MENU (Menu) Button
- Using Location Data Functions
- Using the Wi-Fi (Wireless LAN) Function
- Connecting the Camera to a TV, Printer, or Computer
- Reference Section
- Hints and Notes About the Scene Mode
- Default Settings (Flash, Focus mode, Etc.)
- Focusing
- The Control Range of the Shutter Speed (P, S, A, M Modes)
- Playback Zoom
- Thumbnail Playback/Calendar Display
- Viewing and Deleting Images Captured Continuously (Sequence)
- Editing Images (Still Images)
- Recording and Playing Back Movies
- Capturing Still Images While Recording Movies
- Operations During Movie Playback
- Editing Movies
- Recording the Location Data on the Image
- Recording the Log of Movement Information
- Connecting to a Smart Device (Wi-Fi)
- Preselecting Images in the Camera That You Want to Transfer to a Smart Device
- Connecting the Camera to a TV (Playback on a TV)
- Connecting the Camera to a Printer (Direct Print)
- Using ViewNX 2 (Transferring Images to a Computer)
- The Shooting Menu (The Common Shooting Options)
- The Shooting Menu (P, S, A or M Mode)
- Picture Control (COOLPIX Picture Control)
- Custom Picture Control (COOLPIX Custom Picture Control)
- White Balance (Adjusting Hue)
- Metering
- Continuous Shooting
- ISO Sensitivity
- Exposure Bracketing
- AF Area Mode
- Autofocus Mode
- Flash Exp. Comp.
- Noise Reduction Filter
- Active D-Lighting
- Multiple Exposure
- Zoom Memory
- Startup Zoom Position
- M Exposure Preview
- The Movie Menu
- The Playback Menu
- The Wi-Fi Options Menu
- The Location Data Options Menu
- The Setup Menu
- Time Zone and Date
- Slot Empty Release Lock
- Monitor Settings
- EVF Auto Toggle (Automatically Switching the Display to the Viewfinder)
- Date Stamp
- Vibration Reduction
- AF Assist
- Digital Zoom
- Assign Side Zoom Control
- Sound Settings
- Auto Off
- Format Card
- Language
- Charge by Computer
- Toggle Av/Tv Selection
- Reset File Numbering
- Peaking
- Reset All
- Firmware Version
- Error Messages
- File Names
- Optional Accessories
- Principle Functions of the Controls
- Technical Notes and Index
- Warranty

E71
Reference Section
Exposure Bracketing
The exposure (brightness) can be changed automatically during continuous
shooting. This is effective for shooting when it is difficult to adjust the picture
brightness.
B Notes About Exposure Bracketing
• Exposure bracketing is not available in m (manual) mode.
• When exposure compensation (A44) and ±0.3, ±0.7 or ±1.0 in Exposure
bracketing are set simultaneously, the combined exposure compensation values
are applied.
• This function may not be available to use in combination with other functions
(A46).
Rotate the mode dial to j, k or l M d button M j, k or l menu
icon M Exposure bracketing M k button
Option Description
Off (default
setting)
Exposure bracketing is not performed.
±0.3
When the shutter-release button is pressed all the way, 3 shots
are taken in sequence and the camera varies exposure by 0, –0.3,
and +0.3 over the shots.
±0.7
When the shutter-release button is pressed all the way, 3 shots
are taken in sequence and the camera varies exposure by 0, –0.7,
and +0.7 over the shots.
±1.0
When the shutter-release button is pressed all the way, 3 shots
are taken in sequence and the camera varies exposure by 0, –1.0,
and +1.0 over the shots.