DIGITAL CAMERA Quick Start Guide The KeyMission 360 SnapBridge Introduction Parts of the Camera Getting Started Using the Camera Technical Notes ii iv vi 1 4 17 30 • Read this manual thoroughly before using the camera. • To ensure proper use of the camera, be sure to read the For Your Safety leaflet, “ Notes About Shockproof, Waterproof, and Dustproof Performance and Condensation” (page xi), and “Notes About Wireless Communication Functions” (page 32).
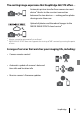
The KeyMission 360 The KeyMission 360 is a new concept camera that is slightly different from the cameras before it. • Create 360° content The camera combines two images captured by lenses with an angle of view of about 180 degrees so that you can enjoy creating 360° content (except when shooting underwater). • Easy shooting with just one button You can press a button to simultaneously turn on the camera and shoot.
Playing Back Images • Playing back using the SnapBridge 360/170 app, the KeyMission 360/170 Utility, or a TV (HDMI connection): Part of the single image that was processed in the camera is displayed and you can play back while moving the point of view. • Playing back using other software: The single image that was processed in the camera is displayed. You cannot move the point of view during playback.
SnapBridge Your images. The world. Connected Welcome to SnapBridge — Nikon’s new family of services to enrich your image experience. SnapBridge connects your camera and compatible smart device, through a combination of Bluetooth® low energy (BLE) technology and a dedicated app. The stories you capture with your Nikon camera and lenses are automatically transferred to the device as they are taken. They can even be uploaded effortlessly to cloud storage services, inviting access across all your devices.
The exciting image experience that SnapBridge 360/170 offers… Automatic picture transfer from camera to smart device1 thanks to the constant connection between the two devices — making online photo sharing easier than ever Upload of photos and thumbnail images to the NIKON IMAGE SPACE cloud service2 1 2 Movies cannot be automatically transferred. NIKON IMAGE SPACE does not support the viewing of 360° content by moving the point of view.
Introduction Read This First Thank you for purchasing the Nikon KeyMission 360 digital camera. Using “SnapBridge 360/170” The dedicated app “SnapBridge 360/170” is required to set up this camera, use remote photography, play back images, change settings, and more. Before setting up the camera, install the dedicated app on your smartphone or tablet (Aiv). Downloading the “Reference Manual” The Reference Manual (PDF format) is available in various languages.
Nikon User Support Should you need technical support, we offer a number of options. Internet For customers in the United States: www.nikonusa.com For customers in Canada: www.nikon.ca (English), fr.nikon.ca (Français) For customers in Mexico: www.nikon.com.mx For customers in Brazil: www.nikon.com.
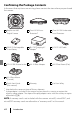
Confirming the Package Contents In the event that any items are missing, please contact the store where you purchased the camera.
Information and Precautions Life-Long Learning As part of Nikon’s “Life-Long Learning” commitment to ongoing product support and education, continually updated information is available online at the following websites: • For users in the U.S.A.: http://www.nikonusa.com/ • For users in Europe: http://www.europe-nikon.com/support/ • For users in Asia, Oceania, the Middle East, and Africa: http://www.nikon-asia.
About the Manuals • No part of the manuals included with this product may be reproduced, transmitted, transcribed, stored in a retrieval system, or translated into any language in any form, by any means, without Nikon’s prior written permission. • Illustrations and screen content shown in this manual may differ from the actual product. • Nikon reserves the right to change the specifications of the hardware and software described in these manuals at any time and without prior notice.
Notes About Shockproof, Waterproof, and Dustproof Performance and Condensation • The shockproof, waterproof, and dustproof performance described here do not guarantee that the camera will remain completely waterproof or free from damage and trouble under all conditions. • Do not subject the camera to excessive shock, vibration or pressure by dropping it, hitting it, or placing a heavy object on it.
Notes About Shockproof, Waterproof, and Dustproof Performance • Do not drop the camera, strike it against a hard object such as a rock, or throw it against a water surface. • Do not subject the camera to shock when using it underwater. - Do not subject the camera to water pressure by exposing it to rapids or waterfalls. - Do not expose to depths greater than 30 m (100 ft) underwater. - Make sure not to drop the camera underwater. This camera does not float in water.
Notes About Operating Temperature, Humidity, and Condensation The operation of this camera has been tested at temperatures from −10°C to +40°C (14°F to 104°F). When you use the camera in cold climate regions or at high altitudes, observe the following precautions. • Battery performance deteriorates temporarily when cold. Keep the camera and batteries warm under your clothing before use.
xiv Introduction
Parts of the Camera The Camera Body Front 4 5 6 10 11 12 1 7 13 2 8 9 3 Back Bottom 14 1 15 2 17 16 18 1 Lens protector mounting mark 10 Waterproofing packing 2 Lens 11 Micro-USB connector 3 Speaker 12 Airplane mode switch 4 Status lamp 13 HDMI micro connector (Type D) 5 Movie button 14 Microphone (stereo) 6 Power-on lamp 15 Photo button 7 Battery-chamber/memory card slot cover latch release 16 N-Mark (NFC antenna) 8 Battery-chamber/memory card slot cover latch 18 Eyelet
Lamp Display You can check the status of the camera by looking at the lamps. Use c Camera M Camera settings M LED brightness in the SnapBridge 360/170 app (A24) to change the brightness of the lamps. Power-On Lamp Status On Flashing Color Description Green • The battery level is within 30% to 100%. • The camera is detecting a computer. Orange The battery level is within 10% to 30%. Green • The battery is charging. Turns off when charging is complete.
Status Lamp Status Color Green Red Description The camera is connected to a TV with an HDMI cable. The camera is recording a movie. On at the same time Green The camera is on standby for pairing (A9). Green • Pairing is complete. • The camera is capturing a still image. • The self-timer is counting down. Alternately flashing Red • The camera is saving a movie. • Pairing failed. Red/Green The firmware is being updated.
Getting Started Inserting the Battery and Memory Card 5 6 3 7 9 1 2 4 Battery latch 8 Memory card slot • Unlock the battery-chamber/memory card slot cover latch (1), move the batterychamber/memory card slot cover latch release to the y position (2), and then open the battery-chamber/memory card slot cover (3). • With the battery’s positive and negative terminals oriented correctly, move the orange battery latch (4), and fully insert the battery (5).
B Formatting a Memory Card The first time you insert a memory card that has been used in another device into this camera, make sure to format it with this camera. • Note that formatting a memory card permanently deletes all images and other data on the memory card. Be sure to make copies of any images you wish to keep before formatting the memory card. • Insert the memory card into the camera, and select c Camera M Camera settings M Format card in the SnapBridge 360/170 app (A24).
Charging the Battery Charging AC Adapter Power-on lamp Electrical outlet 1 USB cable (included) If a plug adapter* is included with your camera, securely connect it to the Charging AC Adapter. Once the two are connected, attempting to forcibly remove the plug adapter could damage the product. * The shape of the plug adapter varies according to the country or region in which the camera was purchased. This step can be omitted if the plug adapter comes permanently bonded to the Charging AC Adapter.
B Notes About Charging with a Computer When c Camera M Camera settings M Charge by computer is set to Auto in the SnapBridge 360/170 app (A24), connecting the camera to a computer that is running will automatically charge the battery inserted into the camera using power supplied by the computer. • When connected to a computer, the camera turns on and starts charging. The camera cannot be operated with buttons during this time.
Turning the Camera On or Off Turning On the Camera • Press and hold down the movie button for about 3 seconds to turn on the camera. • Shooting starts when the camera turns on by pressing the movie button or photo button. • When the camera turns on, the power-on lamp turns on. • You can check the battery level by looking at the power-on lamp (A2) or the SnapBridge 360/170 app screen.
Pairing with a Smartphone or Tablet Here, pairing refers to the setting used to connect the camera and smartphone or tablet (below, “smart device”) through Bluetooth. • The smart device screen and buttons may differ from the actual screen. Preparing for Pairing Prepare for pairing in advance. • Smart device: - Install the SnapBridge 360/170 app on your smart device (Aiv). - Enable Bluetooth and Wi-Fi on the smart device. - When using NFC on an NFC-compatible Android device, enable NFC.
Initial Pairing Perform initial pairing in the following situations: • When pairing for the first time after purchasing the camera • When pairing for the first time after updating the camera’s firmware 1 2 Prepare for pairing (A9). Press the movie button or photo button to put the camera into pairing standby mode. • When the status lamps flash green at the same time for a while and then alternately flash green, the camera enters pairing standby mode.
4 Follow the on-screen instructions and when the screen shown on the right is displayed, tap KeyMission 360_xxxxxxxx. Connect to Camera • “xxxxxxxx” varies depending on the camera. Camera name KeyMission 360_xxxxxxxx 5 When a confirmation dialog for pairing is displayed, tap Pairing on the lower right of the screen (the button name varies depending on the model of the smart device). • If pairing is successful, the screen shown Connect to Camera Connect on the right is displayed.
Re-pairing Perform re-pairing in the following situations: • When pairing the same smart device again after unpairing using End pairing in the SnapBridge 360/170 app • When pairing with a second smart device or more 1 2 Prepare for pairing (A9). Press and hold down the movie button for about 7 seconds to put the camera into pairing standby mode. • When the status lamps flash green at the same time for a while and then alternately flash green, the camera enters pairing standby mode.
4 Tap e in a Connect, and then tap KeyMission360_xxxxxxxx on the displayed screen. Connect Connection options Select camera… KeyMission 360_xxxxxxxx Select a camera for Bluetooth pairing • “xxxxxxxx” varies depending on the camera. 5 When a confirmation dialog for pairing is displayed, tap Pairing on the lower right of the screen (the button name varies depending on the model of the smart device). • If pairing is successful, the screen shown on the right is displayed.
Attaching the Silicone Jacket We recommend attaching the silicone jacket to soften physical impacts to the camera. Attach by inserting the camera from the side of the silicone jacket so that the Nikon logos of the camera and silicone jacket overlap. • If the Nikon logos do not overlap, the silicone jacket may appear in the images. • When using the camera underwater, remove the silicone jacket because it may shift out of place and appear in the images.
The Lens Protector/Underwater Lens Protector Make sure to attach the lens protectors or underwater lens protectors to protect the lens because they are made of glass. • Lens protector: Used to protect the lens (attached to the camera at time of factory shipment). Although the camera can be used underwater because it is waterproof, captured images may be blurred. The lens protectors can be used up to a water depth of about 20 m (65 ft).
B Notes About the Lens Protectors and Underwater Lens Protectors • Be careful not to subject the protectors to physical impacts or rubbing. Doing so could cause scratches or damage. • When you are not using the camera, insert it into a case made of soft cloth material with the lens protectors or underwater lens protectors attached.
Using the Camera Recording Movies or Shooting Still Images Before shooting, check the orientation of the camera (the side with the Nikon logo is the front). • Your hands will appear in images during hand-held photography because this camera captures 360° content. To reduce the appearance of hands, use the base adapter (A27) to stabilize the camera and shoot.
Shooting with a Smart Device 1 2 Pair the camera and the smart device (A9). Tap c Camera M Remote photography in the SnapBridge 360/170 app. • When a confirmation dialog for the Wi-Fi connection is displayed, tap OK. 3 To record a movie, tap . To shoot a still image, tap . • The status lamps light red at the same time while recording movies. To stop recording a movie, tap . • When is tapped, the shutter sound is produced.
Maximum Movie Recording Time The available recording time for a single movie depends on the remaining space in a memory card. • The remaining recording time for a single movie is displayed on the shooting screen of the SnapBridge 360/170 app. • The actual remaining recording time may vary depending on the movie content, subject movement, or type of memory card. • microSDXC memory cards with an SD Speed Class rating of 6 or faster are recommended for recording movies.
Selecting a Movie Mode Select the desired type of movie to record by using Movie mode (A25) in the SnapBridge 360/170 app. • Standard movie: Record normal movies. • Superlapse movie: The camera records movies and saves them in fast motion (960/30p or 960/25p). Use to record a movie while moving the camera. The camera compresses the time of changes in the subject and saves the movie. At 6×, a movie recorded for six minutes is played back as a one-minute movie.
• Time-lapse movie: The camera can automatically capture still images at a specified interval to create time-lapse movies. When NTSC/PAL (A25) is set to NTSC, 300 images are captured. When set to PAL, 250 images are captured.
Playing Back Images Playing Back Images Saved in the Camera 1 2 Pair the camera and the smart device (A9). Tap c Camera M Download selected pictures in the SnapBridge 360/170 app. • When a confirmation dialog for the Wi-Fi connection is displayed, tap OK. • Multiple images saved in the camera are displayed. 3 Tap the image that you want to play back. • To transfer images to the smart device, follow the procedures described below while playing them back.
Playing Back Images Transferred to a Smart Device 1 2 Tap b Gallery in the SnapBridge 360/170 app. Select Latest download or Pictures on device. • Latest download: Multiple new images transferred from the camera are displayed. • Pictures on device: All images transferred from the camera are displayed. 3 Tap the image that you want to play back, and then tap h on the displayed screen. • The image is played back. Drag the screen during playback to move the point of view.
Changing the Settings Perform the following operations in the SnapBridge 360/170 app to change the camera settings. Pair the camera and smart device in advance (A9). • c Camera M Camera settings Option Description Date and time Set the camera clock. Sound settings Set the volume of sounds during operation. • High, Normal (default setting), Low, Off Auto off Set the amount of time that elapses after shooting until the camera turns off.
Option Description Configure the wireless network settings to connect the camera and a smart device. Network menu Send while shooting Set whether to automatically upload captured images to a smart device. Movies cannot be uploaded using Send while shooting. To transfer movies to a smart device, use the SnapBridge 360/170 app. Wi-Fi Configure Wi-Fi connection settings. Bluetooth Configure Bluetooth connection settings.
Option Description Underwater Set to Yes when shooting underwater. Active D-Lighting Reduce the loss of details in highlights and shadows. White balance Adjust white balance to suit the light source in order to make the colors in images match what you see with your eyes. • Auto (default setting): White balance is automatically adjusted. • Daylight: Use under direct sunlight. • Incandescent: Use under incandescent lighting. • Fluorescent: Use under fluorescent lighting.
Using the Base Adapter and Base Mount Attaching the base adapter to the camera allows you to use special accessories such as a base mount. • To increase the adhesive strength, attach the base mount for 24 hours or longer before using the camera. 1 Align the camera screw with the tripod socket of the camera (1), and tighten the screw knob (2). 2 Attach the buckle of the base adapter to the base mount.
3 Adjust the camera angle. • Loosen the plate lock (1), set the camera angle (2), and then tighten the lock (3). 4 Make sure that there are no foreign substances on the surface to which the base mount will be attached. • If there are foreign substances such as dust or water, remove them. 5 28 Peel off the release liner from the back of the base mount, and firmly press the base mount so that the entire surface is attached.
Base Mount The base mount is an accessory that is used to easily attach and detach a base adapter mounted with the camera. Attach the base mount to places where you want to mount the camera. Use the flat or curved type depending on the surface to which the base mount will be attached. The base mount is not designed for use on vehicles. Do not attach it on vehicles. • Base mount (flat): Use to attach to flat surfaces. • Base mount (curved): Use to attach to curved surfaces such as helmets.
Technical Notes Notices Notices for Customers in the U.S.A. IMPORTANT SAFETY INSTRUCTIONS SAVE THESE INSTRUCTIONS. DANGER - TO REDUCE THE RISK OF FIRE OR ELECTRIC SHOCK, CAREFULLY FOLLOW THESE INSTRUCTIONS For connection to a supply not in the U.S.A., use an attachment plug adapter of the proper configuration for the power outlet if needed. The power supply unit is intended to be correctly orientated in a vertical or floor mount position.
Interface Cables Use the interface cables sold or provided by Nikon for your equipment. Using other interface cables may exceed the limits of Class B Part 15 of the FCC rules. Notice for Customers in the State of California WARNING Handling the cord on this product will expose you to lead, a chemical known to the State of California to cause birth defects or other reproductive harm. Wash hands after handling. Nikon Inc., 1300 Walt Whitman Road, Melville, New York 11747-3064, U.S.A.
Notes About Wireless Communication Functions Restrictions on Wireless Devices The wireless transceiver included in this product conforms to wireless regulations in the country of sale and is not for use in other countries (products purchased in the EU or EFTA can be used anywhere within the EU and EFTA). Nikon does not accept liability for use in other countries.
Precautions When Exporting or Carrying This Product Abroad This product is controlled by the United States Export Administration Regulations (EAR). The permission of the United States government is not required for export to countries other than the following, which as of this writing are subject to embargo or special controls: Cuba, Iran, North Korea, Sudan, and Syria (list subject to change). Notice for Customers in the U.S.A.
Caring for the Product Observe the precautions described below in addition to the warnings in the For Your Safety leaflet, “ Notes About Shockproof, Waterproof, and Dustproof Performance and Condensation” (Axi), and “Notes About Wireless Communication Functions” (A32) when using or storing the device. The Camera Do Not Apply Strong Impact to the Camera The product may malfunction if subjected to strong shock or vibration. In addition, do not touch or apply force to the lens.
The Battery Precautions for Use • Note that the battery may become hot after use. • Do not use the battery at ambient temperatures below 0°C (32°F) or above 40°C (104°F) as this could cause damage or malfunction. • If you notice any abnormalities such as excessive heat, smoke, or an unusual smell coming from the battery, immediately discontinue use and consult your retailer or Nikonauthorized service representative.
Charging an Exhausted Battery Turning the camera on or off while an exhausted battery is inserted in the camera may result in reduced battery life. Charge the exhausted battery before use. Storing the Battery • Always remove the battery from the camera or optional battery charger when it is not being used. Minute amounts of current are drawn from the battery while it is in the camera, even when not in use. This may result in excessive battery drain and complete loss of function.
Cleaning and Storage Cleaning after Using the Camera Underwater Follow the procedure below to rinse the camera with fresh water within 60 minutes after using it underwater or at the beach. The underwater lens protectors are used here as an example. 1. Check that the battery-chamber/memory card slot cover is securely closed (locked).
Cleaning after Using the Camera in Conditions Other than Underwater Use a blower or air duster to remove any dust or lint that adheres to the lenses, lens protectors, silicone jacket, camera body, special accessories, etc. To remove fingerprints or other stains, gently wipe the parts with a soft dry cloth. If you wipe with too much pressure or with a rough cloth, it may damage the camera or cause a malfunction.
Troubleshooting If the camera fails to function as expected, check the list of common problems below before consulting your retailer or Nikon-authorized service representative. Also, refer to the Reference Manual (PDF format) (Avi). Camera Issues Problem A Cause/Solution The camera is on but does not respond. • Wait for recording to end. • If the problem persists, turn the camera off.
Problem Cause/Solution • The battery is exhausted. • Out of memory. Insert a memory card with sufficient free space. • The camera has run out of file numbers. Change the The camera beeps memory card, or format the memory card. three times. • An error occurred while accessing the memory card. - Use an approved memory card. - Check that the terminals are clean. - Confirm that the memory card is correctly inserted.
Trademark Information • Windows is either a registered trademark or trademark of Microsoft Corporation in the United States and/or other countries. • The Bluetooth® word mark and logos are registered trademarks owned by Bluetooth SIG, Inc. and any use of such marks by Nikon Corporation is under license. • Apple®, App Store®, the Apple logos, Mac, OS X, iPhone®, iPad®, iPod touch® and iBooks are trademarks or registered trademarks of Apple Inc., in the U.S. and other countries.
“Made for iPod,” “Made for iPhone,” and “Made for iPad” mean that an electronic accessory has been designed to connect specifically to iPod, iPhone, or iPad, respectively, and has been certified by the developer to meet Apple performance standards. Apple is not responsible for the operation of this device or its compliance with safety and regulatory standards. Please note that the use of this accessory with iPod, iPhone, or iPad may affect wireless performance.
Technical Notes 43
44 Technical Notes
Technical Notes 45
No reproduction in any form of this manual, in whole or in part (except for brief quotation in critical articles or reviews), may be made without written authorization from NIKON CORPORATION.