
User Manual

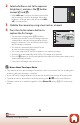
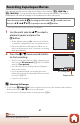
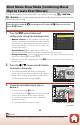


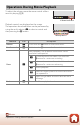

Table Of Contents
- Quick Topic Search
- Introduction
- Parts of the Camera
- Getting Started
- Basic Shooting and Playback Operations
- Shooting Features
- Selecting a Shooting Mode
- Scene Auto Selector Mode
- Scene Mode (Shooting Suited to the Shooting Conditions)
- Creative Mode (Applying Effects When Shooting)
- Smart Portrait Mode (Enhancing Human Faces When Shooting)
- Auto Mode
- Setting Shooting Functions with the Multi Selector
- Flash Mode
- Self-timer
- Macro Mode (Taking Close-up Pictures)
- Exposure Compensation (Adjusting Brightness)
- Using the Zoom
- Focusing
- Default Settings (Flash, Self-timer, and Macro Mode)
- Functions That Cannot Be Used Simultaneously When Shooting
- Playback Features
- Playback Zoom
- Thumbnail Playback/Calendar Display
- List by Date Mode
- Viewing and Deleting Images in a Sequence
- Editing Images (Still Images)
- Before Editing Images
- Quick Effects: Changing Hue or Mood
- Quick Retouch: Enhancing Contrast and Saturation
- D-Lighting: Enhancing Brightness and Contrast
- Red-eye Correction: Correcting Red-eye When Shooting with the Flash
- Glamour Retouch: Enhancing Human Faces
- Data Imprint: Imprinting Information Such as Electronic Compass Heading on Images
- Small Picture: Reducing the Size of an Image
- Crop: Creating a Cropped Copy
- Movies
- Using Location Data Functions
- Connecting the Camera to a TV, Printer, or Computer
- Using the Menu
- Menu Operations
- Menu Lists
- The Shooting Menu (The Common Shooting Options)
- The Shooting Menu (for Auto Mode)
- The Smart Portrait Menu
- The Movie Menu
- The Playback Menu
- The Network Menu
- The Location Data Options Menu
- The Setup Menu
- Time Zone and Date
- Monitor Settings
- Date Stamp
- Photo VR
- AF Assist
- Digital Zoom
- Sound Settings
- Underwater Flash
- Action Control Response
- Playback Action Control
- Auto Off
- LED Light Timer
- Format Card/Format Memory
- Language
- Image Comment
- Copyright Information
- Charge by Computer
- Reset All
- Conformity Marking
- Firmware Version
- Technical Notes

84
Movies
Capturing Still Images While Recording Movies
If the shutter-release button is pressed all the way
while recording a movie, one frame is saved as a still
image. Movie recording continues while the still image
is being saved.
• A still image can be captured when y is displayed
on the screen. When z is displayed, a still image
cannot be captured.
• The size of the captured still image is determined by
the movie image size (A140).
B Notes About Capturing Still Images During Movie Recording
• Still images cannot be saved during movie recording in the following situations:
- When movie recording is paused
- When the remaining movie recording time is less than five seconds
- When Movie options (A140) is set to d 2160/30p (4K UHD), c 2160/25p (4K
UHD), g 480/30p, W 480/25p, or HS movie
• The frames of a movie that were recorded when a still image was being captured may not
play back smoothly.
• The sounds of operating the shutter-release button when saving a still image may be
heard in the recorded movie.
• If the camera moves when the shutter-release button is pressed, the image may be
blurred.
Capturing Still Images While Recording Movies
1 4 m 3 0 s
14m30s
AE-LAE-L