
User's Manual


85
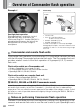
z Details on Commander flash
operation and shooting procedures
5
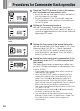
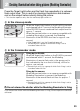
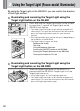
Setting a channel number on the Commander unit.
Set the communication channel through which the
Commander and remote flash units exchange
data.
• Select one of the four available channels. The same
channel number is set to all groups A, B and C.
• Press the [SEL](FUNC.) button to display the channel
number (blinking). Press the [W] or [X] button to
change the channel number. Press the [SEL](FUNC.)
button once again and the channel number will stop
blinking. The last channel number to blink is the one
that has been set automatically.
• The channel number blinks during adjustment and
stops after blinking six times unless an adjustment is
made. The last channel number to blink is the one that
has been automatically set.
6
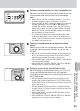
Setting a channel number on the remote flash
unit(s)
Select one of the four available channels. Be sure
to set the same channel number as set on the
SU-800.
• Be sure to set the channel number of the remote flash
unit(s) to 3 when using a Nikon D70-Series camera,
otherwise the remote flash unit(s) will not fire.
• With the SB-R200, rotate the [CHANNEL] select dial to
set the channel number.
• With the SB-910, SB-900, SB-800, SB-700 or SB-600,
read the user’s manual for each model.
7
Setting a group on the remote flash unit(s)
Set the group of remote flash unit(s) to A, B or C.
Once set, the remote flash units will operate
according to the controls for each group as set on
the Commander.
• Set the group of the remote unit(s) to group A or B
when using a Nikon D800-Series, D700, D300-Series,
D200, D90, D80 or D7000 camera, otherwise the flash
unit(s) will not fire.
• Set the group of the remote unit(s) to group A when
using a Nikon D70-Series camera, otherwise the flash
unit(s) will not fire.
• With the SB-R200, rotate the [GROUP] select dial to
set the group name.
• With the SB-910, SB-900, SB-800, SB-700 or SB-600,
read the user’s manual for each model.
CHANNEL
2
34
1
GROUP
A
B
C