
Reference Manual (complete instructions)


15
Getting Started
Camera Setup
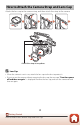
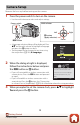
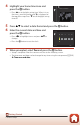
4 Highlight your home time zone and
press the k button.
• Press H to set daylight saving time. When it is on,
the time is one hour earlier and W is displayed at
the top of the map. Press I to turn daylight saving
time off.
5 Press HI to select a date format and press the k button.
6 Enter the current date and time and
press the k button.
• Press JK to highlight items and press HI to
change.
• Press the k button to set the clock.
7 When prompted, select Yes and press the k button.
• Setup is complete when the camera switches to the shooting screen.
• The time zone and date can be changed at any time using the setup menu (A103)
M Time zone and date.
Back
London, Casablanca
Edit
Date and time
YMDhm
201601
01
00 00