
Reference Manual
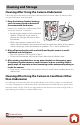
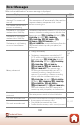

Table Of Contents
- Quick Topic Search
- Introduction
- Parts of the Camera
- Getting Started
- Basic Shooting and Playback Operations
- Shooting Features
- Selecting a Shooting Mode
- Scene Auto Selector Mode
- Scene Mode (Shooting Suited to the Shooting Conditions)
- Creative Mode (Applying Effects When Shooting)
- Smart Portrait Mode (Enhancing Human Faces When Shooting)
- Auto Mode
- Setting Shooting Functions with the Multi Selector
- Flash Mode
- Self-timer
- Macro Mode (Taking Close-up Pictures)
- Exposure Compensation (Adjusting Brightness)
- Using the Zoom
- Focusing
- Default Settings (Flash, Self-timer, and Macro Mode)
- Functions That Cannot Be Used Simultaneously When Shooting
- Playback Features
- Playback Zoom
- Thumbnail Playback/Calendar Display
- List by Date Mode
- Viewing and Deleting Images in a Sequence
- Editing Images (Still Images)
- Before Editing Images
- Quick Effects: Changing Hue or Mood
- Quick Retouch: Enhancing Contrast and Saturation
- D-Lighting: Enhancing Brightness and Contrast
- Red-eye Correction: Correcting Red-eye When Shooting with the Flash
- Glamour Retouch: Enhancing Human Faces
- Data Imprint: Imprinting Information Such as Electronic Compass Heading on Images
- Small Picture: Reducing the Size of an Image
- Crop: Creating a Cropped Copy
- Movies
- Using Location Data Functions
- Connecting the Camera to a TV, Printer, or Computer
- Using the Menu
- Menu Operations
- Menu Lists
- The Shooting Menu (The Common Shooting Options)
- The Shooting Menu (for Auto Mode)
- The Smart Portrait Menu
- The Movie Menu
- The Playback Menu
- The Network Menu
- The Location Data Options Menu
- The Setup Menu
- Time Zone and Date
- Monitor Settings
- Date Stamp
- Photo VR
- AF Assist
- Digital Zoom
- Sound Settings
- Underwater Flash
- Action Control Response
- Playback Action Control
- Auto Off
- LED Light Timer
- Format Card/Format Memory
- Language
- Image Comment
- Copyright Information
- Charge by Computer
- Reset All
- Conformity Marking
- Firmware Version
- Technical Notes

191
Technical Notes
Error Messages
Card is not formatted.
Format card?
The memory card has not been formatted for
use in the camera.
Formatting deletes all data saved on the
memory card. If you need to keep copies of any
images, make sure to select No and save the
copies to a computer or other medium before
formatting the memory card. Select Yes and
press the k button to format the memory card.
187
Out of memory. Delete images or insert a new memory card. 11, 22
Image cannot be saved.
An error occurred while saving the image.
Insert a new memory card or format the memory
card or internal memory.
172
The camera has run out of file numbers.
Insert a new memory card or format the memory
card or internal memory.
172
There is insufficient space to save the copy.
Delete images from the destination.
22
Save previously recorded
data as a time-lapse movie?
The camera turned off while recording a time-
lapse movie.
• Select Yes to create a time-lapse movie with the
previously captured images.
• Select No to delete the incomplete data.
–
Image cannot be modified. Check that the images can be edited. 72, 199
Cannot record movie.
A time-out error occurred while saving the
movie on the memory card.
Select a memory card with a faster write speed.
82, 217
Memory contains no
images.
There are no images in the internal memory or
on the memory card.
• Remove the memory card to play back images
in the internal memory.
• To copy the images saved in the camera’s
internal memory to the memory card, press
the d button to select Copy in the
playback menu.
12
151
File contains no image data.
The file was not created or edited with this camera.
The file cannot be viewed on this camera.
View the file using a computer or the device
used to create or edit this file.
–
All images are hidden.
There are no images available for a slide show,
etc.
149
Display Cause/Solution
A