
Reference Manual
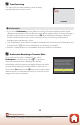
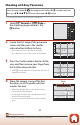
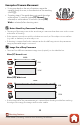

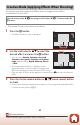
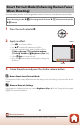
Table Of Contents
- Quick Topic Search
- Introduction
- Parts of the Camera
- Getting Started
- Basic Shooting and Playback Operations
- Shooting Features
- Selecting a Shooting Mode
- Scene Auto Selector Mode
- Scene Mode (Shooting Suited to the Shooting Conditions)
- Creative Mode (Applying Effects When Shooting)
- Smart Portrait Mode (Enhancing Human Faces When Shooting)
- Auto Mode
- Setting Shooting Functions with the Multi Selector
- Flash Mode
- Self-timer
- Macro Mode (Taking Close-up Pictures)
- Exposure Compensation (Adjusting Brightness)
- Using the Zoom
- Focusing
- Default Settings (Flash, Self-timer, and Macro Mode)
- Functions That Cannot Be Used Simultaneously When Shooting
- Playback Features
- Playback Zoom
- Thumbnail Playback/Calendar Display
- List by Date Mode
- Viewing and Deleting Images in a Sequence
- Editing Images (Still Images)
- Before Editing Images
- Quick Effects: Changing Hue or Mood
- Quick Retouch: Enhancing Contrast and Saturation
- D-Lighting: Enhancing Brightness and Contrast
- Red-eye Correction: Correcting Red-eye When Shooting with the Flash
- Glamour Retouch: Enhancing Human Faces
- Data Imprint: Imprinting Information Such as Electronic Compass Heading on Images
- Small Picture: Reducing the Size of an Image
- Crop: Creating a Cropped Copy
- Movies
- Using Location Data Functions
- Connecting the Camera to a TV, Printer, or Computer
- Using the Menu
- Menu Operations
- Menu Lists
- The Shooting Menu (The Common Shooting Options)
- The Shooting Menu (for Auto Mode)
- The Smart Portrait Menu
- The Movie Menu
- The Playback Menu
- The Network Menu
- The Location Data Options Menu
- The Setup Menu
- Time Zone and Date
- Monitor Settings
- Date Stamp
- Photo VR
- AF Assist
- Digital Zoom
- Sound Settings
- Underwater Flash
- Action Control Response
- Playback Action Control
- Auto Off
- LED Light Timer
- Format Card/Format Memory
- Language
- Image Comment
- Copyright Information
- Charge by Computer
- Reset All
- Conformity Marking
- Firmware Version
- Technical Notes

40
Shooting Features
Creative Mode (Applying Effects When Shooting)
The camera saves four images with effects and one image without effects
simultaneously in one shot.
• The camera focuses in the center of the frame.
1 Press the k button.
• The effect selection screen is displayed.
2 Use the multi selector HI to select the
desired effect, and press the k button.
• You can select Variety, Selective color (red),
Selective color (green), Selective color (blue),
Light (default setting), Depth, Memory, Classic,
or Noir.
• The image without effects is displayed on the
upper part of the screen. Four types of images with
effects are displayed on the lower part of the screen.
• Only one type of effect can be applied to a movie. Press JK to select the desired
effect.
3 Press the shutter-release button or b (e movie-record) button
to shoot.
• The five saved images are treated as a sequence. One image with an applied effect
is used as the key picture (A70).
Creative Mode (Applying Effects When Shooting)
Enter shooting mode M A (shooting mode) button M s Creative mode M
k button
Select eect
Variety
2 5 m 0 s
25m 0s
5 0 0
500
1 5m
15m
1 010 h Pa
1010hPa
Select eect
Variety
2 5 m 0 s
25m 0s
5 0 0
500