No reproduction in any form of this manual, in whole or in part (except for brief quotation in critical articles or reviews), may be made without written authorization from NIKON CORPORATION. DIGITAL CAMERA User's Manual Nikon User Support Visit the site below to register your camera and keep up-to-date with the latest product information. You will find answers to frequently asked questions (FAQs) and can contact us for technical assistance. http://www.europe-nikon.
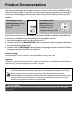
Product Documentation The documentation for this product consists of a User’s Manual (this booklet) and a Reference Manual (pdf ). To get the most from your camera, please be sure to read all instructions thoroughly and keep them where they will be read by all who use the product. For information on basic camera operations, see the User’s Manual (this booklet). For complete product information, see the Reference Manual (available on the supplied reference CD).
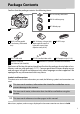
Package Contents Confirm that the package contains the following items: BS-1 accessory shoe cover DK-20 rubber eyecup BF-1B body cap D5200 camera EN-EL14 rechargeable Li-ion battery (with terminal cover) MH-24 battery charger (plug adapter supplied in countries or regions where required; shape depends on country of sale) AN-DC3 strap UC-E17 USB cable EG-CP16 audio/video cable DK-5 eyepiece cap (0 29) ViewNX 2 CD-ROM User’s Manual (this booklet) Reference CD (contains the Reference Manual) Purchase
Table of Contents Package Contents ............................................................................................................................... i For Your Safety...................................................................................................................................iv Notices ...................................................................................................................................................
P, S, A, and M Modes 42 Mode P (Programmed Auto) ..............................................................................................43 Mode S (Shutter-Priority Auto) ..........................................................................................43 Mode A (Aperture-Priority Auto).......................................................................................43 Mode M (Manual)........................................................................................................
For Your Safety To prevent damage to your Nikon product or injury to yourself or to others, read the following safety precautions in their entirety before using this equipment. Keep these safety instructions where all those who use the product will read them. The consequences that could result from failure to observe the precautions listed in this section are indicated by the following symbol: A This icon marks warnings. To prevent possible injury, read all warnings before using this Nikon product.
A Observe proper precautions when handling the charger • Keep dry. Failure to observe this precaution could result in fire or electric shock. • Do not short the charger terminals. Failure to observe this precaution could result in overheating and damage to the charger. • Dust on or near the metal parts of the plug should be removed with a dry cloth. Continued use could result in fire. • Do not go near the charger during thunderstorms. Failure to observe this precaution could result in electric shock.
Notices for Customers in the U.S.A. The Battery Charger IMPORTANT SAFETY INSTRUCTIONS—SAVE THESE INSTRUCTIONS DANGER—TO REDUCE THE RISK OF FIRE OR ELECTRIC SHOCK, CAREFULLY FOLLOW THESE INSTRUCTIONS For connection to a supply not in the U.S.A., use an attachment plug adapter of the proper configuration for the power outlet if needed. This power unit is intended to be correctly oriented in a vertical or floor mount position.
Notice Concerning Prohibition of Copying or Reproduction Note that simply being in possession of material that has been digitally copied or reproduced by means of a scanner, digital camera, or other device may be punishable by law. • Items prohibited by law from being copied or reproduced Do not copy or reproduce paper money, coins, securities, government bonds, or local government bonds, even if such copies or reproductions are stamped “Sample.
Use Only Nikon Brand Electronic Accessories Nikon cameras are designed to the highest standards and include complex electronic circuitry. Only Nikon brand electronic accessories (including chargers, batteries, AC adapters, and flash accessories) certified by Nikon specifically for use with this Nikon digital camera are engineered and proven to operate within the operational and safety requirements of this electronic circuitry.
XIntroduction Getting to Know the Camera X Take a few moments to familiarize yourself with camera controls and displays. You may find it helpful to bookmark this section and refer to it as you read through the rest of the manual. The Camera Body 32 1 14 24 4 5 6 7 8 9 12 25 15 16 5 26 17 27 18 28 19 29 20 30 10 11 13 21 22 23 1 Mode dial...................................3 2 Live view switch Live view ..............................45 Movie....................................
1 7 8 9 10 2 11 12 13 14 15 16 17 18 3 4 X 5 21 19 20 6 1 Viewfinder eyepiece......... 4, 29 2 Rubber eyecup ...................... 29 3 G button Menus .................................. 65 4 Infrared receiver for ML-L3 remote control (rear)..........28 5 Monitor Viewing settings...................6 Live view ............................. 45 Full-frame playback.......... 24 6 Tripod socket 7 Diopter adjustment control .................................. 10 8 P (information edit) button ............
The Mode Dial The camera offers a choice of the following shooting modes: P, S, A, and M Modes Select these modes for full control over camera settings. • P—Programmed auto (0 42, 43) • S—Shutter-priority auto (0 42, 43) • A—Aperture-priority auto (0 42, 43) • M—Manual (0 42, 43) Special Effects Modes Use special effects during shooting.
The Viewfinder X 1 2 3 78 4 5 6 1 Framing grid (displayed when On is selected for Custom Setting d2) 2 Focus points ........................... 33 3 AF area brackets..............10, 15 4 Low battery warning............ 14 5 Monochrome indicator (displayed when the Monochrome Picture Control or a Picture Control based on Monochrome is selected) 6 “No memory card” indicator..................................8 7 Focus indicator ......................
The Monitor The monitor can be angled and rotated as shown below. X 180° 90° 180° Normal use Fold the monitor against the camera face out. This position is recommended for normal photography. Low-angle shots Frame live view shots with the camera close to the ground. High-angle shots Frame live view shots while holding the camera over your head. Self-portraits Use for self-portraits in live view. The monitor shows a mirror image of what will appear in the final picture.
The Information Display X Camera settings can be viewed and adjusted in the information display. Press the P button once to view settings, and again to make changes to settings. Highlight items using the multi selector and press J to view options for the highlighted item. P button 1 6 7 8 9 10 11 12 13 14 21 22 34 33 23 24 25 26 27 32 31 30 29 28 2 3 15 4 5 16 17 18 20 19 1 Shooting mode i auto/ j auto (flash off).............. 15 Scene modes......................
First Steps Always turn the camera off before inserting or removing batteries or memory cards. 1 Attach the strap. Attach the strap securely to the two eyelets on the camera body as shown below. 2 X Charge the battery. If a plug adapter is supplied, raise the wall plug and connect the plug adapter as shown below at left, making sure the plug is fully inserted. Insert the battery and plug the charger in. An exhausted battery will fully charge in about 1 hour and 30 minutes.
4 Insert a memory card (available separately). Check to be sure the card is in the correct orientation and then slide the card until it clicks into place. 8GB X 5 Attach a lens. Be careful to prevent dust from entering the camera when the lens or body cap is removed. Mounting mark (lens; indicated by white dot) Mounting mark (camera) Keeping marks (white dots) aligned, position lens on camera, then rotate until lens clicks into place. Mounting mark (lens) Autofocus is available with AF-S lenses.
6 Open the monitor. Open the monitor as shown. Do not use force. X 7 Turn the camera on. A language-selection dialog will be displayed. A Lenses with Retractable Lens Barrel Buttons Before using the camera, unlock and extend the zoom ring. Keeping the retractable lens barrel button pressed (q), rotate the zoom ring as shown (w).
8 Choose a language and set the camera clock. Move cursor up J button: select highlighted item Use the multi selector and J button to select a language and set the camera clock.
D During Charging Do not move the charger or touch the battery during charging. Failure to observe this precaution could in very rare instances result in the charger showing that charging is complete when the battery is only partially charged. Remove and reinsert the battery to begin charging again. D Charging the Battery Read and follow the warnings and cautions on pages iv–v and 79–81 of this manual. Charge the battery indoors at ambient temperatures of 5 °C–35 °C (41°F–95 °F).
D X Memory Cards • Memory cards may be hot after use. Observe due caution when removing memory cards from the camera. • Turn the power off before inserting or removing memory cards. Do not remove memory cards from the camera, turn the camera off, or remove or disconnect the power source during formatting or while data are being recorded, deleted, or copied to a computer. Failure to observe these precautions could result in loss of data or in damage to the camera or card.
D CPU Lenses with Aperture Rings In the case of CPU lenses equipped with an aperture ring (0 75), lock aperture at the minimum setting (highest f-number). A Detaching the Lens Be sure the camera is off when removing or exchanging lenses. To remove the lens, press and hold the lens release button (q) while turning the lens clockwise (w). After removing the lens, replace the lens caps and camera body cap.
s Basic Photography Battery Level and Card Capacity s Before shooting, check the battery level and number of exposures remaining. 1 Turn the camera on. 2 Check the battery level. Check the battery level in the information display (if the battery is low, a warning will also be displayed in the viewfinder). If the monitor is off, press the P button to view the information display; if the monitor does not turn on, the battery is exhausted and must be recharged.
“Point-and-Shoot” Photography (i and j Modes) This section describes how to take photographs in i and j modes, automatic “point-and-shoot” modes in which the majority of settings are controlled by the camera in response to shooting conditions. 1 s Turn the camera on. Remove the lens cap and turn the camera on. The information display will appear in the monitor. 2 Select i or j mode.
5 Press the shutter-release button halfway. Press the shutter-release button halfway to focus. The active focus point will be displayed. If the subject is poorly lit, the flash may pop up and the AF-assist illuminator may light. 6 s Check the indicators in the viewfinder. Focus point When the focus operation is complete, a beep will sound (a beep may not sound if the subject is moving) and the in-focus indicator (I) will appear in the viewfinder. In-focus indicator Description I Subject in focus.
7 Shoot. Smoothly press the shutter-release button the rest of the way down to release the shutter and record the photograph. The memory card access lamp will light and the photograph will be displayed in the monitor for a few seconds (the photo will automatically clear from the display when the shutter-release button is pressed halfway). Do not eject the memory card or remove or disconnect the power source until the lamp has gone out and recording is complete.
A The Shutter-Release Button The camera has a two-stage shutter-release button. The camera focuses when the shutterrelease button is pressed halfway. To take the photograph, press the shutter-release button the rest of the way down. s Focus: press halfway Shoot: press all the way down A The Standby Timer The viewfinder and information display will turn off if no operations are performed for about eight seconds, reducing the drain on the battery.
Creative Photography (Scene Modes) The camera offers a choice of “scene” modes. Choosing a scene mode automatically optimizes settings to suit the selected scene, making creative photography as simple as selecting a mode, framing a picture, and shooting as described on pages 15–16. The Mode Dial The following scenes can be selected with the mode dial: Mode dial s k Portrait Use for portraits with soft, natural-looking skin tones.
p Child Use for snapshots of children. Clothing and background details are vividly rendered, while skin tones remain soft and natural. s m Sports Fast shutter speeds freeze motion for dynamic sports shots in which the main subject stands out clearly. The built-in flash and AF-assist illuminator turn off. n Close up Use for close-up shots of flowers, insects, and other small objects (a macro lens can be used to focus at very close ranges). Use of a tripod is recommended to prevent blur.
Other Scenes The following scenes can be selected by rotating the mode dial to h and rotating the command dial until the desired scene appears in the monitor. Mode dial Command dial Monitor s o Night Portrait Use for a natural balance between the main subject and the background in portraits taken under low light. Use of a tripod is recommended to prevent blur. r Night Landscape Reduce noise and unnatural colors when photographing night landscapes, including street lighting and neon signs.
t Beach/Snow Capture the brightness of sunlit expanses of water, snow, or sand. The built-in flash and AF-assist illuminator turn off. s u Sunset Preserves the deep hues seen in sunsets and sunrises. The built-in flash and AFassist illuminator turn off; use of a tripod is recommended to prevent blur when lighting is poor. v Dusk/Dawn Preserves the colors seen in the weak natural light before dawn or after sunset.
x Candlelight For photographs taken by candlelight. The built-in flash turns off; use of a tripod is recommended to prevent blur when lighting is poor. s y Blossom Use for fields of flowers, orchards in bloom, and other landscapes featuring expanses of blossoms. The built-in flash turns off; use of a tripod is recommended to prevent blur when lighting is poor. z Autumn Colors Captures the brilliant reds and yellows in autumn leaves.
I Playback and Deletion Photographs are automatically displayed for a few seconds after shooting. If no photograph is displayed in the monitor, the most recent picture can be viewed by pressing the K button. Viewing Photographs I 1 Press the K button. A photograph will be displayed in the monitor. K button 2 View additional pictures. Additional pictures can be displayed by pressing 4 or 2 or rotating the command dial.
❚❚ Thumbnail Playback Use the multi selector or command dial to highlight images and press J to display the highlighted image full frame. Press X to reduce the number of images displayed. W (Q) button ❚❚ Calendar Playback Press the W (Q) button to toggle between the date list and the list of thumbnails for the selected date. Use the multi selector to highlight dates in the date list or to highlight pictures in the thumbnail list. Press X when the cursor is in the date list to return to 72-frame playback.
z More on Photography (All Modes) Single-Frame, Continuous, Self-timer, Remote, and Quiet Release Modes Choose from the following release modes: Mode Description 8 Single frame: Camera takes one photograph each time shutter-release button is pressed. z Continuous L (continuous low speed): The camera takes photographs at about 3 frames per second (fps) while the shutter-release button is pressed.
A The Memory Buffer The camera is equipped with a memory buffer for temporary storage, allowing shooting to continue while photographs are being saved to the memory card. Up to 100 photographs can be taken in succession; note, however, that frame rate will drop when the buffer is full. While photographs are being recorded to the memory card, the memory card access lamp will light (0 17).
Self-Timer and Remote Control Modes The self-timer and optional ML-L3 remote control (0 77) allow the photographer to be at a distance from the camera when a photo is taken. 1 Mount the camera on a tripod. Mount the camera on a tripod or place the camera on a stable, level surface. 2 Select a release mode.
❚❚ Using Optional WR-R10 and WR-T10 Wireless Remote Controllers (0 77) When a WR-T10 is used in combination with a WR-R10, the shutter-release button on the WR-T10 performs the same functions as the camera shutter-release button, allowing wireless remote control continuous and self-timer photography. For more information, see the manual provided with the WR-R10/WR-T10.
Focus This section describes the focus options available when photographs are framed in the viewfinder. Focus can be adjusted automatically or manually (see “Focus Mode,” below), and the focus point for automatic or manual focus can be selected using the multi selector. Focus Mode Choose from the following focus modes. Note that AF-S and AF-C are available only in modes P, S, A, and M.
A Predictive Focus Tracking In AF-C mode or when continuous-servo autofocus is selected in AF-A mode, the camera will initiate predictive focus tracking if the subject moves toward the camera while the shutterrelease button is pressed halfway. This allows the camera to track focus while attempting to predict where the subject will be when the shutter is released.
AF-Area Mode Choose how the focus point for autofocus is selected. Note that d (dynamic-area) and f (3D-tracking) AF-area modes are not available when AF-S is selected for focus mode. Option z Description User selects focus point using multi selector (0 33); camera focuses c Single-point AF on subject in selected focus point only. Use with stationary subjects.
3 Choose an AF-area mode. Highlight an option and press J. To return to shooting mode, press the shutter-release button halfway. Focus Point Selection In manual focus mode or when autofocus is combined with AF-area modes other than e (Auto-area AF), you can choose from 39 focus points, making it possible to compose photographs with the main subject almost anywhere in the frame. 1 2 Choose an AF-area mode other than e (Auto-area AF; 0 32). z Select the focus point.
Image Quality and Size Together, image quality and size determine how much space each photograph occupies on the memory card. Larger, higher quality images can be printed at larger sizes but also require more memory, meaning that fewer such images can be stored on the memory card. Image Quality Choose a file format and compression ratio (image quality).
Image Size Choose a size for JPEG images (this option is not available for RAW-quality images; 0 34). Size (pixels) Print size (cm/in.) * # Large 6000 × 4000 50.8 × 33.9/20 × 13.3 $ Medium 4496 × 3000 38.1 × 25.4/15.0 × 10 % Small 2992 × 2000 25.3 × 16.9/10 × 6.7 * Approximate size when printed at 300 dpi. Print size in inches equals image size in pixels divided by printer resolution in dots per inch (dpi; 1 inch=approximately 2.54 cm). Image size 1 Place the cursor in the information display.
Using the Built-in Flash The camera supports a variety of flash modes for photographing poorly lit or backlit subjects. ❚❚ Using the Built-in Flash: i, k, p, n, o, s, w, and g Modes 1 Choose a flash mode (0 37). 2 Take pictures. The flash will pop up as required when the shutter-release button is pressed halfway, and fire when a photograph is taken. If the flash does not pop up automatically, DO NOT attempt to raise it by hand. Failure to observe this precaution could damage the flash.
Flash Mode The flash modes available vary with shooting mode: i, k, p, n, s, w, g No Auto Njo Auto+red-eye reduction j Flash off N Nj Njp Np Nt 1 o Auto slow sync+ Njr red-eye reduction Nr j 0 Fill flash N Auto slow sync Flash off P, A Fill flash Red-eye reduction Slow sync+red-eye reduction Slow sync N Nj Nq S, M Fill flash Red-eye reduction Rear-curtain sync z Rear-curtain+slow sync Place the cursor in the information display.
A Flash Modes The flash modes listed on the previous page may combine one or more of the following settings, as shown by the flash mode icon: • AUTO (auto flash): When lighting is poor or subject is backlit, flash pops up automatically when shutter-release button is pressed halfway and fires as required. • j (red-eye reduction): Use for portraits. Red-eye reduction lamp lights before flash fires, reducing “red-eye.” • j (off): Flash does not fire even when lighting is poor or subject is backlit.
ISO Sensitivity “ISO sensitivity” is the digital equivalent of film speed. The higher the ISO sensitivity, the less light needed to make an exposure, allowing higher shutter speeds or smaller apertures, but the more likely the image is to be affected by noise (randomly-spaced bright pixels, fog, or lines; noise is particularly likely at settings between Hi 0.3 (equivalent to ISO 8000) and Hi 2 (equivalent to ISO 25600)).
Interval Timer Photography The camera is equipped to take photographs automatically at preset intervals. D Before Shooting Before beginning interval timer photography, take a test shot at current settings and view the results in the monitor. To ensure that shooting starts at the desired time, select Time zone and date in the setup menu and check that the camera clock is set correctly (0 66). Use of a tripod is recommended. Mount the camera on a tripod before shooting begins.
4 Choose the number of intervals. Press 4 or 2 to highlight number of intervals (i.e., the number of times the camera shoots); press 1 or 3 to change. Press 2 to continue. 5 Start shooting. Highlight On and press J (to return to the shooting menu without starting the interval timer, highlight Off and press J). The first series of shots will be taken at the specified starting time, or after about 3 s if Now was selected for Choose start time in Step 2.
t P, S, A, and M Modes P, S, A, and M modes offer different degrees of control over shutter speed and aperture: Mode Description Camera sets shutter speed and aperture for optimal exposure. Programmed auto Recommended for snapshots and in other situations in which (0 43) there is little time to adjust camera settings. Shutter-priority auto User chooses shutter speed; camera selects aperture for best (0 43) results. Use to freeze or blur motion.
Mode P (Programmed Auto) In this mode, the camera automatically adjusts shutter speed and aperture for optimal exposure in most situations. User can rotate command dial to choose from different combinations of shutter speed and aperture that will produce optimal exposure. Command dial Mode S (Shutter-Priority Auto) In shutter-priority auto, you choose the shutter speed while the camera automatically selects the aperture that will produce the optimal exposure.
Exposure Compensation (Mode P, S, A, and % Only) Exposure compensation is used to alter exposure from the value suggested by the camera, making pictures brighter or darker. Choose from values between –5 EV (underexposure) and +5 EV (overexposure) in increments of 1/3 EV. In general, positive values make the subject brighter while negative values make it darker. 1 Place the cursor in the information display. If shooting information is not displayed in the monitor, press the P button.
xLive View Framing Photographs in the Monitor Follow the steps below to take photographs in live view. 1 Rotate the live view switch. The mirror will be raised and the view through the lens will be displayed in the camera monitor. The subject will no longer be visible in the viewfinder. Live view switch 2 Position the focus point. Position the focus point over your subject as described on page 48. x Focus point 3 Focus. Press the shutter-release button halfway.
Focusing in Live View Follow the steps below to choose focus and AF-area modes and position the focus point. ❚❚ Choosing a Focus Mode The following focus modes are available in live view (note that full-time–servo AF is not available in g and ( modes): Option Description For stationary subjects. Focus locks when shutter-release button is AF-S Single-servo AF pressed halfway. For moving subjects. Camera focuses continuously until shutterAF-F Full-time-servo AF release button is pressed.
❚❚ Choosing an AF-Area Mode In modes other than i, j, and (, the following AF-area modes can be selected in live view (note that subject-tracking AF is not available in %, g, and 3 modes): Option 6 7 8 9 1 Description The camera automatically detects and focuses on portrait Face-priority AF subjects. Use for portraits. Use for hand-held shots of landscapes and other non-portrait Wide-area AF subjects. Use the multi selector to select the focus point.
❚❚ Choosing the Focus Point The method for selecting the focus point for autofocus varies with the option selected for AF-area mode (0 47). 6 (face-priority AF): A double yellow border will be displayed when the camera detects a portrait subject (if multiple faces, up to a maximum of 35, are detected, the camera will focus on the closest subject; to choose a different subject, use the multi selector).
The Live View Display yu q w e r i o !0 t !1 !2 : Item Description q Shooting mode The mode currently selected with the mode dial. w “No movie” icon Indicates that movies can not be recorded. The amount of time remaining before live view ends automatically. Displayed if shooting will end in 30 s or less.
A Live View/Movie Recording Display Options Press the R button to cycle through display options as shown below.
D Shooting in Live View Mode To prevent light entering via the viewfinder from interfering with exposure, remove the rubber eyecup and cover the viewfinder with the supplied DK-5 eyepiece cap before shooting (0 29). Although they will not appear in the final picture, distortion may be visible in the monitor if the camera is panned horizontally or an object moves at high speed through frame. Bright light sources may leave after-images in the monitor when the camera is panned. Bright spots may also appear.
D Using Autofocus in Live View Autofocus is slower in live view and the monitor may brighten or darken while the camera focuses.
yRecording and Viewing Movies Recording Movies Movies can be recorded in live view mode. 1 Rotate the live view switch. The mirror is raised and the view through the lens is displayed in the monitor instead of the viewfinder. D The 0 Icon A 0 icon (0 49) indicates that movies can not be recorded. A Live view switch Before Recording Set aperture before recording in mode A or M. 2 Focus.
4 End recording. Press the movie-record button again to end recording. Recording will end automatically when the maximum length is reached, the memory card is full, another mode is selected, the lens is removed, or the monitor is closed (closing the monitor does not end recording on televisions or other external displays).
Movie Settings Use the Movie settings option in the shooting menu to adjust the following settings. • Frame size/frame rate, Movie quality: Choose from the following options.
• Manual movie settings: Choose On to allow manual adjustments to shutter speed and ISO sensitivity when the camera is in mode M. Shutter speed can be set to values as fast as 1/4000 s; the slowest speed available varies with the frame rate: 1/30 s for frame rates of 24p, 25p, and 30p, 1/50 s for 50i or 50p, and 1/60 s for 60i or 60p. ISO sensitivity can be set to values between ISO 100 and Hi 2 (0 39).
Viewing Movies Movies are indicated by a 1 icon in full-frame playback (0 24). Press J to start playback. 1 icon Length Current position/total length Volume Movie progress bar Guide The following operations can be performed: To Pause Play Advance/ rewind Skip 10 s Use Description Pause playback. Resume playback when movie is paused or during rewind/ advance.
% Special Effects Special effects can be used when recording images. Shooting with Special Effects The following effects can be selected by rotating the mode dial to q and rotating the command dial until the desired option appears in the monitor. Mode dial Command dial Monitor % A NEF (RAW) If NEF (RAW)+JPEG is selected for image quality in %, g, (, or 3 mode, only the JPEG images will be recorded (0 34).
% Night Vision Use under conditions of darkness to record monochrome images at high ISO sensitivities (with some noise in the form of randomly-spaced bright pixels, fog, or lines). Autofocus is available in live view only; manual focus can be used if the camera is unable to focus. The built-in flash and AF-assist illuminator turn off; use of a tripod is recommended to reduce blur. g Color Sketch The camera detects and colors outlines for a color sketch effect.
3 Selective Color All colors other than the selected colors are recorded in black and white. The effect can be chosen during live view (0 63). The built-in flash turns off; use of a tripod is recommended when lighting is poor. 1 Silhouette Silhouette subjects against bright backgrounds. The built-in flash turns off; use of a tripod is recommended when lighting is poor. 2 High Key Use with bright scenes to create bright images that seem filled with light. The built-in flash turns off.
Options Available in Live View ❚❚ g Color Sketch 1 Select live view. Rotate the live view switch to raise the mirror and display the view through the lens in the monitor. Live view switch 2 Adjust options. Press J to display the options shown at right (note that the options temporarily clear from the display during autofocus). Press 1 or 3 to highlight Vividness or Outlines and press 4 or 2 to change.
❚❚ ( Miniature Effect 1 Select live view. Rotate the live view switch to raise the mirror and display the view through the lens in the monitor. Live view switch 2 Position the focus point. Use the multi selector to position the focus point in the area that will be in focus and then press the shutter-release button halfway to focus (note that the options temporarily clear from the display during autofocus).
❚❚ 3 Selective Color 1 Select live view. Rotate the live view switch to raise the mirror and display the view through the lens in the monitor. Live view switch 2 Display options. Press J to display selective color options. 3 Select a color. Selected color Frame an object in the white square in the center of the display and press 1 to choose the color of the object as one that will remain in the final image (the camera may have difficulty detecting unsaturated colors; choose a saturated color).
6 Return to the live view display. Press J to return to live view. During shooting, only objects of the selected hues will be recorded in color; all others will be recorded in black-and-white. To exit live view, rotate the live view switch. The selected settings will continue in effect and will apply to photographs taken using the viewfinder.
UCamera Menus Most shooting, playback, and setup options can be accessed from the camera menus. To view the menus, press the G button. G button Tabs Choose from the following menus: • • • • D: Playback C: Shooting • A: Custom Settings • B: Setup N: Retouch m/O: Recent settings or My Menu (defaults to Recent settings) Slider shows position in current menu. Current settings are shown by icons. Menu options Options in current menu.
Menu Options ❚❚ D Playback Menu: Managing Images Delete Playback folder Playback display options Image review Rotate tall Slide show DPOF print order ❚❚ C Shooting Menu: Shooting Options Reset shooting menu Storage folder Image quality Image size White balance Set Picture Control Manage Picture Control Auto distortion control Color space Active D-Lighting HDR (high dynamic range) Long exposure NR High ISO NR ISO sensitivity settings Release mode Multiple exposure Interval timer shooting Movie settings
❚❚ N Retouch Menu: Creating Retouched Copies D-Lighting Red-eye correction Trim Monochrome Filter effects Color balance Image overlay NEF (RAW) processing Resize Quick retouch Straighten Distortion control Fisheye Color outline Color sketch Perspective control Miniature effect Selective color Edit movie ❚❚ m Recent Settings/O My Menu (Defaults to m Recent Settings) The recent settings menu lists the twenty most recently used settings.
Using Camera Menus The multi selector and J button are used to navigate the camera menus. Move cursor up J button: select highlighted item Cancel and return to previous menu Select highlighted item or display sub-menu Move cursor down Follow the steps below to navigate the menus. 1 Display the menus. Press the G button to display the menus. G button 2 Highlight the icon for the current menu. Press 4 to highlight the icon for the current menu. 3 U 68 Select a menu.
4 Position the cursor in the selected menu. Press 2 to position the cursor in the selected menu. 5 Highlight a menu item. Press 1 or 3 to highlight a menu item. 6 Display options. Press 2 to display options for the selected menu item. 7 Highlight an option. Press 1 or 3 to highlight an option. 8 Select the highlighted item. Press J to select the highlighted item. To exit without making a selection, press the G button.
Q ViewNX 2 Installing ViewNX 2 Install the supplied software to display and edit photographs and movies that have been copied to your computer. Before installing ViewNX 2, confirm that your computer meets the system requirements on page 71. The latest version of ViewNX 2 is available for download from the websites listed on page viii. 1 ViewNX 2TM Your Imaging Toolbox Start the computer and insert the installer CD.
4 Exit the installer. Windows Mac OS Click Yes Click OK The following software is installed: • ViewNX 2 5 A • Apple QuickTime (Windows only) Remove the installer CD from the CD-ROM drive. System Requirements CPU OS RAM Windows • Photos/JPEG movies: Intel Celeron, Pentium 4, or Core series, 1.6 GHz or better • H.264 movies (playback): 3.
Using ViewNX 2 Copy Pictures to the Computer 1 Choose how pictures will be copied to the computer. Choose one of the following methods: • Direct USB connection: Turn the camera off and ensure that the memory card is inserted in the camera. Connect the camera to the computer using the supplied UC-E17 USB cable and then turn the camera on. • SD card slot: If your computer is equipped with an SD card slot, the card can be inserted directly in the slot.
4 Terminate the connection. If the camera is connected to the computer, turn the camera off and disconnect the USB cable. If you are using a card reader or card slot, choose the appropriate option in the computer operating system to eject the removable disk corresponding to the memory card and then remove the card from the card reader or card slot. View Pictures Pictures are displayed in ViewNX 2 when transfer is complete.
n Technical Notes Read this chapter for information on compatible accessories, cleaning and storing the camera, and what to do if an error message is displayed or you encounter problems using the camera. Compatible Lenses Compatible CPU Lenses This camera supports autofocus with AF-S and AF-I CPU lenses only. AF-S lenses have names beginning with AF-S, AF-I lenses names beginning with AF-I. Autofocus is not supported with other autofocus (AF) lenses.
A Identifying CPU and Type G and D Lenses CPU lenses can be identified by the presence of CPU contacts, type G and D lenses by a letter on the lens barrel. Type G lenses are not equipped with a lens aperture ring.
Other Accessories At the time of writing, the following accessories were available for the D5200. Power sources Filters Viewfinder eyepiece accessories n Software Body cap 76 • Rechargeable Li-ion Battery EN-EL14 (0 7): Additional EN-EL14 batteries are available from local retailers and Nikon-authorized service representatives. EN-EL14a batteries can also be used. • Battery Charger MH-24 (0 7): Recharge EN-EL14a and EN-EL14 batteries.
• Wireless Remote Control ML-L3 (0 28): The ML-L3 uses a 3 V CR2025 battery. Remote controls/ wireless remote controllers Pressing the battery-chamber latch to the right (q), insert a fingernail into the gap and open the battery chamber (w). Ensure that the battery is inserted in the correct orientation (r). • Wireless Remote Controller WR-R10 */WR-T10: When a WR-R10 wireless remote controller is attached, the camera can be controlled wirelessly using a WR-T10 wireless remote controller (0 29).
Caring for the Camera Storage When the camera will not be used for an extended period, remove the battery and store it in a cool, dry area with the terminal cover in place. To prevent mold or mildew, store the camera in a dry, well-ventilated area.
Caring for the Camera and Battery: Cautions Caring for the Camera Do not drop: The product may malfunction if subjected to strong shocks or vibration. Keep dry: This product is not waterproof, and may malfunction if immersed in water or exposed to high levels of humidity. Rusting of the internal mechanism can cause irreparable damage.
Storage: To prevent mold or mildew, store the camera in a dry, well-ventilated area. If you are using an AC adapter, unplug the adapter to prevent fire. If the product will not be used for an extended period, remove the battery to prevent leakage and store the camera in a plastic bag containing a desiccant. Do not, however, store the camera case in a plastic bag, as this may cause the material to deteriorate.
• The internal temperature of the battery may rise while the battery is in use. Attempting to charge the battery while the internal temperature is elevated will impair battery performance, and the battery may not charge or charge only partially. Wait for the battery to cool before charging. • Continuing to charge the battery after it is fully charged can impair battery performance.
Error Messages This section lists the indicators and error messages that appear in the viewfinder and monitor. A Warning Icons A flashing d in the monitor or s in the viewfinder indicates that a warning or error message can be displayed in the monitor by pressing the W (Q) button. Indicator Monitor Lock lens aperture ring at minimum aperture (largest f/-number). 82 Solution B Set lens aperture ring to minimum aperture (highest (flashes) f-number). F/s • Attach non-IX NIKKOR lens.
Indicator Monitor — Subject is too bright Subject is too dark No Bulb in S mode Interval timer shooting — — Error. Press shutter release button again. Start-up error. Contact a Nikon-authorized service representative. Metering error Unable to start live view. Please wait for camera to cool. Viewfinder Solution ● Camera can not focus using autofocus. Change (flashes) composition or focus manually. • Use a lower ISO sensitivity. • Use commercial ND filter.
Specifications ❚❚ Nikon D5200 Digital Camera Type Type Lens mount n 84 Single-lens reflex digital camera Nikon F mount (with AF contacts) Nikon DX format; focal length equivalent to approx. 1.5× that of lenses Effective angle of view with FX format angle of view Effective pixels Effective pixels 24.1 million Image sensor Image sensor 23.5 × 15.6 mm CMOS sensor Total pixels 24.
Lens Compatible lenses Autofocus is available with AF-S and AF-I lenses. Autofocus is not available with other type G and D lenses, AF lenses (IX NIKKOR and lenses for the F3AF are not supported), and AI-P lenses. Non-CPU lenses can be used in mode M, but the camera exposure meter will not function. The electronic rangefinder can be used with lenses that have a maximum aperture of f/5.6 or faster.
Exposure ISO sensitivity (Recommended Exposure Index) Active D-Lighting Focus Autofocus Detection range Lens servo Focus point AF-area mode Focus lock Flash Built-in flash n 86 ISO 100 – 6400 in steps of 1/3 EV. Can also be set to approx. 0.3, 0.
Live view Lens servo AF-area mode Autofocus Automatic scene selection Movie Metering Metering method Frame size (pixels) and frame rate • Autofocus (AF): Single-servo AF (AF-S); full-time-servo AF (AF-F) • Manual focus (MF) Face-priority AF, wide-area AF, normal-area AF, subject-tracking AF Contrast-detect AF anywhere in frame (camera selects focus point automatically when face-priority AF or subject-tracking AF is selected) Available in i and j modes TTL exposure metering using main image sensor Matrix •
Supported languages Supported languages Power source Battery AC adapter Arabic, Chinese (Simplified and Traditional), Czech, Danish, Dutch, English, Finnish, French, German, Greek, Hindi, Hungarian, Indonesian, Italian, Japanese, Korean, Norwegian, Polish, Portuguese (Portugal and Brazil), Romanian, Russian, Spanish, Swedish, Thai, Turkish, Ukrainian One rechargeable Li-ion EN-EL14 battery EH-5b AC adapter; requires EP-5A power connector (available separately) Tripod socket 1/4 in.
❚❚ MH-24 battery charger AC 100–240 V, 50/60 Hz, 0.2 A maximum DC 8.4 V/0.9 A Nikon Rechargeable Li-ion Battery EN-EL14 Approx. 1 hour and 30 minutes at an ambient temperature of 25 °C/77 °F when no charge remains Operating temperature 0 °C–40 °C (+32 °F–104 °F) Dimensions (W × H × D) Approx. 70 × 26 × 97 mm (2.8 × 1.0 × 3.8 in.), excluding plug adapter Weight Approx. 89 g (3.
A The AF-S DX NIKKOR 18–55mm f/3.5–5.6G VR II The lens generally used in this manual for illustrative purposes is an AF-S DX NIKKOR 18–55mm f/3.5–5.6G VR II. Focal length mark Mounting mark (0 8) Focal length scale Retractable lens barrel button (0 9) CPU contacts (0 75) Rear lens cap A-M mode switch Lens cap Focus ring Vibration reduction ON/OFF switch Zoom ring (0 16) The AF-S DX NIKKOR 18–55mm f/3.5–5.6G VR II features a retractable lens barrel.
A Battery Life The movie footage or number of shots that can be recorded with fully-charged batteries varies with the condition of the battery, temperature, the interval between shots, and the length of time menus are displayed. Sample figures for EN-EL14 (1030 mAh) batteries are given below.
Warranty Terms - Nikon Europe Service Warranty Dear Nikon Customer, We thank you for your purchasing this Nikon product. Should your Nikon product require warranty service, please contact the dealer from whom it was purchased or a member of our authorized service network within the sales territory of Nikon Europe BV (Europe/Africa and Russia). In order to avoid any unnecessary inconvenience, we advise you to read the user manuals carefully before contacting the dealer or our authorized service network.
3. The warranty will not be applicable in the case of: • damage caused by misuse including but not limited to failure to use the product for its normal purpose or according to the user instructions on the proper use and maintenance, and to installation or use of the product inconsistent with the safety standards in force in the country where it is used. • damage caused by accidents including but not limited to lightning, water, fire, misuse or neglect.
No reproduction in any form of this manual, in whole or in part (except for brief quotation in critical articles or reviews), may be made without written authorization from NIKON CORPORATION. DIGITAL CAMERA User's Manual Nikon User Support Visit the site below to register your camera and keep up-to-date with the latest product information. You will find answers to frequently asked questions (FAQs) and can contact us for technical assistance. http://www.europe-nikon.