
Reference Manual

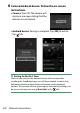

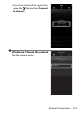
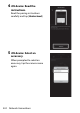
Table Of Contents
- Package Contents
- About This Manual
- Table of Contents
- Menu List
- For Your Safety
- Notices
- Getting to Know the Camera
- First Steps
- Basic Photography and Playback
- Camera Controls
- The MENU Button
- The i Button (the i Menu)
- The info Button
- The Mode Dial
- The Release Mode Dial
- The Focus-Mode Selector
- The AF-Mode Button
- The AF-ON Button
- The AE-L/AF-L Button
- The Help/Protect (WB) Button
- The ISO (Format) Button
- The Exposure Compensation Button
- The Playback Zoom (QUAL) Button
- The Thumbnail (Metering) Button
- The Flash Mode (Flash Compensation) Button
- The BKT Button
- The Pv Button
- The Fn Button
- Shooting Settings
- Choosing a Shooting Mode
- Image Recording Options (Image Area, Quality, and Size)
- Choosing How the Camera Focuses (Focus)
- Exposure-Related Settings (Metering and Exposure Compensation)
- Choosing the Operation Performed When the Shutter Is Released (Release Mode)
- Adjusting the Camera’s Sensitivity to Light (ISO Sensitivity)
- Achieving Natural Colors with Different Light Sources (White Balance)
- Varying Exposure or White Balance over a Series of Photographs (Bracketing)
- Image Processing (Picture Controls)
- Preserving Detail in Highlights and Shadows (Active D-Lighting and HDR)
- Options for Movie Recording and Editing
- Other Shooting Options
- Using Two Memory Cards
- Two-Button Reset: Restoring Default Settings
- Combining Multiple Exposures in a Single Photo (Multiple Exposure)
- Taking Photos at a Set Interval (Interval Timer Shooting)
- Creating a Movie from Photos (Time- Lapse Movie)
- Varying Focus over a Series of Photos (Focus Shift Shooting)
- The Electronic Shutter (Silent Live View Photography)
- Photographing Film Negatives (Negative Digitizer)
- Customizing the i Menu: Customize i Menu
- Using Non-CPU Lenses (Non-CPU Lens Data)
- Playback
- Connecting to Computers and TVs
- Network Connections
- On-Camera Flash Photography
- Remote Flash Photography
- Menu Guide
- Defaults
- The Playback Menu: Managing Images
- The Photo Shooting Menu: Shooting Options
- Reset Photo Shooting Menu
- Storage Folder
- File Naming
- Role Played by Card in Slot 2
- Image Area
- Image Quality
- Image Size
- NEF (RAW) Recording
- ISO Sensitivity Settings
- White Balance
- Set Picture Control
- Manage Picture Control
- Color Space
- Active D-Lighting
- Long Exposure NR
- High ISO NR
- Vignette Control
- Diffraction Compensation
- Auto Distortion Control
- Flicker Reduction
- Flash Control
- Auto Bracketing
- Multiple Exposure
- HDR (High Dynamic Range)
- Interval Timer Shooting
- Time-Lapse Movie
- Focus Shift Shooting
- Silent Live View Photography
- The Movie Shooting Menu: Movie Shooting Options
- Reset Movie Shooting Menu
- File Naming
- Destination
- Image Area
- Frame Size/Frame Rate
- Movie Quality
- Movie File Type
- ISO Sensitivity Settings
- White Balance
- Set Picture Control
- Manage Picture Control
- Active D-Lighting
- High ISO NR
- Diffraction Compensation
- Flicker Reduction
- Electronic VR
- Microphone Sensitivity
- Attenuator
- Frequency Response
- Wind Noise Reduction
- Headphone Volume
- Timecode
- Custom Settings: Fine-Tuning Camera Settings
- Reset Custom Settings
- a: Autofocus
- a1: AF-C Priority Selection
- a2: AF-S Priority Selection
- a3: Focus Tracking with Lock-On
- a4: 3D-Tracking Face-Detection
- a5: Auto-Area AF Face/Eye Detection
- a6: Focus Points Used
- a7: Store Points by Orientation
- a8: AF Activation
- a9: Focus Point Wrap-Around
- a10: Focus Point Options
- a11: Low-Light AF
- a12: Manual Focus Ring in AF Mode
- b: Metering/Exposure
- c: Timers/AE Lock
- d: Shooting/Display
- d1: CL Mode Shooting Speed
- d2: Max. Continuous Release
- d3: Sync. Release Mode Options
- d4: Exposure Delay Mode
- d5: Electronic Front-Curtain Shutter
- d6: Extended Shutter Speeds (M)
- d7: File Number Sequence
- d8: Save Original (EFFECTS)
- d9: Exposure Preview (Lv)
- d10: Framing Grid Display
- d11: Peaking Highlights
- d12: LCD Illumination
- d13: Live View in Continuous Mode
- d14: Optical VR
- e: Bracketing/Flash
- f: Controls
- g: Movie
- The Setup Menu: Camera Setup
- Format Memory Card
- Save User Settings
- Reset User Settings
- Language
- Time Zone and Date
- Monitor Brightness
- Monitor Color Balance
- Virtual Horizon
- Information Display
- AF Fine-Tuning Options
- Non-CPU Lens Data
- Clean Image Sensor
- Lock Mirror Up for Cleaning
- Image Dust Off Ref Photo
- Pixel Mapping
- Image Comment
- Copyright Information
- Beep Options
- Touch Controls
- HDMI
- Location Data
- Wireless Remote (WR) Options
- Assign Remote (WR) Fn Button
- Airplane Mode
- Connect to Smart Device
- Connect to PC
- Wireless Transmitter (WT-7)
- Conformity Marking
- Battery Info
- Slot Empty Release Lock
- Save/Load Menu Settings
- Reset All Settings
- Firmware Version
- The Retouch Menu: Creating Retouched Copies
- MY MENU/RECENT SETTINGS
- Troubleshooting
- Technical Notes
- Kit Lens Manual
- Index

415
Network Connections
Connecting via Bluetooth
Before connecting via Bluetooth for the first time, you will need
to pair the camera and smart device as described below. The
pairing instructions for Android and iOS differ slightly.
D
Before Pairing
Before beginning pairing, enable Bluetooth on the smart device (for
details, see the documentation provided with the device), check that
there is space available on the camera memory card, and ensure that the
batteries in the camera and smart device are fully charged to prevent the
devices turning off unexpectedly.