
User's Manual
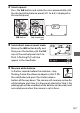

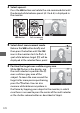
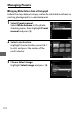
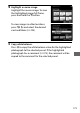
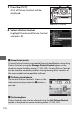
Table Of Contents
- Package Contents
- Table of Contents
- For Your Safety
- Notices
- Introduction
- First Steps
- Tutorial
- Live View Photography
- Movies
- Image Recording Options
- Focus
- Release Mode
- ISO Sensitivity
- Exposure
- White Balance
- Image Enhancement
- Optional Flash Units
- Other Shooting Options
- More About Playback
- Menu List
- Technical Notes
- Compatible Lenses
- The Nikon Creative Lighting System (CLS)
- Other Accessories
- Optional MB-D18 Battery Packs
- Caring for the Camera
- Caring for the Camera and Battery: Cautions
- Troubleshooting
- Error Messages
- Specifications
- AF-S NIKKOR 24–120mm f/4G ED VR Lens User’s Manual
- Approved Memory Cards
- Memory Card Capacity
- Battery Life
- Index

170
3 Select a preset.
Press the U button and rotate the sub-command dial until
the desired white balance preset (d-1 to d-6) is displayed in
the monitor.
4 Select direct measurement mode.
Release the U button briefly and
then press the button until the L
icon in the monitor starts to flash. A
spot white balance target (r) will be
displayed at the selected focus point.
5 Position the target over a white or grey area.
While L flashes in the display, use
the multi selector to position the r
over a white or grey area of the
subject. To zoom the area around the
target in for more precise positioning,
press the X button. You can also
measure white balance anywhere in
the frame by tapping your subject in the monitor, in which
case there is no need to press the center of the multi selector
or the shutter-release button as described in Step 6.
U button Sub-command
dial