
Operation Manual


2120
4
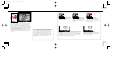
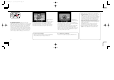
Hold camera. Grasp the camera handgrip with your right
hand. Use your left hand to cradle the camera with the
elbow propped against your body for support, as you look
through the viewfinder. Use your right hand index finger to
press shutter release button.
5
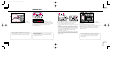
Look through the viewfinder and position focus brackets
on main subject.
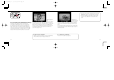
Although the viewfinder covers approx. 92% of the
image area of the actual photograph, a negative film will
show you an image larger than what you see through
the viewfinder.
Note: The image in a slide film may be partially cropped
by the mount. Also, the edges of negative film are
partially cropped by most labs.
For details about each function/mode, see following
pages:
• Film advance mode p. 28
• Metering system pp. 43-45
• Exposure mode pp. 46-60
• Focus area pp. 29-30
• Focus mode pp. 31 -42
• Flexible Program p. 51
• Flash sync mode pp. 68-69
• Exposure compensation function pp. 78-79
• All Mode Exposure Bracketing pp. 80-82
• Flash Exposure Bracketing pp. 102-103
3
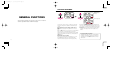
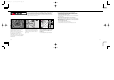
Hold the OUT button and rotate command dial until 0 appears
in the QR (Quick Recall) window on LCD panel. Remove your
finger from the OUT button. The camera's settings are automatically
reset to factory initial settings (as shown below) for basic shooting:
Film advance mode: Single frame (V)
Focus area: Wide (<)
Focus mode Single Servo AF (˚)
Metering system: Matrix (i)
Exposure mode
(including Vari-Program): Auto-Multi Program (A)
Flash sync mode Normal (If accessory Nikon
Speedlight attached is set at
Rear-Curtain Sync, Rear-Curtain
Sync will be performed.)
Flexible Program setting Cancel
Exposure compensation function Cancel
All Mode Exposure Bracketing Cancel
Flash Exposure Bracketing Cancel
For details about QR function, see pages 70 to 71.
F70D I/MêÊçsâ¸í˘ 03.1.16 5:33 PM Page 20