Quick Start Guide Confirming the Package Contents First Steps Shooting and Playback Using ViewNX 2 Other Functions For Your Safety 3 6 14 21 27 36 En En_01
Thank you for purchasing the Nikon COOLPIX P7800 digital camera. This guide introduces the procedures necessary for first time use of this camera. To ensure proper use, please read and thoroughly understand the information provided in “For Your Safety” (A36) before using the camera. For more detailed information, please refer to the digital Reference Manual, which is located on the included CD-ROM.
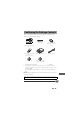
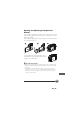
Confirming the Package Contents In the event that any items are missing, please contact the store where you purchased the camera.
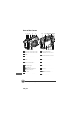
Parts of the Camera 1 2 3 7 4 5 8 9 10 11 1 Exposure compensation dial 2 Exposure compensation dial mark 3 Shutter-release button 4 Mode dial 5 Accessory shoe 6 Flash 7 w2 (function 2) button 8 Sub-command dial 9 Zoom control f : wide-angle g : telephoto h : thumbnail playback i : playback zoom j : help 10 w1 (function 1) button 4 12 6 21 22 23 24 25 11 12 13 14 15 16 17 18 19 20 21 22 AF-assist illuminator K (flash pop-up) control Electronic viewfinder Diopter adjustment control x (monitor) butt
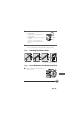
Opening and Adjusting the Angle of the Monitor The orientation and tilt of the monitor can be changed. This is useful when shooting with the camera in a high or a low position, or when taking self-portraits. For normal shooting, fold the monitor against the camera body with the screen facing out (3). When you are not using or carrying the camera, fold the monitor against the camera body with the screen facing inward to prevent scratches or contamination.
First Steps Step 1 1.1 Charge the Battery Prepare the included battery charger. If a plug adapter* is included with your camera, attach the plug adapter to the plug on the battery charger. Push the plug adapter firmly until it is securely held in place. Once the two are connected, attempting to forcibly remove the plug adapter could damage the product. * The shape of the plug adapter varies according to the country or region in which the camera was purchased.
1.3 Plug the battery charger into an electrical outlet. • CHARGE lamp starts flashing when charging starts. • CHARGE lamp turns on when charging is complete. About 1 hour and 30 minutes are required to charge a fully exhausted battery. 1.4 CHARGE lamp When charging is complete, remove the battery and then disconnect the battery charger from the electrical outlet. Step 2 Attaching the Camera Strap Attach the strap at two places. Step 3 3.
3.2 Insert the battery. • Push the orange battery latch in the direction indicated by the arrow (1), and fully insert the battery (2). • The battery locks into place when inserted correctly. Battery latch Be Careful to Insert the Battery in Correct Direction Inserting the battery upside down or backwards could damage the camera. 3.3 Insert the memory card. • Slide the memory card in until it clicks into place.
3.4 Close the battery-chamber/memory card slot cover. • While the battery-chamber/memory card slot cover is open, the camera cannot be turned on. • Images are saved in the internal memory (approx. 86 MB) when no memory card is inserted in the camera. Removing the Battery and the Memory Card Turn the camera off and make sure that the power-on lamp and the monitor have turned off, and then open the battery-chamber/ memory card slot cover.
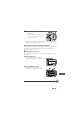
Step 4 4.1 Turn the Camera On Open the monitor and remove the lens cap. • See “Opening and Adjusting the Angle of the Monitor” (A5) for more information. 4.2 Press the power switch. • The monitor turns on. • To turn the camera off, press the power switch again. B Lens Cap At times when you are not shooting images, attach the lens cap to the lens to protect it.
Step 5 Setting the Display Language, Date, and Time When the camera is turned on for the first time, the language-selection screen and the date and time setting screen for the camera clock are displayed. Use the rotary multi selector to select the settings. • If you exit without setting the date and time, O will flash when the shooting screen is displayed.
5.2 Select Yes and press the k button. Time zone and date Choose time zone and set date and time? Yes No Cancel 5.3 Select your home time zone and press the k button. New York Toronto Lima • To enable daylight saving time, press H. When the Back daylight saving time function is enabled, W is displayed above the map. To turn off the daylight saving time function, press I. 5.4 12 Select the date format and press the k button.
5.5 Set the date and time, and press the k button. Date and time M D Y 11 15 2013 • Select a field: Press JK (changes between M, D, Y, hour, and minute). 10 15 • Edit the date and time: Press HI. Date Edit and time can also be changed by rotating the multi selector or main command dial. • Confirm the setting: Select the minute field and press the k button. 5.6 Select Yes and press the k button. • When settings are finished, the lens extends and the camera switches to shooting mode.
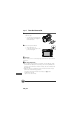
Shooting and Playback Step 1 Rotate the Mode Dial and Align the A (auto) Icon to the Mark Step 2 Check the Battery Level and the Number of Exposures Remaining Battery level indicator 1/250 F5.6 1280 Number of exposures remaining* * When data is recorded to the internal memory, C is displayed. Battery level indicator Display Description b The battery level is high. B The battery level is low. N Battery exhausted. The camera cannot capture images. Recharge the battery.
Built-in Flash In situations where a flash is needed, such as in dark locations or when the subject is backlit, lower the K (flash pop-up) control to raise the flash. • When not using the flash, gently push to lower the flash until it clicks shut. Switching Between the Monitor and Viewfinder (x Button) You can use the viewfinder when bright light under the open sky makes it difficult to see the monitor. Each press of the x button switches the display between the monitor and viewfinder.
Step 3 3.1 Frame a Picture Hold the camera steady. • Keep fingers and other objects away from the lens, flash, AF-assist illuminator, microphone, and speaker. • When taking pictures in portrait (“tall”) orientation, turn the camera so that the flash is above the lens. 3.2 Frame the picture. 1/250 F5.
Step 4 4.1 Focus and shoot Press the shutter-release button halfway. • When the subject is in focus, the focus area that includes the subject or focus indicator glows green (multiple focus areas can glow green). • When you are using digital zoom, the camera focuses on the subject in the center of the frame and the focus area is not displayed. When the camera has focused, the focus indicator glows green. 1/250 F5.6 • If the focus area or focus indicator flashes red, the camera is unable to focus.
C Focusing To set focus and exposure (shutter speed and aperture value), press the shutter-release button halfway. The focus area varies depending on the shooting mode. In A (auto) mode, the camera automatically selects one or more of the 9 focus areas containing the subject closest to the camera when the shutterrelease button is pressed halfway.
Step 5 5.1 Play Back Images Press the c (playback) button. • If you press and hold down the c (playback) button while the camera is turned off, the camera turns on in playback mode. 5.2 11/15/2013 15:30 0004.JPG c (playback) button 4 132 Multi selector Use the multi selector to select an image to display. Display the previous image • Press and hold down HIJK to scroll through the images quickly. • Images can also be selected by rotating the multi selector or command dial.
Step 6 6.1 Delete an Image Press the l button to delete the image currently displayed in the monitor. 11/15/2013 15:30 0004.JPG 4 132 6.2 Use the multi selector HI to select Yes and press the k button. • The deleted image cannot be recovered. • To cancel, select No and press the k button. Erase 1 image? Yes No C Deleting Multiple Images To delete multiple images, select Delete from the playback menu (A32). Step 7 Turn Off the Camera Press the power switch to turn the camera off.
Using ViewNX 2 ViewNX 2 is an all-in-one software package which enables you to transfer, view, edit and share images. Install ViewNX 2 using the included ViewNX 2 CD-ROM. Your Imaging Toolbox Step 1 ViewNX 2™ Installing ViewNX 2 Compatible Operating Systems Windows Windows 8, Windows 7, Windows Vista, Windows XP Macintosh Mac OS X 10.6, 10.7, 10.8 Refer to the Nikon website for details on system requirements, including the latest information on operating system compatibility.
1.1 Start the computer and insert the ViewNX 2 CD-ROM into the CD-ROM drive. • Windows: If instructions for operating the CD-ROM are displayed in the window, follow the instructions to proceed to the installation window. • Mac OS: When the ViewNX 2 window is displayed, double-click the Welcome icon. 1.2 Select a language in the language selection dialog to open the installation window.
1.3 Start the installer. • We recommend clicking Installation Guide in the installation window to check the installation help information and system requirements before installing ViewNX 2. • Click Typical Installation (Recommended) in the installation window. • Follow the on-screen instructions to install the software. 1.4 Exit the installer when the installation completion screen is displayed. • Windows: Click Yes. • Mac OS: Click OK.
Step 2 2.1 Transferring Images to the Computer Choose how images will be copied to the computer. Choose one of the following methods: • Direct USB connection: Turn the camera off and ensure that the memory card is inserted in the camera. Connect the camera to the computer using the included USB cable. The camera automatically turns on. To transfer images that are saved in the camera’s internal memory, remove the memory card from the camera before connecting it to the computer.
If a message is displayed prompting you to choose a program, select Nikon Transfer 2. • When using Windows 7 If the dialog shown at right is displayed, follow the steps below to select Nikon Transfer 2. 1 Under Import pictures and videos, click Change program. A program selection dialog will be displayed; select Import File using Nikon Transfer 2 and click OK. 2 Double-click Import File. If the memory card contains a large number of images, it may take a while for Nikon Transfer 2 to start.
2.2 Transfer images to the computer. • Confirm that the name of the connected camera or removable disk is displayed as the “Source” on the “Options” title bar of Nikon Transfer 2 (1). • Click Start Transfer (2). 1 P7800 2 • At default settings, all the images on the memory card will be copied to the computer. • Images are displayed in ViewNX 2 when transfer is complete. 2.3 Terminate the connection. • If the camera is connected to the computer, turn the camera off and disconnect the USB cable.
Other Functions Functions That Can Be Set Using the Multi Selector Press the multi selector H (m), J (n), I (D), or K (G) while shooting to operate the following functions. 1 2 4 3 Function 1 m Flash mode Description The flash modes available are U (auto), V (auto with redeye reduction), X (fill flash), S (manual), Y (slow sync), Z (rearcurtain sync) and z (commander mode) modes. • z (commander mode) can be used when A, B, C, D, E, F or N mode is selected.
Function Description 3 p Focus mode Choose from A (autofocus), C (close range only), D (macro close-up), B (infinity), and E (manual focus). • E can be selected when the shooting mode is A, B, C, D, E, F, N, special effects mode or the Sports scene mode. 4 G AF area mode In shooting modes A, B, C, D, E, F, N and u (special effects), you can change how the camera selects the focus area for autofocus.
u Special effects Effects can be applied to images during shooting. A, B, C, D mode Select these modes for greater control over shutter speed and aperture value. E, F, N User settings mode Setting combinations that are frequently used for shooting can be saved. The saved settings can be immediately retrieved for shooting simply by rotating the mode dial to E, F or N. e Movie mode You can record slow motion and fast motion movies, in addition to basic movies.
Basic Quick Menu Operations 1 Press the n button. Image quality Image size 1342 Normal 2 Use the multi selector HI to move to the tabs at the top of the screen. • You can also move to the tabs by rotating the sub-command dial. Tabs Image quality Image size 1342 Normal 3 Use J K to select the tab for the function to be set. • You can also select a tab by rotating the main command dial. 1 a Image quality/Image size * Movie options will be shown when the mode dial is rotated to e or h.
4 Use HI to select an item and change the setting using J K. • You can also change the setting by rotating the main command dial. ISO sensitivity Minimum shutter speed Auto 5 Press the k button or n button when setting is complete. • You can also press the shutter-release button to finish setting.
Using Menus (the d Button) Use the multi selector and k button to navigate the menus. 1 Press the d button. • The menu that matches the status of the camera, such as shooting or playback menu, is displayed. Unavailable menu items are displayed in gray and cannot be selected. Shooting menu 1/250 2 F5.6 1280 Custom Picture Control Metering Continuous AF area mode Autofocus mode Flash exp. comp. Noise reduction filter Use the multi selector to select a menu item.
Switching Among Menu Tabs To display a different menu, such as the setup menu, use the multi selector to switch to another tab. Tabs Shooting menu Shooting menu Custom Picture Control Metering Continuous AF area mode Autofocus mode Flash exp. comp. Noise reduction filter Custom Picture Control Metering Continuous AF area mode Autofocus mode Flash exp. comp. Noise reduction filter Use J to move to the tabs.
Playback Mode The following options can be performed in full-frame playback mode. Control Name Main Functions Zoom control • Move toward g (i) to zoom in on the image, and move toward f (h) to display images as thumbnails or the calendar. • Adjust the volume for voice memo and movie playback. Multi selector • While the playback screen is displayed: Change the displayed image using up (H), left (J), down (I), right (K), or by rotating the multi selector.
Control Name Main command dial Sub-command dial Main Functions • Select images and date. • Switch the magnification of an enlarged image. d (menu) button Display and hide the menu. l (delete) button Delete an image. w2 (function 2) button Switch the information displayed in the monitor screen. x (monitor) button Switch between the monitor and viewfinder.
For Your Safety To prevent damage to your Nikon product or injury to yourself or to others, read the following safety precautions in their entirety before using this equipment. Keep these safety instructions where all those who use the product will read them.
Handle the camera strap with care Never place the strap around the neck of an infant or child. Keep out of reach of children Particular care should be taken to prevent infants from putting the battery or other small parts into their mouths. Do not remain in contact with the camera, battery charger, or AC adapter for extended periods while the devices are on or in use Parts of the devices become hot. Leaving the devices in direct contact with the skin for extended periods may result in low-temperature burns.
• Replace the terminal cover when transporting the battery. Do not transport or store with metal objects such as necklaces or hairpins. • The battery is prone to leakage when fully discharged. To avoid damage to the product, be sure to remove the battery when no charge remains. • Discontinue use immediately should you notice any change in the battery, such as discoloration or deformation. • If liquid from the damaged battery comes in contact with clothing or skin, rinse immediately with plenty of water.
Handle moving parts with care Be careful that your fingers or other objects are not pinched by the lens cover or other moving parts. CD-ROMs The CD-ROMs included with this device should not be played back on audio CD equipment. Playing CD-ROMs on an audio CD player could cause hearing loss or damage the equipment. Using the flash close to your subject’s eyes could cause temporary visual impairment The flash should be no less than 1 m (3 ft 4 in.) from the subject.
Notices Notices for Customers in the U.S.A. IMPORTANT SAFETY INSTRUCTIONS -SAVE THESE INSTRUCTIONS. DANGER - TO REDUCE THE RISK OF FIRE OR ELECTRIC SHOCK, CAREFULLY FOLLOW THESE INSTRUCTIONS For connection to a supply not in the U.S.A., use an attachment plug adapter of the proper configuration for the power outlet if needed. The power supply unit is intended to be correctly orientated in a vertical or floor mount position.
• Consult the dealer or an experienced radio/television technician for help. CAUTIONS Modifications The FCC requires the user to be notified that any changes or modifications made to this device that are not expressly approved by Nikon Corporation may void the user’s authority to operate the equipment. Interface Cables Use the interface cables sold or provided by Nikon for your equipment. Using other interface cables may exceed the limits of Class B Part 15 of the FCC rules.
Caring for the Camera To ensure continued enjoyment of this Nikon product, observe the precautions described below in addition to the warnings in “For Your Safety” (A36-39) when using or storing the device. B Do Not Drop The product may malfunction if subjected to strong shock or vibration. B Handle the Lens and All Moving Parts with Care Do not apply force to the lens, lens cover, monitor, memory card slot, or battery chamber. These parts are easily damaged.
B Do Not Point the Lens at Strong Light Sources for Extended Periods Avoid pointing the lens at the sun or other strong light sources for extended periods when using or storing the camera. Intense light may cause deterioration of the image sensor, producing a white blur effect in photographs. B Turn the Product off Before Removing or Disconnecting the Power Source or the Memory Card Do not remove the battery while the product is on, or while images are being saved or deleted.
FX3H01(11) 6MN30011-01 En_01