No reproduction in any form of this manual, in whole or in part (except for brief quotation in critical articles or reviews), may be made without written authorization from NIKON CORPORATION. Wireless Transmitter User's Manual Printed in Japan SB5L01(11) 6MWA4311-01 • Read this manual thoroughly before using the camera. • To ensure proper use of the camera, be sure to read “For Your Safety” (page v). • After reading this manual, keep it in a readily accessible place for future reference.
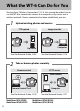
What the WT-6 Can Do for You Starting from “Wireless Connections” (0 5), this manual describes how to use the WT-6 to connect the camera to a computer or ftp server over a wireless network.
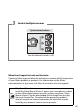
Control multiple cameras Synchronized release See the Network Guide, 049 Nikon User Support for India and Australia Contact a Nikon representative for technical assistance with the operation of your Nikon product or products. For information on the Nikon representatives in your area, visit http://www.nikon-asia.com/support. Nikon Manual Viewer 2 Install the Nikon Manual Viewer 2 app on your smartphone or tablet to view Nikon digital camera manuals, anytime, anywhere.
Trademark Information Mac, OS X, and iPhone are registered trademarks of Apple Inc. in the United States and/or other countries. Windows is either registered trademarks, or trademarks of Microsoft Corporation in the United States and/or other countries. XQD is a trademark of Sony Corporation. CompactFlash is a trademark of SanDisk Corporation.
For Your Safety To prevent damage to your Nikon product or injury to yourself or to others, read the following safety precautions in their entirety before using this equipment. Keep these safety instructions where all those who use the product will read them.
A Do not remain in contact with the camera for extended periods while the device is on or in use Parts of the device become hot. Leaving the device in direct contact with the skin for extended periods may result in low-temperature burns. A Do not expose to high temperatures Do not leave the device in a closed vehicle under the sun or in other areas subject to extremely high temperatures. Failure to observe this precaution could result in fire or in damage to the casing or internal parts.
Notices • No part of the manuals included with this product may be reproduced, transmitted, transcribed, stored in a retrieval system, or translated into any language in any form, by any means, without Nikon’s prior written permission. • Nikon reserves the right to change the appearance and specifications of the hardware and software described in these manuals at any time and without prior notice. • Nikon will not be held liable for any damages resulting from the use of this product.
Notice for Customers in the U.S.A. and Canada This device complies with Part 15 of FCC Rules and Industry Canada’s licenceexempt RSSs. Operation is subject to the following two conditions: (1) this device may not cause interference, and (2) this device must accept any interference, including interference that may cause undesired operation of the device. Nikon WT-6A FCC ID: CGJ1152EA IC: 4634A-1152EA FCC CAUTION 1.
Compliance with FCC requirement 15.407(c) Data transmission is always initiated by software, which is the passed down through the MAC, through the digital and analog baseband, and finally to the RF chip. Several special packets are initiated by the MAC. These are the only ways the digital baseband portion will turn on the RF transmitter, which it then turns off at the end of the packet. Therefore, the transmitter will be on only while one of the aforementioned packets is being transmitted.
Notice for Customers in Europe R&TTE Directive We, the manufacturer (Nikon Corporation) hereby declare that this Wireless Transmitter (WT-6) is in compliance with the essential requirements and other relevant provisions of Directive 1999/5/EC. AT FR LU ES HR BE DE MT SE BG GR NL GB CY HU PL IS CZ IE PT LI DK IT RO NO EE LV SK CH FI LT SI TR Symbol for Separate Collection in European Countries This symbol indicates that electrical and electronic equipment is to be collected separately.
Available Channels The WT-6 is available in four versions, each destined for use in a different region in compliance with local regulations governing the use of wireless devices (for information on countries not listed in the following table, contact a Nikon representative). Use each model only in the region for which it is intended.
5GHz band The channels available for 5GHz band are listed below.
xiii
Table of Contents What the WT-6 Can Do for You..........................................................ii For Your Safety ........................................................................................v Notices......................................................................................................vii Introduction 1 Connection Types...................................................................................3 Attaching the WT-6.................................................
Introduction Thank you for your purchase of a WT-6 wireless transmitter for compatible Nikon digital cameras. The WT-6 is for use exclusively in the country of sale; operation in other jurisdictions is not guaranteed. Users who are unsure as to the country of purchase are requested to contact a Nikon-authorized service representative for more information. Please read this manual thoroughly and keep it where all those who use the product can read it.
Life-Long Learning As part of Nikon’s “Life-Long Learning” commitment to ongoing product support and education, continually-updated information is available online at the following sites: • For users in the U.S.A.: http://www.nikonusa.com/ • For users in Europe and Africa: http://www.europe-nikon.com/support/ • For users in Asia, Oceania, and the Middle East: http://www.nikon-asia.
Connection Types The WT-6 offers a choice of the following connection types: FTP upload Image transfer Camera control HTTP server Synchronized release Upload existing photos and movies to a computer or ftp server, or upload new photos as they are taken. Control the camera using optional Camera Control Pro 2 software and save new photos and movies directly to the computer. View and take pictures remotely using a browser-equipped computer or smart device.
Attaching the WT-6 q Open the camera’s peripheral connector cover and rotate it up out of the way. w Fully insert the WT-6 connector into the camera peripheral connector. e Rotate the locking wheel to lock the WT-6 in place. D Power Source The WT-6 is not equipped with a battery or power switch. Power is supplied from the camera. A Connection Status Connection status is shown by the camera network indicator.
Wireless Connections Follow the steps below to connect to a wireless network.
A Network Guide For information on using a wireless network once the camera and WT-6 are connected, see the Network Guide. D Choosing a Power Source To prevent the camera powering off unexpectedly during setup or data transfer, use a fully-charged battery or an optional AC adapter designated for use with your camera. For more information, see the camera manual.
Step 1: Getting Ready After starting the computer and logging in, ready the camera and WT-6 as described below. 1 Insert a memory card. Turn the camera off and insert a memory card (do not turn the camera off while data are being transferred to the computer). This step can be omitted in camera control mode (0ii). 2 3 Attach the WT-6 (04). Turn the camera on. Power switch Rotate the power switch to turn the camera on.
Step 2: Enable Camera Wireless Ready the camera for connection to a wireless network. 1 Select Choose hardware. In the setup menu, select Network, then highlight Choose hardware and press 2. The menu offers a choice of Wired LAN and Wireless LAN. 2 Select Wireless LAN. Highlight Wireless LAN and press J to select the highlighted option and return to the network menu. Step 3: The Connection Wizard Follow the on-screen instructions to create a network profile. 1 Display network profiles.
3 Start the connection wizard. Highlight Connection wizard and press 2 to start the connection wizard. 4 Choose a connection type. (03) Highlight a connection type and press J. 5 Name the new network profile. A default profile name will be displayed; to change the name as described in “Text Entry” (010), press the center of the multi selector. The profile name will appear in the Network > Network settings list in the camera setup menu. Press J to proceed to the next step when entry is complete.
A Text Entry The following dialog is displayed when text entry is required. Name area Keyboard area Keyboard selection To enter a new letter at the current cursor position, tap the letters on the touch-screen keyboard (tap the keyboard selection button to cycle through the upper-case, lower-case, and symbol keyboards).
❚❚ Search for Wireless Network Select Search for wireless network in Step 6 on page 10 to choose from a list of the networks (wireless LAN access points) detected by the camera. 1 Choose a network. Highlight a network SSID and press J (if the desired network is not displayed, press X to search again). Encrypted networks are indicated by a h icon; if the selected network is encrypted, you will be SSID prompted to enter the encryption key as described in Step 2.
3 Choose your next step. The message at right is displayed when a connection is established. Your next step depends on the connection type selected in Step 4 on page 9: • • • • FTP upload: Proceed to page 16. Image transfer: Proceed to page 19. Camera control: Proceed to page 19. HTTP server: Proceed to page 19. ❚❚ Push-Button WPS Choose Push-button WPS in Step 6 on page 10 if the wireless LAN access point uses push-button WPS. 1 Press the WPS button on the wireless LAN access point.
3 Choose your next step. The message at right is displayed when a connection is established. Your next step depends on the connection type selected in Step 4 on page 9: • • • • FTP upload: Proceed to page 16. Image transfer: Proceed to page 19. Camera control: Proceed to page 19. HTTP server: Proceed to page 19.
❚❚ PIN-Entry WPS Choose PIN-entry WPS in Step 6 on page 10 if the wireless LAN access point uses PIN-entry WPS. 1 Enter the PIN for the wireless LAN access point. From a computer, enter the PIN for the wireless LAN access point. For more information, see the documentation provided with the wireless LAN access point. 2 Press J button on the camera. The WT-6 will connect to the access point automatically. 3 Choose your next step. The message at right is displayed when a connection is established.
❚❚ Direct (Access Point) Selecting Direct (access point) in Step 6 on page 10 enables access point mode, in which the camera serves as a wireless access point. The camera SSID and encryption key will be displayed in the monitor. On the computer or smart device, enter the SSID and encryption key displayed in the camera monitor (022). For more information, see the documentation provided with the computer or smart device.
Step 4: Network Settings ❚❚ FTP Upload If you selected FTP upload in Step 4 on page 9, follow the steps below to connect to an existing ftp server. Skip Step 1 if you selected Direct (access point) in Step 6 on page 10. 1 Obtain or select an IP address. Highlight one of the following options and press J. • Obtain automatically: Select this option if the network is configured to supply the IP address automatically. Proceed to Step 2.
4 Enter the IP address. Press the center of the multi selector and enter the server URL or IP address (010) and press J, and then press J to connect. 5 Log in. Highlight one of the following options and press J. • Anonymous login: Select this option if the server does not require a user ID or password. • Enter user ID: Enter a user ID and password when prompted and press J. A MAC Address Filtering If the network uses MAC address filtering, the filter must be supplied with the MAC address of the WT-6.
6 Choose a destination folder. Highlight one of the following options and press J. • Home folder: Select this option to upload pictures to the server’s home folder. • Enter folder name: Select this option to upload pictures to another of the folders existing on the server. Enter a folder name and path when prompted and press J. 7 Exit the wizard. Highlight one of the following options and press J. • Connect and exit wizard: Save the new network profile and connect to the server.
❚❚ Image Transfer, Camera Control, and HTTP Server If you choose any of the above options in Step 4 on page 9, follow the steps below to connect to an existing network. Where you will start depends on the option selected in Step 6 on page 10: if you selected an option other than Direct (access point), start at Step 1; otherwise, proceed to Step 2, below (Image transfer or Camera control), or to Step 5 on page 21 (HTTP server). 1 Obtain or select an IP address.
3 Connect the camera to the computer. When prompted, connect the camera to the computer using the USB cable supplied with the camera. A Routers Connection to computers on other networks via a router is supported only when HTTP server is selected. A MAC Address Filtering If the network uses MAC address filtering, the filter must be supplied with the MAC address of the WT-6. After attaching the WT-6 to the camera, choose Network > Options > MAC address from the camera setup menu and note the MAC address.
4 Start the Wireless Transmitter Utility. When prompted, start the copy of the Wireless Transmitter Utility installed on the computer (06). Pairing will begin automatically. 5 Disconnect the camera. The message at right will be displayed when pairing is complete. Disconnect the USB cable. 6 Exit the wizard. Highlight one of the following options and press J. • Connect and exit wizard: Save the new network profile and connect to the network. • Exit wizard: Save the new network profile and exit.
Appendices Accessing the Camera After creating a network profile, turn the camera on and follow the steps below to access the camera from a computer or iPhone. Windows 8.1 ........................................................................................ Windows 7............................................................................................ Mac OS X ............................................................................................... iPhone......................................
3 Enter the encryption key and click Next. 4 Connect. When the message “Do you want to find PCs, devices, and content on this network, and automatically connect to devices like printers and TVs?" is displayed, click Yes to connect to the network, or No to exit without connecting. 5 Confirm that the connection is successful. An icon is displayed in the taskbar when a connection is established.
❚❚ Windows 7 1 Click the Internet Access icon in the taskbar. 2 Select the network name (SSID) and click Connect. 3 Enter the encryption key and click OK. 4 Confirm that the connection is successful. An icon is displayed in the taskbar when a connection is established.
❚❚ Mac OS X 1 Click the Wi-Fi icon and select Turn Wi-Fi On. 2 Click the Wi-Fi icon and select the network name (SSID). 3 Enter the encryption key and click Join. 4 Confirm that the connection is successful. The icon shown at right is displayed in the taskbar when a connection is established.
❚❚ iPhone 26 1 2 Tap Settings in the iPhone “Home” screen. 3 Enable Wi-Fi and select the network name (SSID). Tap Wi-Fi.
4 Enter the encryption key and tap Join. 5 Confirm that the connection is successful. A check appears next to the network name when a connection is established.
Creating Network Profiles with the Wireless Transmitter Utility Network profiles can be created using the Wireless Transmitter Utility installed on the computer (06). 1 Connect the camera. Use the USB cable supplied with the camera to connect the camera to the computer as shown below. 2 Turn the camera on. Power switch Rotate the power switch to turn the camera on. 3 Start the Wireless Transmitter Utility. • Windows: Double-click the Wireless Transmitter Utility icon on the desktop.
4 Click Next. 5 Select Wireless LAN (WT-5/WT-6) and click Next.
6 Select Add/edit profiles and click Next. A “Setup Picture Folder” To choose the destination for images uploaded to the computer in image transfer mode, select Setup picture folder in Step 6 and click Next. The dialog at right will be displayed; click the "Browse..." and choose a destination.
7 Select Add new profile and click Next. 8 Enter the following information and click Next. • Profile name: Enter a name of up to 16 characters. • Connection type: Choose FTP upload, Image transfer, Camera control, or HTTP server (0ii).
9 32 Select Manual setup (for advanced users) and click Next.
A “Automatic Setup” When connecting to an infrastructure network for the first time, select Automatic setup (recommended). The following dialog will be displayed; select Infrastructure network (recommended) and choose the network from the pull-down menu. Mac users must also choose the encryption type and key index from separate pull-down menus. Click Next to proceed to Step 12 (037).
10 Enter the following information and click Next. • Network name (SSID): Enter the name of the network on which the host computer or ftp server is located. • Communication mode: Select Infrastructure or Access point. • Channel: Select a channel (access point mode only; in infrastructure mode, the WT-6 will choose the channel automatically). Note that if a matching SSID is found on a different channel, the WT-6 may change the channel automatically. • Authentication: The authentication used on the network.
• Key index: If WEP64 or WEP128 is selected for Encryption, choose a key index (the default index is 1). A key index is not required when None is selected.
11 Enter IP address information and click Next. If the network is configured to supply IP addresses automatically using a DHCP server or Auto IP, select Obtain IP address automatically. Otherwise remove the check from this option and enter the following information: • IP address/Subnet mask: Enter an IP address and subnet mask for the WT-6. Choose an IP address that is not already assigned to other devices on the network.
12 Enter ftp settings and click Next. The following options will be displayed if you selected FTP upload in Step 8 (031). If you selected another option, proceed to Step 13 (038). • FTP server: Enter the URL or IP address of the ftp server. • FTP server port: Enter the port number for the ftp server (03). • FTP path: Choose the folder to which pictures will be uploaded. • Server type: Choose FTP or SFTP.
13 Confirm that settings are correct and click Next. 14 Select Finish wizard and click Next. 15 Turn the camera off and disconnect the USB cable.
16 Connect the WT-6. Insert a memory card in the camera, connect the WT-6, and turn the camera on. 17 Display network profiles. Select Network in the camera setup menu, then highlight Network settings and press 2 to display the profiles list. 18 Select the new network profile. Highlight the new network profile and press 2 to return to the network menu. 19 Select Network connection. Highlight Network connection and press 2. 20 Select Enable. Highlight Enable and press 2 to connect to the network.
Troubleshooting Problem Solution Adjust the position of the Excessive radio wireless access point or host interference. computer. Check settings for the host and/ or wireless LAN adapter and adjust camera settings appropriately. Check firewall settings. Confirm that you can write to the The camera displays a TCP/ destination folder on the ftp IP or ftp error. server.
Problem Transfer is interrupted before all photographs are sent. No connection is established when the camera URL is entered in a web browser (http server connections only). Solution Transfer will resume if the camera is turned off and then on again. Confirm that the browser is not using a proxy connection.
Specifications Type Wireless Standards Communications protocols Operating frequency (MHz) Approximate range (line of sight) * Data rates † Security Wireless setup Access protocols 42 WT-6/WT-6A/WT-6B/WT-6C WT-6/WT-6A/WT-6B/WT-6C: 802.11a/b/g/n/ac IEEE802.11a: OFDM IEEE802.11g: OFDM IEEE802.11b: DSSS IEEE802.11n: OFDM IEEE802.
Power consumption 3.0 W maximum Operating environment Temperature: 0–40 °C/32–104 °F Humidity: 85% or less (no condensation) Weight Approximately 33 g/1.2 oz (body only) Dimensions (W × H × D) Approximately 35.5 mm × 49.0 mm × 30.0 mm (1.3 in. × 1.9 in. × 1.1 in.) * With large antenna at wireless LAN access point. Range varies with signal strength and presence or absence of obstacles. † Maximum logical data rates according to IEEE standard. Actual rates may differ.
Index A P Access point ........................... 6, 10, 15, 34 Automatic setup ......................................33 C PASV mode ................................................ 37 PIN-entry WPS................................... 10, 14 Port................................................. 16, 20, 37 Push-button WPS............................. 10, 12 S Camera control................................3, 5, 19 Channel.......................................... xi, 34, 42 Choose hardware ...............
No reproduction in any form of this manual, in whole or in part (except for brief quotation in critical articles or reviews), may be made without written authorization from NIKON CORPORATION. Wireless Transmitter User's Manual Printed in Japan SB6B02(11) 6MWA4311-02 • Read this manual thoroughly before using the camera. • To ensure proper use of the camera, be sure to read “For Your Safety” (page v). • After reading this manual, keep it in a readily accessible place for future reference.