DIGITAL CAMERA User's Manual (with Warranty) • Read this manual thoroughly before using the camera. • To ensure proper use of the camera, be sure to read “For Your Safety” (page x). • After reading this manual, keep it in a readily accessible place for future reference. Scan for detailed operating instructions.
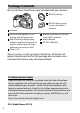
Package Contents Be sure all items listed here were included with your camera. BF-N1 body cap Camera EN-EL25 rechargeable Li-ion battery with terminal cover MH-32 battery charger (plug adapter supplied in countries or regions where required; shape depends on country of sale) Strap (0 9) DK-30 rubber eyecup (comes attached to camera) Warranty (printed on the back cover of this manual) User’s Manual UC-E21 USB cable Memory cards are sold separately.
About This Manual Symbols and Conventions To make it easier to find the information you need, the following symbols and conventions are used: D This icon marks notes, information that should be read before using this product. A This icon marks tips, additional information you may find helpful when using this product. 0 This icon marks references to other sections in this manual. Menu items, options, and messages that appear in the camera displays are shown in bold.
Table of Contents Package Contents ......................................................................... ii Menu List ....................................................................................... vi For Your Safety .............................................................................. x Notices.......................................................................................... xiv Getting to Know the Camera 1 Parts of the Camera .................................................
Technical Notes 27 Caring for the Camera and Battery: Cautions........................27 Specifications............................................................................... 32 Approved Memory Cards ..........................................................43 Battery Endurance ...................................................................... 44 NIKKOR Z DX 16–50mm f/3.5–6.3 VR Lens .............................45 NIKKOR Z DX 50–250mm f/4.5–6.3 VR Lens...........................47 Notices....
Menu List The camera offers the following menus. For a more complete description of individual menu items, refer to the “Menu Guide” chapter in the Reference Manual.
MOVIE SHOOTING MENU Reset movie shooting menu File naming Frame size/frame rate Movie quality Movie file type ISO sensitivity settings White balance Set Picture Control Manage Picture Control Active D-Lighting High ISO NR Vignette control Diffraction compensation Auto distortion control Flicker reduction Metering Release mode (save frame) Focus mode AF-area mode Optical VR Electronic VR Microphone sensitivity Attenuator Frequency response Wind noise reduction CUSTOM SETTING MENU Reset custom settings a Aut
CUSTOM SETTING MENU d Shooting/display d1 CL mode shooting speed d2 Max. continuous release d3 Exposure delay mode d4 Shutter type Limit selectable image d5 area d6 File number sequence d7 Apply settings to live view d8 Framing grid display d9 Peaking highlights View all in continuous d10 mode e Bracketing/flash e1 Flash sync speed e2 Flash shutter speed e3 Exposure comp.
SETUP MENU Format memory card Save user settings Reset user settings Language Time zone and date Monitor brightness Viewfinder brightness Viewfinder color balance Information display AF fine-tune Image Dust Off ref photo Image comment Copyright information Beep options Touch controls Self-portrait mode HDMI Location data display Airplane mode Connect to smart device Connect to PC Wireless remote (ML-L7) options Conformity marking Energy saving Slot empty release lock Reset all settings Firmware version RET
For Your Safety To prevent damage to property or injury to yourself or to others, read “For Your Safety” in its entirety before using this product. Keep these safety instructions where all those who use this product will read them. DANGER: Failure to observe the precautions marked with this icon carries a high risk of death or severe injury. WARNING: Failure to observe the precautions marked with this icon could result in death or severe injury.
• Do not directly view the sun or other bright light source through the lens. Failure to observe this precaution could result in visual impairment. • Do not aim the flash or AF-assist illuminator at the operator of a motor vehicle. Failure to observe this precaution could result in accidents. • Keep this product out of reach of children. Failure to observe this precaution could result in injury or product malfunction. In addition, note that small parts constitute a choking hazard.
• Turn this product off when its use is prohibited. Disable wireless features when the use of wireless equipment is prohibited. The radio-frequency emissions produced by this product could interfere with equipment onboard aircraft or in hospitals or other medical facilities. • Remove the battery and disconnect the AC adapter if this product will not be used for an extended period. Failure to observe this precaution could result in fire or product malfunction.
• Charge only as indicated. Failure to observe this precaution could result in the batteries leaking, overheating, rupturing, or catching fire. • If battery liquid comes into contact with the eyes, rinse with plenty of clean water and seek immediate medical attention. Delaying action could result in eye injuries. • Follow the instructions of airline personnel. Batteries left unattended at high altitudes in an unpressurized environment may leak, overheat, rupture, or catch fire.
Notices • No part of the manuals included with • Nikon will not be held liable for any this product may be reproduced, damages resulting from the use of transmitted, transcribed, stored in a this product. retrieval system, or translated into • While every effort has been made to any language in any form, by any ensure that the information in these means, without Nikon’s prior written manuals is accurate and complete, permission.
Notice Concerning Prohibition of Copying or Reproduction Note that simply being in possession of material that has been digitally copied or reproduced by means of a scanner, digital camera, or other device may be punishable by law.
Use Only Nikon Brand Electronic Accessories Nikon cameras are designed to the highest standards and include complex electronic circuitry. Only Nikon brand electronic accessories (including lenses, chargers, batteries, charging AC adapters, and flash accessories) certified by Nikon specifically for use with this Nikon digital camera are engineered and proven to operate within the operational and safety requirements of this electronic circuitry.
Getting to Know the Camera Take a few minutes to familiarize yourself with the names and functions of camera controls and displays. You may find it helpful to bookmark this section and refer to it as you read through the rest of the manual. Parts of the Camera Refer to this section for the names and locations of camera controls and displays. Camera Body 2 5 6 7 8 1 4 3 1 9 13 1 2 3 4 5 6 7 12 Eyelet for camera strap...................9 Stereo microphone....................... 23 Speaker............
The Camera Body (Continued) 1 2 3 4 8 9 5 10 11 7 6 12 1 AF-assist illuminator .....................20 6 Lens mounting mark ....................15 Red-eye reduction lamp 7 Image sensor Self-timer lamp 8 Connector for external 2 Built-in flash microphone 3 Flash pop-up control 9 USB connector 4 Cover for microphone connector 10 Charge lamp 5 Cover for USB and HDMI 11 HDMI connector connectors 12 Body cap..........................................
12 3 4 5 6 7 8 9 17 1 2 3 4 5 6 7 8 9 16 15 14 Monitor mode button Viewfinder eyepiece Viewfinder Eye sensor Diopter adjustment control A (L) button J button ...........................................8 Multi selector ....................................8 Memory card access lamp .......... 21 13 12 11 10 10 11 12 13 14 15 16 17 G button..................................vi, 7 O button ......................................... 26 K button .......................................
The Camera Body (Continued) 6 7 1 8 2 3 4 9 5 10 11 1 2 3 4 5 6 4 Sub-command dial 7 Lens release button ......................16 Fn1 button 8 CPU contacts Fn2 button 9 Tripod socket Battery-chamber cover latch......11 10 Battery latch ...................................11 Battery-chamber cover ................11 11 Memory card slot ..........................11 Lens mount .....................................
The Monitor and Viewfinder At default settings, the following indicators appear in the monitor and viewfinder in photo mode. Monitor Viewfinder 21 23 24 3 4 5 6 7 8 10 9 1 23456 7 8 26 25 24 23 22 21 20 19 18 17 16 15 14 9 10 11 12 26 2 19 13 20 1 22 18 17 12 16 15 14 13 1 2 3 4 5 6 7 8 9 10 11 Shooting mode Focus point.....................................
17 18 19 20 21 Aperture Shutter speed Subject tracking Metering Battery indicator ............................13 22 23 24 25 26 Shutter type “Clock not set” indicator Optical VR indicator Touch shooting AF-area brackets The following items appear in movie mode. Monitor Viewfinder 1 1 24 2 3 4 8 7 6 5 6 1 Recording indicator ......................22 Recording disabled .......................23 2 Frame size and rate/ image quality 3 Time remaining..............................
The G Button Press the G button to view the menus. 1 2 3 4 5 6 7 8 9 D: Playback menu ........................vi C: Photo shooting menu............vi 1: Movie shooting menu............vii A: Custom Settings menu..........vii B: Setup menu................................. ix N: Retouch menu.......................... ix O/m: My Menu or recent settings (defaults to My Menu)........................................
❚❚ Using the Menus You can navigate the menus using the multi selector and J button. 1: Move cursor up J: Select highlighted item 4: Cancel and return to previous menu 2: Select highlighted item or display sub-menu 3: Move cursor down 1 Highlight the icon for the current menu. Press 4 to highlight the icon for the current menu. 2 Select a menu. Press 1 or 3 to select the desired menu. 3 Position the cursor in the selected menu. Press 2 to position the cursor in the selected menu.
First Steps Complete the steps in this chapter before taking pictures for the first time. Attach the Camera Strap A strap is supplied with the camera; additional straps are available separately. Attach the strap securely to the camera eyelets.
Charge the Battery The battery can be charged using the supplied battery charger. D The Battery and Charger Read and follow the warnings and cautions in “For Your Safety” (0 x) and “Caring for the Camera and Battery: Cautions” (0 27). The Battery Charger Insert the battery and plug the charger in. An exhausted battery will fully charge in about 2 hours and 30 minutes. In some countries or regions, charger may be supplied with adapter connected. The CHARGE lamp will flash while the battery charges.
Insert the Battery and a Memory Card Before inserting or removing the battery or memory cards, confirm that the camera power switch is in the OFF position. Insert the battery in the orientation shown, using the battery to keep the orange battery latch pressed to one side. The latch locks the battery in place when the battery is fully inserted. Holding the memory card in the orientation shown, slide it straight into the slot until it clicks into place.
D Removing the Battery To remove the battery, turn the camera off and open the battery-chamber cover. Press the battery latch in the direction shown by the arrow to release the battery and then remove the battery by hand. D Removing Memory Cards After confirming that the memory card access lamp is off, turn the camera off, open the battery-chamber cover, and press the card in to eject it (q). The card can then be removed by hand (w).
Battery Level The battery level is shown in the shooting display while the camera is on. Monitor Viewfinder • The battery level display changes as the battery level diminishes, from L through K and finally to H. When the battery level falls to H, suspend shooting and charge the battery or ready a spare battery. • If the message “Shutter release disabled. Recharge battery.” is displayed, charge or exchange the battery.
D Memory Cards • Memory cards may be hot after use. Observe due caution when removing memory cards from the camera. • Turn the power off before inserting or removing memory cards. Do not remove memory cards from the camera, turn the camera off, or remove the battery during formatting or while data are being recorded, deleted, or copied to a computer or other device. Failure to observe these precautions could result in loss of data or in damage to the camera or card.
Attach a Lens The camera can be used with Z mount lenses. Before attaching or removing lenses, confirm that the camera power switch is in the OFF position. Be careful to prevent dust from entering the camera when the lens or body cap is removed, and be sure to remove the lens cap before taking pictures. The lens generally used in this manual for illustrative purposes is a NIKKOR Z DX 16– 50mm f/3.5–6.3 VR.
D F Mount Lenses Be sure to attach the FTZ mount adapter (available separately) before using F mount lenses. Attempting to attach F mount lenses directly to the camera could damage the lens or image sensor. D Detaching Lenses Be sure the camera is off when removing or exchanging lenses. To remove the lens, press and hold the lens release button (q) while turning the lens clockwise (w). After removing the lens, replace the lens caps and camera body cap.
Turn the Camera On When you first turn the camera on, you will be prompted to choose a language using the multi selector and J button. Press G and use the multi selector and J button to set the camera clock. No other operations can be performed until the clock is set.
Basic Photography and Playback This chapter explains the basics of taking and viewing photos. Taking Photographs (b Mode) Follow the steps below to take photographs in b (auto) mode, an automatic “point-and-shoot” mode in which the majority of settings are controlled by the camera in response to shooting conditions. 1 Turn the camera on. The monitor will light. 2 Select photo mode. Rotate the photo/movie selector to C.
3 Select b mode. Rotate the mode dial to b. Mode dial 4 Ready the camera. Hold the handgrip in your right hand and cradle the camera body or lens with your left. Bring your elbows in against the sides of your chest.
5 Frame the photograph. Frame the shot with your subject in the AF-area brackets. AF-area brackets 6 Press the shutter-release button halfway to focus. • If the subject is stationary, the focus point will be displayed in green when the camera focuses. If the camera is unable to focus, the AFarea brackets will flash.
7 Shoot. Smoothly press the shutter-release button the rest of the way down to take the photograph (you can also take a photograph by touching the monitor: touch your subject to focus and lift your finger to release the shutter). The memory card access lamp will light while the photo is recorded to the memory card. Do not eject the memory card or remove the battery until the lamp has gone out and recording is complete.
Shooting Movies (b Mode) b (auto) mode can also be used for simple, “point-and-shoot” movie recording. 1 Turn the camera on. The monitor will light. 2 Select movie mode. Rotate the photo/movie selector to 1. Note that the built-in flash and optional flash units cannot be used when the camera is in movie mode. 3 Select b mode. Rotate the mode dial to b.
4 Start recording. Press the movie-record button to start recording. While recording is in progress, the camera will display a recording indicator and the time remaining. The camera can be refocused at any time during recording by tapping your subject in the display. Sound is recorded via the built-in microphone; do not cover the microphone during recording. Movie-record button Recording indicator Time remaining 5 End recording. Press the movie-record button again to end recording.
Basic Playback Photographs and movies can be viewed on the camera. 1 Press the K button. A picture will appear in the display. 2 View additional pictures. Press 4 or 2 to view additional pictures. When pictures are displayed in the monitor, you can view other pictures by flicking a finger left or right over the display. To end playback and return to shooting mode, press the shutterrelease button halfway. Viewing Movies Movies are indicated by a 1 icon.
The following operations can be performed: Operation Pause Play Rewind/advance Start slow-motion playback Skip 10 s Skip to last or first frame Adjust volume Trim movie Exit Return to shooting mode Description Press 3 to pause playback. Press J to resume playback when playback is paused or during rewind/advance. Press 4 to rewind, 2 to advance.
Deleting Unwanted Pictures Press the O button to delete the current picture. Note that pictures cannot be recovered once deleted. 1 Display a picture you wish to delete. Display a photo or movie you wish to delete as described in “Basic Playback” (0 24). 2 Delete the picture. Press the O button. A confirmation dialog will be displayed; press the O button again to delete the picture and return to playback. To exit without deleting the picture, press K.
Technical Notes Caring for the Camera and Battery: Cautions Do not drop: The product may malfunction if subjected to strong shocks or vibration. Keep dry: This product is not waterproof, and may malfunction if immersed in water or exposed to high levels of humidity. Rusting of the internal mechanism can cause irreparable damage.
Cleaning: When cleaning the camera body, use a blower to gently remove dust and lint, then wipe gently with a soft, dry cloth. After using the camera at the beach or seaside, wipe off any sand or salt using a cloth lightly dampened in pure water and then dry the camera thoroughly. Lenses, viewfinders, and other glass elements are easily damaged. Dust and lint should be gently removed with a blower. When using an aerosol blower, keep the can vertical to prevent discharge of liquid.
Notes on the monitor and viewfinder: These displays are constructed with extremely high precision; at least 99.99% of pixels are effective, with no more than 0.01% being missing or defective. Hence while these displays may contain pixels that are always lit (white, red, blue, or green) or always off (black), this is not a malfunction and has no effect on images recorded with the device. Images in the monitor may be difficult to see in a bright light.
• Remove the battery from the camera or charger when not in use and replace the terminal cover. These devices draw minute amounts of charge even when off and could draw the battery down to the point that it will no longer function. If the battery will not be used for some time, insert it in the camera and run it flat before removing it from the camera for storage.
• Battery capacity may temporarily drop if the battery is charged at low temperatures or used at a temperature below the temperature at which it was charged. • Continuing to charge the battery after it is fully charged can impair battery performance. • A marked drop in the time a fully charged battery retains its charge when used at room temperature indicates that it requires replacement. Purchase a new battery. • Use the charger with compatible batteries only. Unplug when not in use.
Specifications Nikon Z 50 Digital Camera Type Type Lens mount Lens Compatible lenses Effective pixels Effective pixels Image sensor Image sensor Total pixels Dust-Reduction System Storage Image size (pixels) 32 Technical Notes Digital camera with support for interchangeable lenses Nikon Z mount • Z mount NIKKOR lenses • F mount NIKKOR lenses with mount adapter; restrictions may apply 20.9 million 23.5 × 15.7 mm CMOS sensor (Nikon DX format) 21.
Storage File format Picture Control System Media File system Viewfinder Viewfinder Frame coverage Magnification Eyepoint Diopter adjustment Eye sensor Monitor Monitor • NEF (RAW): 12 or 14 bit • JPEG: JPEG-Baseline compliant with fine (approx. 1 : 4), normal (approx. 1 : 8), or basic (approx.
Shutter Type Speed Flash sync speed Release Release mode Electronically-controlled vertical-travel focalplane mechanical shutter; electronic frontcurtain shutter; electronic shutter 1/4000 – 30 s (choose from step sizes of 1/3 and 1/2 EV), bulb, time X= 1/200 s; synchronizes with shutter at 1/200 s or slower; Auto FP High-Speed sync supported Single frame, low-speed continuous, highspeed continuous, high-speed continuous (extended), self-timer • Low-speed continuous: 1–4 fps • High-speed continuous: 5 fps
Exposure Mode • b: Auto, P: programmed auto with flexible program, S: shutter-priority auto, A: aperturepriority auto, M: manual • Scene modes: k portrait; l landscape; p child; m sports; n close up; o night portrait; r night landscape; s party/indoor; t beach/snow; d sunset; e dusk/dawn; f pet portrait; g candlelight; j blossom; z autumn colors; 0 food • Special effect modes: 4 night vision; V super vivid; T pop; U photo illustration; 5 toy camera effect; 6 miniature effect; 7 selective color; 1 silhouett
Focus Lens servo • Autofocus (AF): Single-servo AF (AF-S); continuous-servo AF (AF-C); AF mode autoswitch (AF-A; available only in photo mode); full-time AF (AF-F; available only in movie mode); predictive focus tracking • Manual focus (M): Electronic rangefinder can be used Focus points (single-point 209 AF, photo mode, DX image area) AF-area mode Pinpoint, single-point, and dynamic-area AF (pinpoint and dynamic-area AF available in photo mode only); wide-area AF (S); wide-area AF (L); auto-area AF Focus
Flash Flash-ready indicator Accessory shoe Nikon Creative Lighting System (CLS) White balance White balance Bracketing Bracketing types Movie Metering system Metering mode Frame size (pixels) and frame rate Lights when built-in flash or optional flash unit is fully charged; flashes as underexposure warning after flash is fired at full output ISO 518 hot-shoe with sync and data contacts and safety lock i-TTL flash control, optical Advanced Wireless Lighting, FV lock, Color Information Communication, Auto
Movie File format Video compression Audio recording format Audio recording device MOV, MP4 H.
Wi-Fi/Bluetooth Wi-Fi Bluetooth Range (line of sight) • Standards: - IEEE 802.11b/g/n (Africa, Asia, Oceania, and the following European countries: Albania, Armenia, Georgia, Kyrgyzstan, Moldova, and Tajikistan) - IEEE 802.11b/g/n/a/ac (other European countries, Uzbekistan, U.S.A., Canada, Mexico) - IEEE 802.
Power source Battery Charging AC adapter One EN-EL25 rechargeable Li-ion battery EH-73P charging AC adapter Tripod socket Tripod socket 14 Dimensions/weight Dimensions (W × H × D) Weight Operating environment Temperature Humidity / in. (ISO 1222) Approx. 126.5 × 93.5 × 60 mm (5 × 3.7 × 2.4 in.) Approx. 450 g (15.9 oz.) with battery and memory card but without body cap; approx. 395 g/14 oz.
❚❚ MH-32 Battery Charger Rated input Rated output Supported batteries Charging time Operating temperature Dimensions (W × H × D) Weight AC 100–240 V, 50/60 Hz, 0.21 A DC 8.4 V/1.12 A (MAX) Nikon EN-EL25 rechargeable Li-ion batteries Approx. 2 hours and 30 minutes at an ambient temperature of 25 °C (77 °F) when no charge remains 0 °C–40 °C (+32 °F–104 °F) Approx. 67 × 94 × 28 mm (2.7 × 3.8 × 1.2 in.), excluding plug adapter Approx. 99 g (3.
A Disposing of Data Storage Devices Please note that deleting images or formatting memory cards or other data storage devices does not completely erase the original image data. Deleted files can sometimes be recovered from discarded storage devices using commercially available software, potentially resulting in the malicious use of personal image data. Ensuring the privacy of such data is the user’s responsibility.
Approved Memory Cards The camera supports SD, SDHC, and SDXC memory cards, including SDHC and SDXC cards compliant with UHS-I. Cards rated UHS Speed Class 3 or better are recommended for movie recording and playback; using slower cards may result in recording or playback being interrupted. When choosing cards for use in card readers, be sure they are compatible with the device. Contact the manufacturer for information on features, operation, and limitations on use.
Battery Endurance The approximate length of footage or number of shots that can be recorded with a fully-charged EN-EL25 battery varies with the monitor mode.
NIKKOR Z DX 16–50mm f/3.5–6.3 VR Lens Note that lens kits may not be available in some countries or regions. Using the Lens ❚❚ Parts of the Lens: Names and Functions 1 2 8 3 4 5 6 7 9 Note: The rear cap included with the lens that comes with the lens kit may differ from that shown, in which case it can be removed without performing Step q.
1 2 3 4 5 Lens hood* Zoom ring Focal length scale Focal length mark Control ring 6 Lens mounting mark 7 CPU contacts 8 Front lens cap 9 Rear lens cap * Available separately. Specifications Mount Focal length Maximum aperture Lens construction Angle of view Focal length scale Focusing system Vibration reduction Minimum focus distance (measured from focal plane) Maximum reproduction ratio Diaphragm blades Aperture range Filter-attachment size Dimensions Weight Nikon Z mount 16 – 50 mm f/3.5 – 6.
NIKKOR Z DX 50–250mm f/4.5–6.3 VR Lens Note that lens kits may not be available in some countries or regions. Using the Lens ❚❚ Parts of the Lens: Names and Functions 1 2 3 11 4 5 6 7 8 9 10 12 Note: The rear cap included with the lens that comes with the lens kit may differ from that shown, in which case it can be removed without performing Step q.
1 2 3 4 5 6 Lens hood* Lens hood lock mark Lens hood alignment mark Lens hood mounting mark Zoom ring Focal length scale 48 Technical Notes 7 Focal length mark 8 Control ring 9 Lens mounting mark 10 CPU contacts 11 Front lens cap 12 Rear lens cap * Available separately.
Specifications Mount Focal length Maximum aperture Lens construction Angle of view Focal length scale Focusing system Vibration reduction Minimum focus distance (measured from focal plane) Maximum reproduction ratio Diaphragm blades Aperture range Filter-attachment size Dimensions Weight Nikon Z mount 50 – 250 mm f/4.5 – 6.
Notices Notices for Customers in the U.S.A. The Battery Charger IMPORTANT SAFETY INSTRUCTIONS—SAVE THESE INSTRUCTIONS DANGER—TO REDUCE THE RISK OF FIRE OR ELECTRIC SHOCK, CAREFULLY FOLLOW THESE INSTRUCTIONS For connection to a supply not in the U.S.A., use an attachment plug adapter of the proper configuration for the power outlet if needed. This power unit is intended to be correctly oriented in a vertical or floor mount position.
Notice for Customers in Canada CAN ICES-3 B / NMB-3 B Notices for Customers in Europe CAUTION: RISK OF EXPLOSION IF BATTERY IS REPLACED BY AN INCORRECT TYPE. DISPOSE OF USED BATTERIES ACCORDING TO THE INSTRUCTIONS. This symbol indicates that electrical and electronic equipment is to be collected separately. The following apply only to users in European countries: • This product is designated for separate collection at an appropriate collection point. Do not dispose of as household waste.
Notice for Customers in the U.S.A. and Canada This device complies with part 15 of FCC Rules and Innovation, Science and Economic Development Canada’s licence-exempt RSSs. Operation is subject to the following two conditions: (1) this device may not cause harmful interference, and (2) this device must accept any interference received, including interference that may cause undesired operation.
Co-location This transmitter must not be co-located or operated in conjunction with any other antenna or transmitter. Nikon Inc., 1300 Walt Whitman Road, Melville, New York 11747-3064, U.S.A. Tel.: 631-547-4200 FCC/ISED RF Exposure Statement The available scientific evidence does not show that any health problems are associated with using low power wireless devices. There is no proof, however, that these low power wireless devices are absolutely safe.
Notice for Customers in the UK Hereby, Nikon Corporation declares that the radio equipment type Z 50 is in compliance with Radio Equipment Regulations 2017. The full text of the UKCA declaration of conformity is available at the following internet address: https://imaging.nikon.com/support/pdf/UKCA_DoC_N1912.pdf For this radio equipment, 5150–5350 MHz band is restricted to indoor operations only.
A Conformity Marking The standards with which the camera complies can be viewed using the Conformity marking option in the setup menu.
Trademarks and Licenses A Trademark Information IOS is a trademark or registered trademark of Cisco Systems, Inc., in the United States and/or other countries and is used under license. Windows is either a registered trademark or a trademark of Microsoft Corporation in the United States and/or other countries. Mac, macOS, OS X, Apple®, App Store®, the Apple logos, iPhone®, iPad®, and iPod touch® are trademarks of Apple Inc. registered in the U.S. and/or other countries.
A FreeType License (FreeType2) Portions of this software are copyright © 2012 The FreeType Project (https://www.freetype.org). All rights reserved. A MIT License (HarfBuzz) Portions of this software are copyright © 2018 The HarfBuzz Project (https://www.freedesktop.org/wiki/Software/HarfBuzz). All rights reserved.
A Unicode® Character Database License (Unicode® Character Database) This software incorporates Unicode® Character Database open-source code. The license for this open-source code is given below. COPYRIGHT AND PERMISSION NOTICE Copyright © 1991-2019 Unicode, Inc. All rights reserved. Distributed under the Terms of Use in https://www.unicode.org/copyright.html.
Technical Notes 59
60 Technical Notes
Warranty Terms - Nikon Europe Service Warranty Dear Nikon Customer, We thank you for your purchasing this Nikon product. Should your Nikon product require warranty service, please contact the dealer from whom it was purchased or a member of our authorized service network within the sales territory of Nikon Europe B.V. (e.g. Europe/Russia/others). See details under: https://www.europe-nikon.
2. This warranty will not cover: • necessary maintenance and repair or replacement of parts due to normal wear and tear. • modifications to upgrade the product from its normal purpose as described in user manuals, without the prior written consent of Nikon. • transport costs and all risks of transport relating directly or indirectly to the warranty of the products.
4. This service warranty does not affect the consumer’s statutory rights under applicable national laws in force, nor the consumer’s right against the dealer arising from their sales/ purchase contract. Notice: An overview of all authorized Nikon Service Stations can be found online by following this Link (URL = https://www.europe-nikon.com/service/).
E L P Nikon Z 50 S M A No reproduction in any form of this manual, in whole or in part (except for brief quotation in critical articles or reviews), may be made without written authorization from NIKON CORPORATION.