
Reference Manual


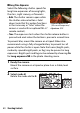
Table Of Contents
- Package Contents
- Table of Contents
- Menu List
- For Your Safety
- Notices
- Getting to Know the Camera
- Parts of the Camera
- Camera Controls
- The Viewfinder
- The Monitor Mode Button
- The Mode Dial
- The Command Dials
- The ISO (ISO Sensitivity) Button
- The Exposure Compensation Button
- Touch Controls
- The DISP Button
- The Playback Zoom and Thumbnail/Help Buttons
- The AE-L/AF-L (Protect) Button
- The MENU Button
- The i Button (i Icon)
- The Function Buttons (Fn1 and Fn2)
- The Flash Pop-Up Control
- First Steps
- Basic Photography and Playback
- Basic Settings
- Shooting Controls
- The i Menu
- More About Playback
- Menu Guide
- Defaults
- The Playback Menu: Managing Images
- The Photo Shooting Menu: Shooting Options
- Reset Photo Shooting Menu
- Storage Folder
- File Naming
- Choose Image Area
- Image Quality
- Image Size
- NEF (RAW) Recording
- ISO Sensitivity Settings
- White Balance
- Set Picture Control
- Manage Picture Control
- Color Space
- Active D-Lighting
- Long Exposure NR
- High ISO NR
- Vignette Control
- Diffraction Compensation
- Auto Distortion Control
- Flicker Reduction Shooting
- Metering
- Flash Control
- Flash Mode
- Flash Compensation
- Release Mode
- Focus Mode
- AF-Area Mode
- Optical VR
- Auto Bracketing
- Multiple Exposure
- HDR (High Dynamic Range)
- Interval Timer Shooting
- Time-Lapse Movie
- Silent Photography
- The Movie Shooting Menu: Movie Shooting Options
- Reset Movie Shooting Menu
- File Naming
- Frame Size/Frame Rate
- Movie Quality
- Movie File Type
- ISO Sensitivity Settings
- White Balance
- Set Picture Control
- Manage Picture Control
- Active D-Lighting
- High ISO NR
- Vignette Control
- Diffraction Compensation
- Auto Distortion Control
- Flicker Reduction
- Metering
- Release Mode (Save Frame)
- Focus Mode
- AF-Area Mode
- Optical VR
- Electronic VR
- Microphone Sensitivity
- Attenuator
- Frequency Response
- Wind Noise Reduction
- Custom Settings: Fine-Tuning Camera Settings
- The Setup Menu: Camera Setup
- Format Memory Card
- Save User Settings
- Reset User Settings
- Language
- Time Zone and Date
- Monitor Brightness
- Viewfinder Brightness
- Viewfinder Color Balance
- Information Display
- AF Fine-Tune
- Image Dust Off Ref Photo
- Image Comment
- Copyright Information
- Beep Options
- Touch Controls
- Self-Portrait Mode
- HDMI
- Location Data Display
- Airplane Mode
- Connect to Smart Device
- Connect to PC
- Wireless Remote (ML-L7) Options
- Conformity Marking
- Energy Saving
- Slot Empty Release Lock
- Reset All Settings
- Firmware Version
- The Retouch Menu: Creating Retouched Copies
- My Menu/Recent Settings
- Establishing Wireless Connections to Computers or Smart Devices
- Connecting to Other Devices
- On-Camera Flash Photography
- Remote Flash Photography
- Troubleshooting
- Technical Notes
- Compatible Lenses
- The Camera Display
- The Nikon Creative Lighting System
- Other Accessories
- Software
- Caring for the Camera
- Caring for the Camera and Battery: Cautions
- Specifications
- Approved Memory Cards
- Memory Card Capacity
- Battery Endurance
- NIKKOR Z DX 16–50mm f/3.5–6.3 VR Lens User’s Manual
- NIKKOR Z DX 50–250mm f/4.5–6.3 VR Lens User’s Manual
- Lenses That May Block the Built-in Flash and AF-Assist Illuminator
- Trademarks and Licenses
- Index
- Added Functions

80 Shooting Controls
❚❚ Long Time-Exposures
Select the following shutter speeds for
long time-exposures of moving lights,
the stars, night scenery, or fireworks.
• Bulb: The shutter remains open while
the shutter-release button is held
down (note that this option functions
in the same way as “time” when the
camera is used with an optional ML-L7
remote control).
• Time: The exposure starts when the shutter-release button is
pressed and ends when the button is pressed a second time.
To prevent blur, mount the camera on a tripod. Nikon also
recommends using a fully-charged battery to prevent loss of
power while the shutter is open. Note that noise (bright spots,
randomly-spaced bright pixels, or fog) may be present in long
exposures. Bright spots and fog can be reduced by choosing On
for Long exposure NR in the photo shooting menu.
1 Ready the camera.
Mount the camera on a tripod or place it on a stable, level
surface.
2 Select mode M.
Rotate the mode dial to M.
• Shutter speed: Bulb
(35-second exposure)
• Aperture: f/25