Professional Professional Professional Technical guide - N-RAW - En
Index Photographing About RAW video 3 Camera settings 4 About tone mode 6 Restrictions for recording videos in N-RAW format 7 N-RAW data information (image size, etc.
About RAW Video RAW video is a video file that is output directly from the camera’s image sensor without any in-camera image processing (RGB data before demosaicing)*. Like RAW still images, RAW video files record rich image information (tonal gradation, etc.), meaning they offer greater flexibility in color grading compared to Log video or video recorded in-camera.
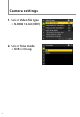
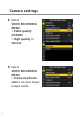
Camera settings 1. Select Video file type > N-RAW 12-bit (NEV) 2.
Camera settings 3. Select VIDEO RECORDING MENU > Video quality (N-RAW) > High quality or Normal 4.
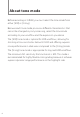
About tone mode Before recording in N-RAW, you must select the tone mode from either [SDR] or [N-Log]. Because each tone mode possesses different characteristics that cannot be changed in post-processing, select the tone mode according to your workflow and the expression you desire. The [SDR] tone mode is optimal for SDR workflows, allowing for shooting at low sensitivities below ISO 800 and offering superior noise performance in dark areas compared to the [N-Log] mode.
Restrictions for recording videos in N-RAW format Restrictions on selecting the [SDR] or [N-Log] tone mode are as follows.
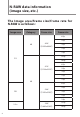
N-RAW data information (image size, etc.) The Image area/frame size/frame rate for N-RAW is as follows: Image area Category Frame size Frame rate 60p 50p 8K 8.3K (8256×4644) 30p 25p 24p 120p FX 100p 60p 4.1K (4128×2322) 50p 30p 25p 24p 4K 60p 50p DX 5.4K (5392×3032) 30p 25p 24p 2.3× 8 3.
Da Vi nc i R e s o l ve 9
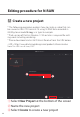
Editing procedure for N-RAW 1 Create a new project * The following procedure explains how to create a video that can be viewed in Rec.709 Gamma 2.4 using N-RAW data recorded in 8K/60p, tone mode N-Log, as a typical example. * Paid version of DaVinci Resolve 17.4.6 or later is required for editing work including rendering. * Please download and install DaVinci Resolve from the URL below. https://www.blackmagicdesign.com/products/davinciresolve Note: This URL is as of June, 2022.
Editing procedure for N-RAW 2 Set the master settings for the project you created ① ② ① Select File on the menu bar ② Select Project Settings ③ ④ ③ Select Timeline resolution > 7680 x 4320 8K Ultra HD 11 ④ Select Timeline frame rate > 59.
Editing procedure for N-RAW 3 Check the color management settings ② ③ ④ ① ⑤ ① Select Color Management in the project settings ② Confirm that Color science is set to the default setting of DaVinci YRGB ③ Confirm that Timeline color space is set to the default setting of Rec.709 Gamma 2.
Editing procedure for N-RAW 4 Import the data recorded in 8K/60p N-RAW ① ① Open the folder where the data is stored and drag-and-drop to the media pool 13
Editing procedure for N-RAW 5 Edit the video ② ① ① Select the Edit tab at the bottom of the screen to move to the edit page ② Right-click the data and select Create New Timeline Using Selected Clips ③ ④ ③ Name the timeline ④ Select Create 14
Editing procedure for N-RAW ⑤ ⑤ Drag-and-drop the N-RAW data to the timeline 15
Editing procedure for N-RAW 6 Change the color space and gamma of the recorded data according to the timeline color space and output color space Conversion pattern 1: Convert from the camera RAW ① ② ③ ① Select Decode Using > Clip to allow Color Space and Gamma to be changed for each clip ② Set Color Space to Rec.709 and Gamma to Gamma 2.
Editing procedure for N-RAW Conversion pattern 2: Use N-Log 3D LUT * It is assumed that the N-Log 3D LUT provided by Nikon is registered with DaVinci Resolve.
Editing procedure for N-RAW 7 Export the data ② ④ ③ ① ① Select the Deliver tab at the bottom right of the screen ② Type the file name in the Render Settings ③ Scroll down and confirm that the resolution and frame rate of the timeline is the same as the project.
EDI US X Pro 19
Editing procedure for N-RAW 1 Create new project * The following procedure explains how to create a video that can be viewed in SDR using N-RAW data recorded in 8K/60p, tone mode N-Log, as a typical example. * Paid version of EDIUS X Pro 10.32 or later is required for editing work including rendering. * Please download and install EDIUS X Pro from the URL below. https://www.ediusworld.com/products/index.html Note: This URL is as of June, 2022.
Editing procedure for N-RAW 2 Configure the project settings ① ① Select an available preset ② ③ ② Select Customize ③ Select OK 21
Editing procedure for N-RAW 3 Change the detailed settings of the project ① ④ ⑤ ② ③ ⑥ ① Select Video Preset > 8K UHD 7680 x 4320 59.94p ② Select Video Bit Depth > 10bit ③ Select Color Space > BT.709 ④ Confirm that HDR/SDR gain is set to the default setting of 6.
Editing procedure for N-RAW * You can also change the settings of projects that you have previously finished.
Editing procedure for N-RAW 4 Import the data recorded in 8K/60p N-RAW * Proxy files need to be imported at the same time, assuming editing utilizing the EDIUS proxy mode. * Editing RAW videos of 8K/60p requires high CPU processing power. Therefore, the EDIUS proxy mode is recommended for editing.
Editing procedure for N-RAW ⑤ ⑥ ⑤ When the proxy file that is paired with the N-RAW file is imported to EDIUS, a temporary editing clip mark appears at the top right corner on the image displayed in the Bin panel ⑥ Drag-and-drop the N-RAW file to the timeline ⑦ ⑧ ⑦ Select Mode on the menu bar ⑧ Select Proxy Mode 25 * When the display of the clip shows a grid-like display appearing on the timeline, the system has switched from the original N-RAW to a proxy-handling state.
Editing procedure for N-RAW 5 Convert the color space and gamma of the recorded data according to the project settings * As previously set up, it is assumed that the video will be viewed in SDR and color space BT.709. * When N-RAW data is imported to EDIUS, it is decoded as N-Log, so that color space is set to rec.2020 and the gamma is set to N-Log.
Editing procedure for N-RAW ④ Confirm that the display of the preview window changes ⑤ Double-click the Primary Color Correction in the Information panel to open the Primary Color Correction ⑤ ⑥ ⑦ ⑧ ⑥ Confirm that Color Space > Source is set to N-log ⑦ Confirm that Destination/LUT is set to Project Color Space (BT.709) ⑧ Confirm that HDR/SDR Gain is the same as the project settings, and that N-Log (decoded from N-RAW) as source file is converted to SDR BT.
Editing procedure for N-RAW Conversion pattern 2: Use N-Log 3D LUT * It is assumed that the 3D-LUT provided by Nikon is registered with EDIUS.
Editing procedure for N-RAW 6 Export the video in the timeline * It can be assumed that an actual workflow has editing and color grading before the following steps, however, this manual omits the explanation.
Editing procedure for N-RAW ④ ⑤ ④ Select an exporter ⑤ Select Export ⑥ Name the file ⑦ Select Save ⑥ 30 ⑦
Editing procedure for N-RAW ⑧ ⑧ Select the Job tab and check the rendering progress 31
© 2022 Nikon Corporation