
Reference Manual
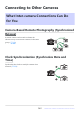
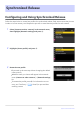

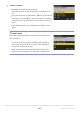

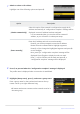
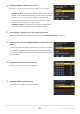
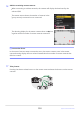
Table Of Contents
- Table of Contents
- When Your First Photo Can’t Wait
- Before You Begin
- Parts of the Camera
- Using the Menus
- First Steps
- Basic Photography and Playback
- Shooting Settings
- Video Recording
- Viewing Pictures
- Retouching Photographs
- Editing Videos
- Voice Memos
- Connecting to HDMI TVs and Recorders
- Connecting to Smart Devices
- Connecting to Computers or FTP Servers
- Connecting to Other Cameras
- Flash Photography
- Remote Flash Photography
- The Photo Shooting Menu
- Menu Items and Defaults
- Reset Photo Shooting Menu
- Storage Folder
- File Naming
- Primary Slot Selection
- Secondary Slot Function
- Image Area
- Tone Mode
- Image Quality
- Image Size Settings
- RAW Recording
- ISO Sensitivity Settings
- White Balance
- Set Picture Control
- Manage Picture Control
- Set Picture Control (HLG)
- Color Space
- Active D-Lighting
- Long Exposure NR
- High ISO NR
- Vignette Control
- Diffraction Compensation
- Auto Distortion Control
- Skin Softening
- Portrait Impression Balance
- Photo Flicker Reduction
- Metering
- Flash Control
- Flash Mode
- Flash Compensation
- Release Mode
- Focus Mode
- AF-Area Mode
- AF/MF Subject Detection Options
- MF Subject Detection Area
- Vibration Reduction
- Link VR to Focus Point
- Auto Bracketing
- Multiple Exposure
- HDR Overlay
- Interval Timer Shooting
- Time-Lapse Video
- Focus Shift Shooting
- Pixel Shift Shooting
- The Video Recording Menu
- Menu Items and Defaults
- Reset Video Recording Menu
- Storage Folder
- File Naming
- Destination
- Video File Type
- Frame Size/Frame Rate
- Image Area
- ISO Sensitivity Settings
- White Balance
- Set Picture Control
- Manage Picture Control
- HLG Quality
- Active D-Lighting
- High ISO NR
- Vignette Control
- Diffraction Compensation
- Auto Distortion Control
- Skin Softening
- Portrait Impression Balance
- Video Flicker Reduction
- Metering
- Focus Mode
- AF-Area Mode
- AF/MF Subject Detection Options
- MF Subject Detection Area
- Vibration Reduction
- Electronic VR
- Microphone Sensitivity
- Attenuator
- Frequency Response
- Wind Noise Reduction
- Mic Jack Plug-in Power
- Headphone Volume
- Timecode
- External Rec. Cntrl (HDMI)
- The Custom Settings Menu
- Menu Items and Defaults
- Reset Custom Settings
- a1: AF-C Priority Selection
- a2: AF-S Priority Selection
- a3: Focus Tracking with Lock-On
- a4: Focus Points Used
- a5: Store Points by Orientation
- a6: AF Activation
- a7: Focus Point Persistence
- a8: Limit AF-Area Mode Selection
- a9: Focus Point Wrap-Around
- a10: Focus Point Display
- a11: Built-in AF-Assist Illuminator
- a12: Focus Peaking
- a13: Focus Point Selection Speed
- a14: Manual Focus Ring in AF Mode
- b1: ISO Sensitivity Step Value
- b2: Easy Exposure Compensation
- b3: Matrix Metering Face Detection
- b4: Center-Weighted Area
- b5: Fine-Tune Optimal Exposure
- c1: Shutter-Release Button AE-L
- c2: Self-Timer
- c3: Power Off Delay
- d1: CL Mode Shooting Speed
- d2: Maximum Shots per Burst
- d3: Pre-Release Capture Options
- d4: Sync. Release Mode Options
- d5: Shutter Type
- d6: Extended Shutter Speeds (M)
- d7: Limit Selectable Image Area
- d8: File Number Sequence
- d9: View Mode (Photo Lv)
- d10: Starlight View (Photo Lv)
- d11: Warm Display Colors
- d12: View All in Continuous Mode
- d13: Release Timing Indicator
- d14: Image Frame
- d15: Grid Type
- d16: Virtual Horizon Type
- d17: Custom Monitor Shooting Display
- d18: Custom Viewfinder Shooting Display
- e1: Flash Sync Speed
- e2: Flash Shutter Speed
- e3: Exposure Comp. for Flash
- e4: Auto Flash ISO Sensitivity Control
- e5: Modeling Flash
- e6: Auto Bracketing (Mode M)
- e7: Bracketing Order
- e8: Flash Burst Priority
- f1: Customize i Menu
- f2: Custom Controls (Shooting)
- f3: Custom Controls (Playback)
- f4: Touch Fn
- f5: Focus-Point Lock
- f6: Reverse Dial Rotation
- f7: Release Button to Use Dial
- f8: Reverse Indicators
- f9: Reverse Ring for Focus
- f10: Focus Ring Rotation Range
- f11: Control Ring Response
- f12: Switch Focus/Control Ring Roles
- f13: Power Zoom (PZ) Button Options
- f14: Full-Frame Playback Flicks
- g1: Customize i Menu
- g2: Custom Controls
- g3: Focus-Point Lock
- g4: Limit AF-Area Mode Selection
- g5: AF Speed
- g6: AF Tracking Sensitivity
- g7: Power Zoom (PZ) Button Options
- g8: Fine ISO Control (Mode M)
- g9: Extended Shutter Speeds (S/M)
- g10: View Assist
- g11: Zebra Pattern
- g12: Limit Zebra Pattern Tone Range
- g13: Grid Type
- g14: Brightness Information Display
- g15: Custom Monitor Shooting Display
- g16: Custom Viewfinder Shooting Display
- g17: Red REC Frame Indicator
- The Playback Menu
- The Setup Menu
- Menu Items and Defaults
- Format Memory Card
- Language
- Time Zone and Date
- Monitor Brightness
- Monitor Color Balance
- Viewfinder Brightness
- Viewfinder Color Balance
- Finder Display Size (Photo Lv)
- Limit Monitor Mode Selection
- Auto Rotate Info Display
- AF Fine-Tuning Options
- Non-CPU Lens Data
- Save Focus Position
- Save Zoom Position (PZ Lenses)
- Auto Temperature Cutout
- Clean Image Sensor
- Image Dust Off Ref Photo
- Pixel Mapping
- Image Comment
- Copyright Information
- IPTC
- Voice Memo Options
- Camera Sounds
- Silent Mode
- Touch Controls
- Self-Portrait Mode
- HDMI
- USB Connection Priority
- Conformity Marking
- Battery Info
- USB Power Delivery
- Energy Saving (Photo Mode)
- Slot Empty Release Lock
- Save/Load Menu Settings
- Reset All Settings
- Firmware Version
- The Network Menu
- My Menu/Recent Settings
- Troubleshooting
- Technical Notes
- Compatible Lenses and Accessories
- Camera Displays
- Compatible Flash Units
- Other Compatible Accessories
- Software
- Caring for the Camera
- Caring for the Camera and Battery: Cautions
- Specifications
- Approved Memory Cards
- Portable Chargers (Power Banks)
- Memory Card Capacity
- Memory Card Capacity (Videos)
- Battery Endurance
- Trademarks and Licenses
- Notices
- Bluetooth and Wi-Fi (Wireless LAN)
- Index

Highlight [Master/remote] and press 2.
Choose a role for each camera fr
om “master” and “remote”.
[Master camera]: Pressing the shutter-release button on the
master camera releases the shutters on the remote cameras.
Each group can have only one master. If the group has
multiple master cameras, only the first to connect to the
network will actually serve in that capacity.
[Remote camera]: The shutters on the remote cameras are
synchronized with the shutter on the master camera.
On the master camera, highlight [Remote camera list] and
press
2.
Cameras assigned the remote camera role in Step10 are added
to the master camera’s remote camera list. The master camera
can store information for up to 10 remote cameras in slots [01]
through [10].
Highlight the desired slot and press 2.
Remot
e camera options will be displayed.
Highlight [Address] and press 2.
You will be pr
ompted to enter an IP address.
Repeat Steps1 through 10 for the remaining cameras.
When configuring remot
e cameras, be sure to select [Remote camera] in Step10.
348
Synchronized Release
10
11
12
13
14