N-Log Video Technical Guide — Video Editing Edition —
Table of Contents N-Log Videos: A Primer....................................................... 3 • About N-Log......................................................................................3 • N-Log Editing.....................................................................................3 Basic N-Log Video Editing.................................................. 4 LUTs: A Primer..................................................................... 16 • About LUT...................................
N-Log Videos: A Primer ● About N-Log Nikon’s unique “N-Log” is a logarithmic gamma curve designed to take full advantage of sensor dynamic range. Use N‑Log to preserve details in highlights and shadows and avoid over-saturated colors when recording videos. How to record N‑Log footage varies by camera type. See the Reference Guide for your camera available from the Nikon Download Center for details. https://downloadcenter.nikonimglib.
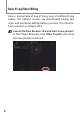
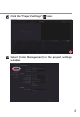
Basic N-Log Video Editing Here is an example of one of many ways of editing N-Log videos. For optimal results, we recommend taking test shots and practicing editing before you start. This information is current as of April 2024. 1 4 Launch DaVinci Resolve 18.6 and start a new project. In the Project Manager, click [New Project] and name the new project as desired.
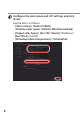
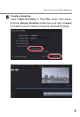
2 Click the “Project Settings” ( ) icon. 3 Select [Color Management] in the project settings window.
4 6 Configure the color space and LUT settings and click [Save]. Set the items as follows: • [Color science]: [DaVinci YRGB] • [Timeline color space]: [DaVinci WG/Intermediate] • [Output color Space]: [Rec.709 (Scene)] (Windows) / [Rec.
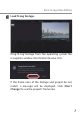
Basic N-Log Video Editing 5 Load N‑Log footage. Drag N‑Log footage from the operating system file navigation window into DaVinci Resolve 18.6. If the frame rates of the footage and project do not match, a message will be displayed. Click [Don’t Change] to use the project’s frame rate.
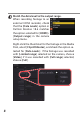
6 Match the data level to the output range. When recording footage to an external HDMI recorder, check that the [Data Levels] option in DaVinci Resolve 18.6 matches the option selected for [HDMI]> [Output range] in the camera setup menu. Right-click the thumbnail for the footage in the Media Pool, select [Clip Attributes], and check the option selected for [Data Levels].
Basic N-Log Video Editing 7 Create a timeline. Select [New Timeline] in the [File] menu, then deselect the [Empty Timeline] check box and click [Create] to create a new timeline using the selected footage.
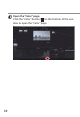
8 10 Open the “Color” page. Click the “Color” button ( ) at the bottom of the window to open the “Color” page.
Basic N-Log Video Editing 9 Add multiple nodes. • Right-click a node and select [Add Node] > [Add Serial]. • Repeat the step above to create multiple nodes.
10 12 Apply effects to the first node. Select [Effects], then [Color Space Transform] and drag it into the first node.
Basic N-Log Video Editing 11 Configure color space settings for the first node. Set items for [Color Space Transform] as follows: • [Input Color Space]: [Rec.
12 14 Configure color space settings for the last node. For the last node, set items for [Color Space Transform] as follows: • [Input Color Space]: [DaVinci Wide Gamut] • [Input Gamma]: [DaVinci Intermediate] • [Output Color Space]: [Rec.709] • [Output Gamma]: [Rec.709] (Windows) /[Rec.
Basic N-Log Video Editing 13 Apply color grading to the middle node. Color grading for videos is applied to the middle node. Multiple serial nodes can be added. When adding nodes, add them between the first and last nodes. For more color grading instructions and other additional information, see the online help for DaVinci Resolve or visit the Blackmagic Design website. Labeling Nodes Right-click the node and select [Node label] to add a label to the node.
LUTs: A Primer ● About LUT A “LUT”, or “lookup table”, is an array of preselected values used in video color-correction to map colors from the original input footage to the desired colors in the final output. Color correction is performed by looking up input colors and assigning them new RGB values based on the data in the table. A lookup table that treats each of the red, green, and blue channels separately is a “1D LUT”, which cannot be used to correct saturation or hue.
● About the N-Log 3D LUT Using the N-Log 3D LUT Nikon’s N-Log 3D LUT is specifically designed for color grading N-Log footage. Although the N-Log gamma curve captures a wide range of tones, the raw footage will seem to lack contrast. The 3D LUT can be applied post-production for pictures that display beautifully on monitors that support Rec. 709.
● Loading the N-Log 3D LUT To color grade N‑Log footage using the N‑Log 3D LUT, you will need compatible third-party video editing software. This guide shows how to apply the N‑Log 3D LUT using Blackmagic Design’s DaVinci Resolve 18.6. Compatible Applications In addition to DaVinci Resolve, the following applications can be used with the N‑Log 3D LUT: • Adobe: Premiere Pro • Apple: Final Cut Pro X Note that Nikon neither endorses this software nor guarantees its operation.
LUTs: A Primer 1 Select [Color Management] in the project settings window and click [Open LUT Folder]. q w The DaVinci Resolve 18.6 LUT folder will open. The folder path is: • Windows: C:\ProgramData C:\ ProgramData\\Blackmagic Design\ Design\DaVinci Resolve\ Resolve\Support Support\\LUT • macOS: Library//Application Support/ Library Support/Blackmagic Design/ Design/DaVinci Resolve/ Resolve/LUT 19
2 Add the N‑Log 3D LUT. Create a sub-folder under the LUT folder, name it as desired, and copy the N‑Log 3D LUT to the new sub-folder (named “Nikon” in this example). 3 Click [Update Lists] and then click [Save]. q w DaVinci Resolve will load the new LUT.
LUTs: A Primer ● Applying the N-Log 3D LUT Click the node you want to apply an N-Log 3D LUT to and double-click the N‑Log 3D LUT in the [LUTs] browser at the upper-left side of the window. w q For information on adjusting the LUT once it has been applied, see online help for DaVinci Resolve or visit the Blackmagic Design website.
© 2024 Nikon Corporation