INSTALLATION & OPERATION GUIDE M O D E L S DS8.3 DIRECTED SOUNDFIELD DS8.
Congratulations! Thank you for choosing a Directed Soundfield Ceiling Mount Loudspeaker from Niles. With proper installation and operation, you'll enjoy years of trouble-free use. Niles manufactures the industry's most complete line of custom installation components and accessories for audio/video systems. For a free full line catalog write: Niles, Catalog Request, P.O.
Features and Benefits Fully pivoting woofer and tweeter A pivoting woofer assembly can adjust up to 15° focusing bass and midrange tones directly at the listening area for superb imaging and unparalleled clarity. Within the woofer assembly, the tweeter is housed in its own low-diffraction pivoting assembly that can adjust up to 17° in any direction to create direct or diffused sound fields. The independently pivoting woofer’s and tweeter’s superior design is patented, (U.S. patent number 6,683,963).
Features and Benefits 3 Easy Installation The DS8.3 and DS8.5 employ a bracketless mounting system in existing ceilings. Simply cut a hole in the mounting surface, install the frame by tightening the four mounting “dogs” via the front panel screws. The dogs first swivel 90°, then clamp the loudspeakers frame to the drywall as you tighten the screws. Twist & LockTM Baffle Patented, (U.S. patent number 6,683,963). two-piece twist and lock baffle frame mechanism facilitates quick installations.
Recommended Amplifier Power For satisfactory performance, we recommend an amplifier with a power rating of 10 to 150 watts for the DS8.3; 10 to 175 watts for the DS8.5. Curiously, most speakers are not damaged by large amplifiers but by small amplifiers. If your system is playing loudly, a small amplifier will run out of power very quickly. When an amplifier runs out of power it creates damaging “clipping” distortion. A large amplifier will play at the same volume without distorting.
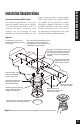
Installation Considerations Incorporating a Local Volume Control In a multiroom system there is one indispensible device for true convenience—a local volume control. It enables you to adjust the volume of the loudspeakers without leaving the room. Plan to wire the system so that each pair of loudspeakers has its own volume control built into the wall (think of a volume control as a dimmer switch for sound). Niles makes a wide range of high performance indoor and outdoor volume controls.
In large or unusually shaped rooms this might be the only way to achieve a good effect. If you like to listen to music surround modes which emulate concert hall acoustics, more than two surround loudspeakers will prove extraordinarily effective (See Figure 6). With Niles DS8.3 and DS8.5 loudspeakers it is easy to add another pair without affecting the decor of the room. However, you will need to use a much more powerful amplifier than that which is built into a typical surround sound receiver or amplifier.
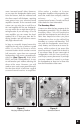
Speaker Placement Placement for Varying Listening Positions If you want the freedom to sit anywhere in a room facing any direction, and/or find that you prefer the “all around you” sound of some car stereos to a conventional “sound stage” facing you, consider the speaker placement techniques professional installers use in restaurants and bars. They place speakers in an array around the listening area, so that the music is always surrounding you, regardless of the direction you face.
Introduction Although the DS8.3 and DS8.5 have extensive ability to compensate for unusual placements with their unique pivoting woofers, tweeters and acoustic fine-tuning switches, placement is still the primary tool for satisfying your particular listening needs. In this section, we discuss how loudspeakers should be placed and how woofers and tweeters should be directed and how the acoustic fine-tuning switches should be set for different purposes.
Installation Fundamentals Installation Fundamentals Running the Loudspeaker Wire in New Construction If you have doubts about whether you are capable of installing a Niles ceiling mount loudspeakers, consult a Niles dealer or professional installer. They have special tools, techniques, and experience to make the impossible possible. The installer can provide you with an estimate before any work is done.
Pulling the Cable Pull the cable in sections (from the stereo to the volume control, from the volume control to the loudspeaker). Start with the longest sections and use left over wire to complete the short sections. If you plan to pull many rooms at the same time through a central route, walk off the distance to each destination, add a generous fudge factor for turns and other obstacles, then cut off each section so that you have a bundle of wires you can pull at once.
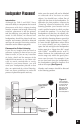
Installation Fundamentals Loudspeaker Location Volume Control Location Stereo Location Figure 8 beside electrical wire for more than a few feet. Try to keep speaker wire running parallel to power cables at least three feet away. To find exactly where an electrical cable is routed, try inspecting the inside of the wall by turning off the breaker for a particular power outlet or switch, removing the cover plate and switch or receptacle, and shining a penlight into the wall.
Figure 10 Installation Fundamentals In traditional wood stud/drywall construction you should first cut the hole for the loudspeaker and utilize the large hole to auger across the (through the ceiling joists) for as far as your drill bit will take you. Sometimes, you will need to use the “notching” technique to reach areas your drill bit won’t reach or to turn corners (e.g. to go down the wall when there is not an accessible attic). Don’t make an irregular hole in the drywall.
Installation in New Construction Installation in New Construction Insulating the Ceiling Cavity If feasible, fill the ceiling cavity with insulation at this point. Mounting the New Construction Bracket The hole saving bracket enables a faster and cleaner final installation of the loudspeaker. It forces the drywall installer to cut out the loudspeaker hole for you and provides wire ties for the loudspeaker wire, reducing the risks of accidental loss or movement of the wire.
Figure 14 IMPORTANT: Before you cut into any wall, review the sections on running wire and loudspeaker placement. 1. When determining the location of the loudspeaker cutout keep in mind that the mounting dogs will extend 3/4" beyond the cutout. make sure that you do not place the edge of the cutout directly next to a ceiling joist. Locate the joists using a stud sensor or handknocking. 2.
Final Installation in New or Existing Construction Final Installation in New or Existing Construction 1. If it is possible to lay a batt of insulation into the ceiling cavity do so. Remember to use equal amounts of insulation for each loudspeaker. 2. Check the position of the Impedance jumper on the crossover PC board. Choose the 4 ohm position if you are using an amplifier capable of driving a 4 ohm load and you have only one pair of speakers connected. Otherwise, use the 8 ohm position (See Figure 15).
Installing the loudspeaker the user’s favorite listening position minimizing reflections from the side walls. For surround sound or low volume background listening create more reflections and thus more ambience by directing the tweeter towards the side walls. 8. Direct the Woofer. The woofer is directed by gently pushing on the outer edge of the grille face. (See Figure 20). It will move 15° in any direction.
Operation Loudspeaker Phase Loudspeaker wire has two conductors. One conductor is attached to the negative (-) terminals and one conductor is attached to the positive (+) terminals of both your loudspeaker and your amplifier. Usually, the wire is marked for your convenience.
DS8.3 Driver Compliment 8” Injection molded polypropylene woofer with butyl rubber surround in an integrated patented pivoting mount, (15° pivot angle) 1" fluid-cooled ultra-wide dispersion silk dome tweeter in a patented low diffraction pivoting mount, (17° pivot angle) Recommended Amplifier Power 10 to 150 watts per channel Tone Controls Bass jumper: flat, -1dB and -2dB Baffle-mounted Treble controls: -1.5dB, flat and +1.
Limited Warranty Limited Warranty Niles Audio Corporation (“NILES”) warrants its loudspeaker products to the original purchaser to be free of manufacturing defects in material and workmanship for a period of five years from date of purchase. This Warranty is subject to the following additional conditions and limitations.
PLEASE FILL OUT THE WARRANTY REGISTRATION CARD ON THE REVERSE SIDE, DETACH, AND MAIL TO: DETACH HERE Niles Audio Corporation Warranty Registration Dept. P.O.
WARRANTY REGISTRATION CARD Model Purchased___________________________________ _________________________________________________ Serial Number____________________________________________________________________________________ Dealer Name and Location________________________________________________________________________ __________________________________________________________________________________________________ ❑ Dr. ❑ Miss ❑ Mr. ❑ Mrs. ❑ Ms.
www.nilesaudio.com Niles Audio Corporation 12331 S.W. 130 Street Miami, Florida 33186 Tel: (305) 238-4373 Fax: (305) 238-0185 Printed in Brazil CHARTER MEMBER ©2005 Niles Audio Corporation. All rights reserved. Niles, the Niles logos, Blending High Fidelity and Architecture, Systems Integration Amplifiers, and IntelliPad are registered trademarks of Niles Audio Corporation. QuickSnap, Microperf and Twist and Lock are trademarks of Niles Audio Corporation.