DS00427ACN_OS_3Si.qxp 12/20/04 5:51 PM INSTALLATION & Page a OPERATION GUIDE M O D E L S OS6.3Si OS5.
DS00427ACN_OS_3Si.qxp 12/20/04 5:51 PM Page b CONGRATULATIONS Thank you for choosing a Niles OS Indoor/Outdoor Loudspeaker. With proper installation and operation, you’ll enjoy years of trouble-free use. Niles manufactures the industry’s most complete line of custom installation components and accessories for audio/video systems. To learn more about Niles products visit our website: www.nilesaudio.com or call us at 800-BUY-HIFI (800-289-4434).
DS00427ACN_OS_3Si.qxp 12/20/04 5:51 PM Page 1 Niles once again raises the bar. With our first OS Indoor/Outdoor models we revealed a radical new understanding of loudspeaker capabilities. Niles original OS Indoor/Outdoor loudspeakers are constantly praised for their ability to deliver exemplary reliability and outstanding sound quality. These attributes have made Niles OS Indoor/Outdoor loudspeakers the best selling loudspeakers in their class.
DS00427ACN_OS_3Si.
DS00427ACN_OS_3Si.
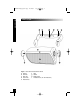
DS00427ACN_OS_3Si.qxp 12/20/04 5:51 PM Page 4 PARTS GUIDE PARTS GUIDE b d c d b d a g g f e e Figure 1 OS-5.3Si and OS-6.3Si Parts Guide a. b. c. d. e. 5 Bracket Nail Hole Wire Hole Screw Hole Bracket Knob f. g. h. i.
DS00427ACN_OS_3Si.
DS00427ACN_OS_3Si.qxp 12/20/04 5:51 PM Page 6 INSTALLATION CONSIDERATIONS INSTALLATION CONSIDERATIONS Tools and Materials Required • A wire stripper • A pencil • A level (optional) • Three screws or bolts suitable for the mounting surface • The proper screwdriver for your mounting hardware • A drill bit of the right size and type • An electric drill Wiring The OS loudspeaker connects to your receiver or amplifier using 2x2-conductor loudspeaker wire (See Figure 2).
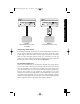
DS00427ACN_OS_3Si.qxp 12/20/04 5:51 PM Page 7 INSTALLATION CONSIDERATIONS Figure 2 Wiring directly from a receiver or amplifier Figure 3 Incorporating a volume control Incorporating a Volume Control It’s possible to control the volume of the sound at the loudspeaker location. Plan to wire the system so that each loudspeaker has it’s own volume control. Niles makes a wide range of indoor and outdoor volume controls. Consult your local Niles dealer for more information.
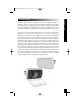
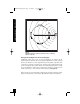
DS00427ACN_OS_3Si.qxp 12/20/04 5:51 PM Page 8 INSTALLATION CONSIDERATIONS 10' Figure 4 Illustration depicts the optimum placement zone for a listening distance of ten feet. Placing the OS Loudspeaker for the Best Sound Quality Traditionally, when using a pair of stereo loudspeakers, the listener will be positioned directly between the left and right loudspeakers to achieve optimum stereo sound. However, in some applications this is not possible, especially when a large area of coverage is required.
DS00427ACN_OS_3Si.qxp 12/20/04 5:51 PM Page 9 Figure 5 Placement for more bass output INSTALLATION CONSIDERATIONS You can control the loudspeakers bass output by placement. This is called the boundary effect. You will get more bass response by mounting the OS loudspeaker directly to a wall or other flat surface (any boundary close to the loudspeaker will reinforce the bass frequencies).
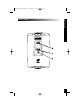
DS00427ACN_OS_3Si.qxp 12/20/04 5:51 PM Page 10 INSTALLATION CONSIDERATIONS Top View Nail Mounting Screw Mounting Custom Bracket Mounting Figure 7 The OS loudspeaker can be mounted three ways. 3. There is a threaded brass insert (1/4" – 20) on the back of the OS loudspeaker for attaching a custom bracket (See Figure 7). This allows you to position the loudspeaker at unusual angles or varying distances from the mounting surface.
DS00427ACN_OS_3Si.qxp 12/20/04 5:51 PM Page 11 The enclosure, the brackets, and the grilles of the OS loudspeaker can all be painted to match the surroundings. Because we want you to preserve the acoustic qualities of the grille, please paint the grille according to the grille painting instructions. Make sure you pick a paint that is appropriate for the mounting location. There are interior and exterior varieties, and even paint for marine uses.
DS00427ACN_OS_3Si.qxp 12/20/04 5:51 PM Page 12 PAINTING THE LOUDSPEAKER 2. Wipe off the other sides of the cabinet, the bracket, bracket knobs, and grille with a damp cloth. Do not touch or rub the loudspeakers on the front baffle. Make sure everything is dry before masking. 3. Mask off the binding posts and the brass threaded inserts on the back panel with masking tape. 4. Mask off the threaded inserts on the top and bottom with masking tape. 5.
DS00427ACN_OS_3Si.qxp 12/20/04 5:52 PM Page 13 Replacing the Grille Carefully fit the grille into its recess so that it is barely in place. Starting with one corner, go around the speaker, pushing the grille in a little bit each time. You should be gentle, the aluminum grille can be bent easily out of shape. You will feel a positive “snap” when it is in place. PAINTING THE LOUDSPEAKER If you are using an applicator or brush and a can of paint, thin the paint first.
DS00427ACN_OS_3Si.qxp 12/20/04 5:52 PM Page 14 INSTALLATION INSTALLATION Mounting the Bracket (if attaching the loudspeaker to a wall, ceiling, beam or other solid structure) 1. Loosen the bracket knobs and remove the bracket from the loudspeaker. 2. Hold the bracket up to the mounting surface. The loudspeaker can be mounted either horizontally or vertically. Hold the bracket so that the loudspeaker wire fits through the large, circular wire hole in the center of the bracket.
DS00427ACN_OS_3Si.qxp 12/20/04 5:52 PM Page 15 2. Strip one half inch of insulation from the end of each conductor of the loudspeaker wires. INSTALLATION Connecting the Loudspeaker 1. Separate the two conductors of each loudspeaker wire so that at least two inches of each conductor are free. 3. If you have any connectors (gold pins or bananas) which you prefer to use, affix them to the stripped wire ends now. Only gold plated connectors should be used outside as they will not tarnish or corrode. 4.
DS00427ACN_OS_3Si.qxp 12/20/04 5:52 PM Page 16 INSTALLATION 9. Tighten the bracket knobs using only your hands. Use of any power tools may over-tighten the knob, and strip the threads of the insert. 10. Check that the entire installation is safe and secure. Loudspeaker Phase Loudspeaker wire has two conductors. One conductor is attached to the negative (-) terminals and one conductor is attached to the positive (+) terminals of both your loudspeaker and your amplifier.
DS00427ACN_OS_3Si.qxp 12/20/04 5:52 PM Page 17 Listening at Higher Volumes Outdoors there are no walls to reflect and contain the sound. It requires more power to achieve a reasonable volume of sound outside than it does when you are indoors. You also frequently find yourself very far from the loudspeaker. It is possible to turn the volume so high that the amplifier runs out of power. This creates “clipping” distortion.
DS00427ACN_OS_3Si.qxp SPECIFICATIONS 19 12/20/04 5:52 PM Page 18 SPECIFICATIONS OS6.3Si Loudspeaker OS5.
DS00427ACN_OS_3Si.qxp 12/20/04 5:52 PM PLEASE FILL OUT THE WARRANTY REGISTRATION CARD ON THE REVERSE SIDE, DETACH, AND MAIL TO: DETACH HERE Niles Audio Corporation Warranty Registration Dept. P.O.
DS00427ACN_OS_3Si.qxp 12/20/04 5:52 PM Page 20 WARRANTY REGISTRATION CARD Model Purchased___________________________________ _______________________________________ Serial Number_________________________________________________________________________ Dealer Name and Location_______________________________________________________________ ______________________________________________________________________________________ K Dr. K Miss K Mr. K Mrs. K Ms.
DS00427ACN_OS_3Si.qxp 12/20/04 5:52 PM Page 21 DETACH HERE AND RETURN TO: Niles Audio Corporation Warranty Registration Dept. P.O. Box 160818 Miami, Florida 33116-0818 Niles Audio Corporation ("NILES") warrants its outdoor loudspeaker products to the original purchaser to be free of manufacturing defects in material and workmanship for a period of two years from date of purchase. This Warranty is subject to the following additional conditions and limitations.
DS00427ACN_OS_3Si.qxp 12/20/04 5:52 PM Page 22 Niles Audio Corporation 12331 S.W. 130 Street Miami, Florida 33186 Tel: (305) 238-4373 Fax: (305) 238-0185 Printed in China ©2004 Niles Audio Corporation. All rights reserved. Niles reserves the right to change product specifications without notice. Niles, the Niles logo and Blending High Fidelity and Architecture are registered trademarks of Niles Audio Corporation. MicroPerf and UltraSilk is a trademark of Niles Audio Corporation. Printed in China.