Nilfisk C 105.5 Nilfisk C 115.3 User Manual Downloaded from www.Manualslib.
Copyright © 2011 Nilfisk, Division of Nilfisk-Advance A/S Downloaded from www.Manualslib.
Nilfisk C 105.5 / C 115.3 Index 1 2 3 4 5 6 7 8 9 10 EN Safety precautions and warnings .............................................3 Description ...............................................................................5 Before you start using your pressure washer ...........................6 Operating your pressure washer ..............................................7 After using your pressure washer .............................................9 Maintenance .....................................
Nilfisk C 105.5 / C 115.3 EN safety only use original spare parts from the manufacturer or approved by the manufacturer. High pressure hoses, fittings and couplings are important for the safety of the appliance. Only use hoses, fittings and couplings recommended by the manufacturer. Do not use the appliance if a supply cord or important parts of appliance are damaged, e.g. safety device , high pressure hose and trigger gun. The appliance is intended to clean cars and garden etc..
Nilfisk C 105.5 / C 115.3 2 Description 2.1 Application 2.2 Operation elements and model survey EN This high-pressure washer has been developed for domestic use within: Only use the high-pressure washer for purposes described in this manual. - Car, motorbike, boat, caravan, trailer, patio/drive/flagstones, woodwork, brickwork, barbecue, garden furniture, lawn mower The safety precautions must be observed to prevent damage to the machine, the surface to be cleaned or severe personal injuries.
Nilfisk C 105.5 / C 115.3 EN 3 Before you start using your pressure washer 3.1 Mounting of trolley handle (C 115.3) 1. Place the trolley handle on the machine. 2. Secure the handle by mounting the 2 screws. Use the enclosed hexagon key. 3.2 Mounting of quick coupling 1. Screw the quick coupling tight on to the water inlet (2). Note: The inlet filter (2a) must always be fitted in the water inlet pipe to filter out sand, limestone and other impurities as these will damage the pump valves.
Nilfisk C 105.5 / C 115.3 4 Operating your pressure washer 4.1 Connection of high pressure hose EN 1. Mount the high pressure hose on the outlet (3). 4.2 Mounting of spray lance and Click & Clean nozzles 1. Push the spray lance (6) into the spray handle (7) and screw it on. Note: The spray lance (6) has a built-in low pressure nozzle that can be used for flushing away dirt. 2. Attach the nozzle.
Nilfisk C 105.5 / C 115.3 EN 4.3 Water connection An ordinary 1/2" garden hose of min. 10 m and max. 25 m will be suitable. NOTE: Connection to the public mains according to regulations. IMPORTANT! Only use water without any impurities. If there is a risk of running sands in the inlet water (i.e. from your own well), an additional filter (106411231) should be mounted. 1. Let the water run through the water hose before connecting it to the machine to prevent sand and dirt from penetrating the machine.
Nilfisk C 105.5 / C 115.3 5 After using your pressure washer 5.1 Storing the washer 5.2 Winding up of electric cable and high pressure hose (C115.3) The machine should be stored in a frost-free room! Pump, hose and accessories should always be emptied of water prior to storing as follows: 1. Stop the machine (press the start/stop switch “O” (1) and detach water hose and accessory. 2. Restart the machine and activate the trigger. Let the machine run until no more water runs through the spray handle.
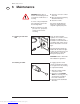
Nilfisk C 105.5 / C 115.3 EN 6 Maintenance WARNING! Always disconnect the electrical plug from the socket prior to maintenance or cleaning. To ensure a long and problem free working life, please take the following advice: Clean the connectors of dust and sand. Rinse the detergent spraying attachment after use. Clean the nozzles. Any repair should always be made in an authorized workshop with original spare parts.
Nilfisk C 105.5 / C 115.3 6.3 Cleaning of machine vents The machine should be kept clean so as to let cooling air pass freely through the machine vents. 6.4 Greasing of couplings To ensure an easy connection and that o-rings do not dry up, the couplings should be greased regularly. EN 11 Downloaded from www.Manualslib.
Nilfisk C 105.5 / C 115.3 EN 7 Trouble-shooting To avoid unnecessary disappointments, you should check the following before contacting the Nilfisk service organization: Symptom Cause Recommended action Machine refuses to start Machine not plugged in Defective socket Fuse has blown Defective extension cable Plug in machine. Try another socket. Replace fuse. Switch off other machines. Try without the extension cable. Fluctuating pressure Check that hoses and connections are airtight.
Nilfisk C 105.5 / C 115.3 8 Further information 8.1 Recycling the washer Make the old cleaner unusable immediately. 1. Unplug the cleaner and cut the electric cable. Do not discard electrical appliances with household waste. 8.2 Warranty conditions Nilfisk guarantees high pressure washers for domestic use for 2 years. If your high pressure washer or accessories are handed in for repair, a copy of the receipt must be enclosed.
Nilfisk C 105.5 / C 115.3 EN 9 Main Technical Data Type C 105.5-5 C 115.3-6 Rated pressure bar/MPa 75/7.5 80/8.0 Permissible pressure bar/MPa max. 105/10.5 max. 115/11.5 Rated flow l/min 5.2 5.2 Rated input kW 1.3 1.4 Rated voltage V 230-240 230-240 Max. water temperature °C 40 40 Inlet pressure bar/MPa 0.15-10/0.015-1.0 0.15-10/0.015-1.0 Sound pressure level dB(A) 78 78 Guaranteed sound power level dB(A) 93 93 Vibration according to ISO 5349 m/s2 < 2.5 < 2.
5m Downloaded from www.Manualslib.
O I O no 1LO¿V ,QGX N $G C 11 1284 5.3 7009 0 IP P123X5 77 128303884 Seria l YDQF ./W '. VWULYH H P M 1 $ 6 W/YY 'HQP 0 +DGV P ma DUN XQG 8.0 YY MP Q x 11. a 5 MP (80 T in ma l/min a (11 bar) We x 5 igh °C 5.2 bar) t AC kg 40 230 Ma -240V 8.4 de /50 for Hz/ Nilf 1.4 iskkW Ad van ce A/S Downloaded from www.Manualslib.
www.nilfisk.com Downloaded from www.Manualslib.