
User's Manual


1. Drill the fitting holes at the place of installation (wall/ ceiling), make sure, that
no cables or other lines are passing in place of drilling.
2. Put the screws in the holes and fix the lamp to the mounting place.
3. Insert the power cable (Type SJTW, 18AWG, min 80℃) connected to the
connector, through the bushing in the opening . (By slightly pulling, the position of
the washer can be optimised)
4. When Connect the connector, Pay attention to the correct polarity L and N
Note: For Canada the power cable is connected to the lamp by manufacture.
Warning : Ensure the cable is connected well, and cover the outlet box with the
canopy, be sure providing watertight seal between canopy and mounting surface
by using silicone building sealant or ther similar caulking
5. The reflector should shall be permanently and reliably connected to
the earthing terminal through the grouding wire.
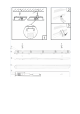
6. Adjust the connecting plate (7) and pay attention that the installation cable is
not touching the LED driver. The LED driver can become hot while in operation.
7. Assemble the clamps (11) at the designated position (See Fig. 2/ 3)
8. Put on the cover (10) and fix it with the clamps (11). All clamps should be used.