
Manual


12
www.ninjakitchen.com
English
Use
WARNING: Handle the Pro Extractor Blades
®
Assembly with care, as the blades are sharp.
WARNING: Never leave the appliance unattended while in use.
WARNING: Remove utensils prior to processing. Failure to remove may cause the bowl to be damaged or to
shatter, which may cause personal injury.
CAUTION: Do not blend hot liquids, doing so may cause excessive pressure buildup, resulting in risk of the
user being burned.
CAUTION: Remove the Pro Extractor Blades Assembly from the cup upon completion of blending. Do not
store ingredients before or after blending in the Nutri Ninja cup with the blade assembly attached. Some
foods may contain active ingredients or release gases which will expand if left in a sealed container,
resulting in excessive pressure buildup that can pose a risk of injury. For storage, only use Sip & Seal Lid
to cover.
IMPORTANT: Make sure that the motor base is plugged in for use.
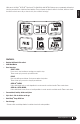
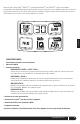
1 Review warning and caution statements above before
proceeding to number 2.
2 Place the motor base on a clean, dry, level surface such
as a counter or table top.
3 Make sure that the motor base is plugged in for use.
Display will read "--".
4 Add ingredients to the Nutri Ninja
®
cup.
NOTE: Do not overfill! To avoid spilling, do not add
ingredients past the “MAX” fill line.
5 Place the Pro Extractor Blades Assembly onto the cup
and twist it on tightly until you have a good seal.
(Fig. 1)
6 Turn the cup upside down and place it onto the motor
base, aligning the tabs on the cup with the motor base.
Turn it clockwise, until you feel it click into place. The
Timer light will illuminate.(Fig. 2)
7 Press one of the buttons to activate. (Fig. 3)
NOTE: When using the AUTO-iQ
™
presets, the unit will
operate using pulses, pauses and continuous runs. The
pauses allow the contents of the cup to settle. When
the timer reaches “0”, it will stop by itself.
Fig. 1 Fig. 2
Fig. 3 Fig. 4 Fig. 6
ASSEMBLY USE REMOVAL
Fig. 5
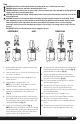
8 To remove the cup, ensure that the motor has stopped
running. Then turn the cup counter clockwise (Fig. 4)
and pull straight up to remove. (Fig. 5)
9 Turn the cup upright and remove the Pro Extractor
Blades Assembly by twisting the Pro Extractor Blades
Assembly counter clockwise. (Fig. 5)
10 Do not store blended contents with the Pro Extractor
Blade Assembly attached.
11 Twist the Sip & Seal
®
lid onto the cup to enjoy your
drink on the go. Press flip top cap firmly into the
opening to get the best seal. The flip top cap locks open
when pressed backward.
12 For storage, only use Sip & Seal lid to cover.
13 Be sure to store the Pro Extractor Blades Assembly
attached to an empty cup when not in use.
14 Make sure that the motor base is unplugged when not
in use.
15 To remove the motor base unit, tip the unit forward
from the rear to easily disengage the suction cups.