
Use and Care Manual


17
www.ninjakitchen.com
English
NOTE: Nutri Ninja
®
|
Ninja
®
Blender System with Auto-iQ
™
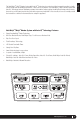
Technology can sense which jar is on the motor base. The
function lights will illuminate depending on which jar is
placed on the motor base. (Fig. 1)
WARNING: Never leave the appliance unattended while
in use.
IMPORTANT: Make sure that the motor base is
plugged in for use.
1 Place the motor base on a clean, dry, level surface such
as a counter or table top.
2 Add ingredients to the Nutri Ninja
®
cup.
3 Place the Pro Extractor Blades™ onto the cup and
tightly screw it on clockwise until you have a good seal.
(Fig. 2)
4 Turn the Nutri Ninja
®
cup upside down and place it
onto the motor base, aligning the tabs on the cup with
the motor base. Rotate the Nutri Ninja
®
cup clockwise
until it locks in place, you will hear a click when the
lock is engaged. (Fig. 3)
Fig. 2 Fig. 3
Assembly and Use for the Nutri Ninja
®
Cups
Fig. 4 Fig. 5 Fig. 6
ASSEMBLY USE REMOVAL
5 Press the power button on, and select the speed or
Auto-iQ
™
program that suits your needs.
The Auto-iQ
™
program will stop the appliance
automatically at the end of the program. (Fig. 4)
6. To pause the appliance, press the selected speed or
Auto-iQ
™
Program a second time.
7 Once you have reached your desired consistency, turn
the power button off. Turn the Nutri Ninja
®
cup counter-
clockwise and pull straight up to remove. (Fig. 5, Fig. 6)
NOTE: Do not overfill! To avoid spilling, do not add
ingredients past the “Max Liquid” line.
8 Turn the cup upright and remove the Pro Extractor
Blades™ by twisting the blade assembly counter
clockwise.
9 Place the Sip & Seal
™
lid onto the Nutri Ninja
®
cup,
twist to seal and enjoy!
10 Make sure that the motor base is unplugged when
not in use.
Use caution when handling the blade assemblies as the blades are very sharp.
Fig. 1