® Kitchen System 1100™ NJ602 series OWNER’S GUIDE NJ602_series_30_IB_ENG_120427_2.
IMPORTANT SAFETY INSTRUCTIONS For Household Use Only WHEN USING ELECTRICAL APPLIANCES, BASIC SAFETY PRECAUTIONS SHOULD ALWAYS BE FOLLOWED, INCLUDING THE FOLLOWING: READ ALL INSTRUCTIONS BEFORE USING YOUR NINJA® KITCHEN SYSTEM 1100™. POLARIZED PLUG WARNING: To reduce the risk of electric shock, this appliance has a polarized plug (one blade is wider than the other). This plug will fit into a polarized outlet only one way. If the plug does not fit fully into the outlet, reverse the plug.
12. DO NOT attempt to sharpen blades. 13. DO NOT use the appliance if blade assembly is bent or damaged. 14. To reduce risk of injury, never place the blade assembly on base without pitcher or bowl properly attached. 15. DO NOT operate this appliance on or near any hot surfaces (such as gas or electric burner or in a heated oven). 16. The use of attachments or accessories including canning jars, not recommended by the manufacturer may result in fire, electric shock or personal injury. 17.
THIS BOOK COVERS MODEL NUMBERS: NJ602 30 NJ602CO 30 TECHNICAL SPECIFICATIONS Voltage: 120V., 60Hz. Power: 1100 Watts Pitcher Capacity: 2.15 L (72 ounces) (9 cups) Bowl Capacity: 1.18 L (40 ounces) (5 cups) 4 TOLL FREE: 1-877-646-5288 NJ602_series_30_IB_ENG_120427_2.
Contents Thank you for purchasing the Ninja® Kitchen System 1100™. Getting Started..................................................................................... 6 Using the Ninja® Kitchen System 1100™...................................... 8 Using the Pitcher.................................................................................. 11 Using the Bowl...................................................................................... 12 Care & Maintenance.....................................
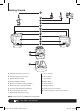
Getting Started a b c d e f g h i j k l m n o a 6-Blade Assembly (pitcher) j 72 oz. Pitcher b 4-Blade Assembly (bowl) k 40 oz.
The Ninja® Kitchen System 1100™ is a professional, high powered innovative tool with a sleek design and outstanding performance, a true asset to any kitchen. It is perfect for ice crushing, blending, pureeing, and controlled processing. The Ninja ® Kitchen System 1100™ also features a unique capability to knead dough for pizzas, breads, pretzels and cookies! Create all of your favorite recipes fast and easy with just one touch of a button.
Using the Ninja® Kitchen System 1100™ PLEASE KEEP THESE IMPORTANT SAFEGUARDS IN MIND WHEN USING THE APPLIANCE: IMPORTANT: Never add ingredients into the container before placing the attachment in first. IMPORTANT: Attachments are not interchangeable. CAUTION: Blades are sharp! Use extreme caution when handling the blade assemblies. Always hold them by the shaft. IMPORTANT: DO NOT attempt to operate the appliance without the lid on. Fig. 1 Fig. 2 IMPORTANT: Never run the appliance empty.
Shaft Shaft Fig. 3a Fig. 3b Fig. 4b Fig. 4a HOW TO ASSEMBLE CAUTION: Make sure that the motor base is unplugged from the power source. 1 Place the motor base on a clean, dry, level surface. 2 Lower the pitcher or the bowl onto the motor base. (Fig. 1) 3 Rotate the container to the left as far as it will go. As the container rotates, it will lower and the safety tabs on the bottom of the container will slide under the safety tabs on the top of the motor base. (Fig.
Using the Ninja® Kitchen System 1100™ - cont'd NOTE: The handle will remain locked in the upward position until the lid is completely seated on top of the container. Locking Handle Fig. 5 Fig. 6 3 Place the color co-ordinated lid onto the corresponding container with the locking handle in the upright position and the pouring spout on the corner opposite the container’s handle. Align the arrows ( ) located on the lid and container’s handle.
Using the Pitcher Fig. 8 Fig. 7 8 To remove the container, press the power button ( ) to turn the appliance “Off”. Wait for the attachment to stop moving before removing. (Fig. 7) 9 Depending on the consistency of the contents in the container, open the pouring spout cap and use the spout to empty liquid contents. For thicker consistencies, or for removing dough from the bowl, remove the lid and attachment carefully (by its shaft), then empty contents from the container.
Using the Bowl Locking Tab Fig. 9 USING THE 4-BLADE ASSEMBLY 1 Holding the 4-Blade assembly by the shaft, place it onto the gear shaft inside the bowl. Ensure that the attachment fits around the gear shaft and that it is standing straight. 2 Add the ingredients and secure the bowl lid onto the bowl. (Fig. 9) 3 Plug the power cord into the electrical outlet and press on the power button ( ). NOTE: Please refer to “Speed Settings & Uses” chart for suggested uses and speeds. Fig. 10 Fig.
USING THE DOUGH PADDLE IMPORTANT: Use only the “DOUGH” button when using this attachment. IMPORTANT: Use the dough station when using the dough paddle on SPEED 1/DOUGH. 1 Place the dough station on a clean, dry, level surface such as a counter or table top with the locking tab in the back. (Fig. 10) Press down to secure the suction feet to the surface. Fig. 12 Fig. 13 2 Place the motor base inside the dough station and push down until you hear it click into place. (Fig.
Care & Maintenance HOW TO CLEAN CAUTION: Make sure that the motor base is unplugged from the power source before inserting or removing any attachment and before cleaning. CAUTION: DO NOT immerse the motor base into water or any other liquid. 1 Separate/remove all parts from each other. 2 Clean the motor base and dough station with a damp cloth and wipe dry.
Speed Setting & Uses FUNCTION CONTAINER ATTACHMENT SPEED BUTTON TYPE OF FOOD Whipping Bowl Dough Paddle 1 Whipped cream Thin pancake batter Scrambled eggs Mousse Meringue* Mincing Bowl Blade Assembly Pulse Onion Garlic Herbs Bread dough Pie dough Pizza dough Pretzel dough Kneading Bowl Dough Blade 1 (DOUGH) Dough Mixing Bowl Dough Paddle 1 (DOUGH) Cookie dough Blending Bowl Blade Assembly 2 (BLEND) Pâtés Stewed fruits Dips Apple sauce Spreads Soups Baby food Grinding Bowl Blade
Troubleshooting Guide PROBLEMS POSSIBLE REASONS & SOLUTIONS Make sure the container is securely placed on motor base. Make sure the lid is securely on container in the correct position (align arrows). The appliance is turned “Off”. Press the power button ( ) to turn “On”. Motor Doesn’t Start or Attachment Doesn’t Rotate. Check that the plug is securely inserted into the electrical outlet. Check the fuse or circuit breaker. The unit has overloaded.
Recipes Orange Double-Up Ingredients: 4 Cups 1 /2 Cup 2 Medium 16 oz. Directions: Pour 2 cups of orange juice into the pitcher. Add the juice concentrate and the fresh oranges. Blend on 2 until uniformly smooth. Pour the mixture into a large serving pitcher and add the remaining orange juice and carbonated water. Stir well to blend. Pour over ice and serve. Serves 4 to 6.
Recipes - cont’d Banana Pineapple Smoothie Ingredients: 2 Cups 1 Cup 1 Small 1 /4 Cup 1 Tbsp. 3 Cups Directions: Pour the juice into the pitcher and add the pineapple, banana, coconut milk, honey and ice. Blend on 3 until very smooth. Pour into glasses and serve at once. Serves 3 to 4.
Sweet Strawberry Smoothie Ingredients: 1 /2 Cup 1 /2 Cup 1 Cup 1 /2 Cup 2 Cups Directions: Pour the milk and cream into the pitcher and add the strawberries, yogurt and ice cubes. Blend on 3 until the mixture is very smooth and no fruit pieces remain. Pour into glasses and serve right away. Serves 2 to 3.
Recipes - cont’d Easy Pizza Dough Ingredients: 1 /4 oz. Pkg. 1 tsp. 1 Tbsp. 2 /3 Cup 1 /4 Cup 2 Cups Directions: Place the yeast, salt, sugar and water in the bowl. Pulse on 1 for 10 seconds. Add the oil and flour and blend on 1 until the dough is smooth and no lumps remain. Transfer the dough to a lightly-oiled bowl and cover. Let rise for about 1 hour. If you are making high-rise pizza dough, punch down the dough and let rise again for 45 minutes.
Pineapple Nut Crumb Cake Ingredients: 1 /2 Cup 3 /4 Cup 2 1 1 /2 tsp. 1 1 /4 Cups 1 tsp. 1 Fresh Butter, softened Sugar Eggs Vanilla Extract All-Purpose Flour Baking Powder Pineapple, peeled, cored, quartered lengthwise and sliced Crumb Topping: 1 1 /4 Cups All Purpose Flour 1 /2 Cup Sugar 1 /4 tsp. Ground Cinnamon 1 /2 Cup Butter 1 /2 Cup Walnuts Directions: Preheat the oven to 350°F. Butter the bottom and sides of a 10-inch spring form pan.
Recipes - cont’d English Toffee Cookies Ingredients: 1 Cup 1 /2 Cup 1 /2 Cup 1 tsp. 1 2 Cups Pinch 10 oz. 1 /2 Cup Directions: Place the softened butter, sugars, extract and egg yolk in the bowl and blend on 1 until smooth and creamy. Use a spatula to clean the sides of the bowl. Add the flour and salt. Blend again until smooth. Spoon the cookie dough onto a baking sheet that has been coated with cooking spray. Allow a 2-inch margin, as the dough will spread.
Model NJ602 30 ONE (1) YEAR LIMITED WARRANTY EURO-PRO Operating LLC warrants this product to be free from material defects and workmanship for a period of one (1) year from the date of purchase when utilized for normal household use, subject to the following conditions, exclusions and exceptions. The liability of EURO-PRO Operating LLC is limited solely to the cost of the repair or replacement of the unit at our option.
Euro-Pro Operating LLC US: Newton, MA 02459 CAN: Ville St-Laurent, QC H4S 1A7 1-877-646-5288 www.ninjakitchen.com Copyright © 2012 Euro-Pro Operating LLC Printed in China Illustrations may differ from actual product. NJ602series.E.120427.2 NJ602_series_30_IB_ENG_120427_2.