
Use and Care Manual


12
1-877-646-5288
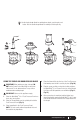
6 To stop the appliance, release your fingers from the on/
off pulse button on the Power Pod. (Fig. 16)
7 Make sure that the blades have stopped completely before
removing the Power Pod and Geared Lid.
CAUTION: Blades are not attached. Do not pour out
contents without removing the blades first.
8 Carefully hold the blade assembly by the shaft and
remove it from the Chopper before emptying the
contents of the Chopper.
HINTS & TIPS FOR USING YOUR NUTRI
NINJA
®
2-in-1 Chopper
• The chopping blades can be used for chopping meat,
fish, vegetables, cheese etc.
• Pre-cut larger pieces to make them fit into the Chopper.
When chopping hard foods (e.g., meat, cheese) cut into
1-inch cubes.
• For coarse chopping, use short, quick pulses and
monitor food texture.
IMPORTANT: Never run the appliance empty.
CAUTION: Blades are sharp! Use extreme caution when
handling the blades. Always hold by the shaft.
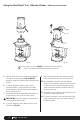
WARNING: DO NOT crush ice in the Bowl-in-Bowl
Chopper or damage may occur to the unit.
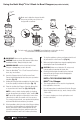
1 Place the Nutri Ninja
®
2-in-1 Food Processor Bowl on a
clean, dry, level surface.
2 Insert the Chopper into the Food Processor Bowl.
Ensure that the gripping tab faces the pour spout when
installed. (Fig. 13)
3 Holding the Chopper blade assembly by the shaft, place
it onto the spindle pin inside the Chopper. (Fig. 13)
4 Place the food into the Chopper. Place the Geared Lid
on top and then the Power Pod. (Fig. 14, Fig. 15)
NOTE: In order to obtain a better quality of chopping,
operate the appliance by using the “pulse” method. DO
NOT operate the appliance continuously for more than
30 seconds at a time. Be careful not to over process.
For coarsely chopped foods, use repeated short pulsing
action until the desired consistency is reached.
5 If the ingredients stick to the side of the Chopper during
processing, stop the appliance by releasing the pulse
button, remove the Power Pod and Geared Lid. Use
a spatula to dislodge the pieces and then replace the
Geared Lid and the Power Pod. Continue processing.
Using the Nutri Ninja
®
2-in-1 Bowl-In-Bowl Chopper (may not be included)
Fig. 13 Fig. 14 Fig. 15 Fig. 16
For best results, use short “PULSES” by pushing down on the button in short,
1 second bursts until desired consistency is achieved.
Make sure to align the chopper tab with
the processor bowl pour spout or the
chopper will not activate.