QUICK REFERENCE GUIDE ALTIMA 2015 1666553_15a_AltimaSedan_QRG_033114.
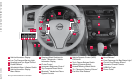
1666553_15a_AltimaSedan_QRG_033114.indd 3 1 Behind steering wheel 3 Behind steering wheel 2 4 4 19 5 20 6 9 12 13 14 1 Vehicle Information Display 2 Low Tire Pressure Warning Light 3 Headlight and Turn Signal Control 4 Paddle Shifters* 3/28/14 4:22 PM 5 Windshield Wiper / Washer Switch 6 Vehicle Information Display *See your Owner’s Manual for information.
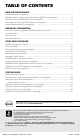
TABLE OF CONTENTS NEW SYSTEM FEATURES Text Messaging (if so equipped)..................................................................................................................2 RearView Monitor with Moving Object Detection (MOD) (if so equipped).......................................2 Blind Spot Warning (BSW) System (if so equipped).............................................................................3 Lane Departure Warning (LDW) System (if so equipped).......................................
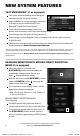
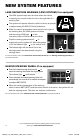
NEW SYSTEM FEATURES TEXT MESSAGING* (if so equipped) T his system allows for sending and receiving text messages through the vehicle interface. U sing predefined or custom messages, send a text to a name or phone number stored in your Bluetooth® Hands-free Phone System. O nce enabled, the text message, sender and delivery time are shown on the control panel display screen. Text messages have the option of being read aloud.
If the MOD system detects moving objects, a yellow frame 4 will be displayed on the camera image and a chime will sound. 5 3 When the following are displayed: 4 • Blue MOD icon 5 ; the system is active. • Gray MOD icon; the system is not active. • No MOD icon; the system is off. The indicator will also be off if all of the warning systems are deactivated using the settings menu. The MOD system will not operate if the trunk is open.
NEW SYSTEM FEATURES LANE DEPARTURE WARNING (LDW) SYSTEM (if so equipped) The LDW system helps alert the driver when the vehicle is traveling too close to either the left or the right side of a traveling lane. 1 The system will operate when the vehicle is driven at speeds of approximately 45 MPH (70 km/h) and above.
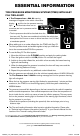
ESSENTIAL INFORMATION TIRE PRESSURE MONITORING SYSTEM (TPMS) WITH EASY FILL TIRE ALERT A Tire Pressure Low – Add Air warning message will appear in the vehicle information display 1 and the low tire pressure warning light 2 will illuminate when one or more tires are low in pressure and air is needed. 1 • The tire pressures should be checked when the tires are cold. The tires are considered cold after the vehicle has been parked for 3 hours or more or driven less than 1 mi (1.
ESSENTIAL INFORMATION LOOSE FUEL CAP A LOOSE FUEL CAP warning message will display in the vehicle information display 1 when the fuel-filler cap is not tightened correctly. 1 To tighten, turn the cap clockwise until a single click is heard. The warning message will disappear when the vehicle detects the fuel-filler cap is properly tightened and the reset button 2 is pressed for about 1 second. If the cap is not properly tightened, the Malfunction Indicator Light may also illuminate.
3 1 CLOCK SET/ADJUSTMENT To adjust the time and the appearance of the clock on the display: 1. Press the button 1 . 2. Touch the “Settings” key. 3. Touch the “System” key. 4. Touch the “Clock” key. The following settings can be adjusted: • Time Format: The clock can be set to 12 hours or 24 hours. • D ate Format: The date can be changed to 1 of 5 different formats.
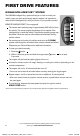
FIRST DRIVE FEATURES NISSAN INTELLIGENT KEY® SYSTEM The NISSAN Intelligent Key® system allows you to lock or unlock your vehicle, open your trunk and remotely start the engine. It is important to make sure the Intelligent Key is with you (that is, in your pocket or purse). REMOTE ENGINE START* (if so equipped) 2 The remote start operating range is approximately 200 ft (60 m) from the vehicle. The remote engine start feature will not operate if the Intelligent Key is inside the vehicle.
LOCKING AND UNLOCKING THE VEHICLE The lock and unlock operating range of the Intelligent Key is within 31.5 in (80 cm) from each request switch. 3 To lock the vehicle, push either door handle request switch 3 once or press the button 1 on the key fob. To unlock the vehicle, perform one of the following procedures: • Push either door handle request switch 3 once; the corresponding door will unlock.
FIRST DRIVE FEATURES TRUNK LID RELEASE Use one of the following methods to open the trunk: 1 Push the trunk opener request switch 1 , located under the trunk handle, for more than 1 second while carrying the NISSAN Intelligent Key® with you (that is, in your pocket or purse). Press the trunk release more than 1 second. HOLD button 2 on the Intelligent Key for From inside the vehicle, push the trunk lid release switch 3 located on the instrument panel to the left of the steering wheel.
STARTING/STOPPING THE ENGINE It is important to make sure the NISSAN Intelligent Key® is with you (that is, in your pocket or purse). Depress the brake pedal. • If the brake pedal is not depressed, pushing the ignition switch once enters the ACC mode. • If the ignition is pushed a second time, the vehicle will enter the ON mode. Move the shift lever to the P (PARK) position. Press the ignition switch START/STOP button to start the engine.
FIRST DRIVE FEATURES FOG LIGHT SWITCH (if so equipped) The headlights must be on and the low beams selected for the fog lights to operate. Turn the switch (inside collar) to the 6 to turn the fog lights on. position 6 Turn the switch (inside collar) to the OFF position to turn the fog lights off. LANE CHANGE SIGNAL To signal a lane change, move the lever up or down to the point where the indicator light begins to flash but the lever does not latch.
3 4 9 1 5 6 7 2 8 10 AUTOMATIC CLIMATE CONTROLS (if so equipped) 1 AUTO BUTTON/DRIVER’S SIDE TEMPERATURE CONTROL DIAL The automatic mode may be used year-round. Press the AUTO button to turn the system on, and the system will automatically control the inside temperature (automatic cooling and/or dehumidified heating), air flow distribution and fan speed. Turn the driver’s side temperature control dial to the left for cooler air or right for warmer air.
FIRST DRIVE FEATURES 7 MODE BUTTON Press the MODE button to cycle through the following air flow outlets: Air flows from the center and side vents. Air flows from the center, side and foot vents. Air flows mainly from the foot vents. Air flows from the defroster and foot vents. 8 A/C BUTTON Press the A/C button to turn the air conditioner system on or off. This system helps cool and dehumidify the air inside the cabin and defog the windows.
2 TUNE•SCROLL KNOB/ENTER•AUDIO BUTTON To manually tune the radio, turn the TUNE•SCROLL knob left or right. Press the ENTER•AUDIO button to go to the audio settings screen. 3 SEEK BUTTONS To tune and stop at the previous or next broadcast station, press the seek buttons or . For satellite radio, to switch to the first channel of the previous or next category, press the seek buttons or .
FIRST DRIVE FEATURES CRUISE CONTROL (if so equipped) The cruise control system enables you to set a constant cruising speed once the vehicle has reached 25 MPH (40 km/h). The system will automatically maintain the set speed until you tap the brake pedal, accelerate, cancel or turn the system off. 4 3 2 1 To activate the cruise control, push the ON/OFF switch 1 . The CRUISE indicator light in the instrument panel will illuminate.
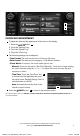
SYSTEM GUIDE VEHICLE INFORMATION DISPLAY The vehicle information display 1 displays such items as: Vehicle settings Trip computer information Drive system warnings and settings (if so equipped) Audio information Navigation turn-by-turn Cruise control system information NISSAN Intelligent Key® operation information Indicators and warnings Tire pressure information 1 USING THE VEHICLE INFORMATION DISPLAY The vehicle information display can be changed using button 2 and th
SYSTEM GUIDE NISSANCONNECT™ APPS SMARTPHONE INTEGRATION (if so equipped) Integrates popular smartphone apps and services into your vehicle. The NissanConnect™ App must be downloaded to your smartphone and you must be enrolled. For more information on how to pair your phone and set up NissanConnect™ Apps, visit: www.nissanusa.com/connect/support. For more information, refer to the “Monitor, climate, audio, phone and voice recognition systems (section 4)” of your Owner’s Manual.
CONNECTING PROCEDURE WITHOUT NAVIGATION* (Type A) (if so equipped) 1. Press the button on the steering wheel. 2. After the command, say “Connect Phone”. 3. The system will confirm your command. After the tone, say “Add Phone”, and then follow the voice prompts to complete the connecting procedure from your handset. • T he connecting procedure varies according to each phone. See your cellular phone’s Owner’s Manual for details and also visit www.nissanusa.com/bluetooth.
SYSTEM GUIDE MAKING A CALL FROM PHONEBOOK 1. Press the button. 2. After the tone, say “Call ” where is the name of a contact stored in your phonebook. 3. The system will confirm the name. If correct, say “Yes.” Otherwise, say “No.” • Please note that some phones require the name to be spoken in a format. MAKING A CALL BY PHONE NUMBER 1. Press the button. 2. After the tone, say “Call ”, or say “Call”. 3.
CONNECTING PROCEDURE 1. Press the button on the control panel. 2. Touch the “Settings” key 1 . 1 3. Touch the “Phone & Bluetooth” key 2 . 2 4. Touch the “Connect New Device” key 3 . 3 5. Initiate the connecting process from the handset. The system will display the message: “Is PIN XXXXXX displayed on your Bluetooth device?” If the PIN is displayed on your Bluetooth® device, touch “Yes” to complete the connecting process. VEHICLE PHONEBOOK To access the vehicle phonebook: 1.
SYSTEM GUIDE RECEIVING/ENDING A CALL To accept the incoming call, either: • Press the button on the steering wheel, or • Select the icon on the screen. To reject the incoming call, either: • Press the button on the steering wheel, or • Select the icon on the screen. To end a phone call, either: • Press the button on the steering wheel, or • Select the icon on the screen.
6 MAP button – Press to display the current location map screen. 7 TUNE•SCROLL knob / ENTER•AUDIO button – Turn to navigate the items in a list. Press to select a menu item. BACK button – Press to return to the previous screen. 8 button – Press to access the system settings key. 9 10 button – Press to change the display brightness between day and night modes. While the mode is being displayed, the brightness can be adjusted using the TUNE/ SCROLL knob.
SYSTEM GUIDE n additional person may make the remaining steps easier. To complete the A programing process: • At the receiver of the device that you are programing to the HomeLink system, press and release the “learn” or “smart” button (the name may vary by manufacturer but it is usually located near where the hanging antenna wire is attached to the unit). You have approximately 30 seconds to initiate the following step.
MEMO 1666553_15a_AltimaSedan_QRG_033114.
This Quick Reference Guide is intended to provide an overview of some of the unique features of your new vehicle. Please see your Owner’s Manual for important safety information and system operation limitations. Features and equipment in your vehicle may vary depending on model, trim level, options selected, order, date of production, region or availability. Therefore, you may find information about features or equipment that are not included or installed on your vehicle.