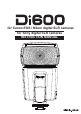
for Canon EOS / Nikon digital SLR cameras for Sony digital SLR cameras INSTRUCTION MANUAL
Thank you for purchasing a Nissin product Before using this flash unit, please read this instruction manual and refer your camera owner’s manual carefully to get a better understanding of the proper operation to enjoy flash photography. Nissin Di600 type Canon, Nikon and Sony are designed for Canon, Nikon and Sony digital SLRs, with the latest TTL flash control system. Please note that Di600 Canon, Nikon and Sony are not usable with other branded cameras for TTL operation.
SAFETY INSTRUCTIONS These safety instructions refer to important information on how to use this product safely and properly. Please read the following instructions before using the product. WARNING This sign refers to the danger or serious damage. The flash unit contains high voltage electric parts. Do not try to open or repair the flash unit. Return it back to the repair service station or the store where you bought it from.
Names of the Components D F Ch 1 Group A Pilot Sync Sync *Sony type hotshoe / Flash stand Flash stand Light diffusing panel / Fill-in reflector Flash head AF-assist light / wireless flash sensor Lock ring Mounting foot Hotshoe contacts X - Terminal Pilot button (Test flash button) Battery compartment door Power switch (Press button) Mode select button / indicator (TTL → Manual → SD → SF → Wireless TTL slave) Flash power level indication lamp (6 LEDs) Flash power level select button Accessories: Flas
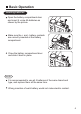
Basic Operation Inserting batteries F/ On/Off Pilot Ch 1 Group A Open the battery compartment door and insert 4 x size AA batteries as shown by the picture. On/Off Pilot F/ Ch 1 Group A Make sure the + and - battery contacts are correctly inserted at the battery compartment. On/Off Pilot F/ Ch 1 Group A Close the battery compartment door and slide it back in place. NOTE It is recommended to use all 4 batteries of the same brand and type, and replace them all the same time.
Mounting Di600 on the camera *For Nikon and Canon type digital SLR cameras Twist the lock ring anti-clockwise to loosen it as shown in the picture. Slide the mounting foot of Di600 into the hotshoe of camera. Twist the lock ring clockwise to tighten it. Removing Di600 from the camera Loosen the lock ring and slide the mounting foot of Di600 off the hotshoe of camera. NOTE Before mounting or removing Di600 into or from the camera, make sure to turn off the power switch of both Di600 and the camera.
Mounting Di600 on the camera *For Sony type digital SLR cameras Push the lever of the locking ring (in the direction of the arrow) of Di600 to loosen it as shown in the picture. Slide the mounting foot of Di600 into the hotshoe of the camera while holding down the lock ring. Release the lock ring of Di600 when the mounting foot is fully slide into the hotshoe of the camera. Lock pin comes out to hook the foot at the hotshoe for sure contact.
Turn on the flash unit Press the On/Off switch and the Pilot button turns red showing the unit is turned on. In a few seconds, the Pilot button turns green. The Di600 is ready to shoot. On/Off For a test flash, press the Pilot button. When using the test flash as an open flash, please note that the reference guide number in this case is G.No.10 (ISO 100). To turn off the flash unit manually, press the On/Off switch for 2 seconds.
Shooting Di600 automatically Canon cameras (Program), (Full Auto), (Aperture priority), (Shutter priority) or (Manual); Nikon cameras (Program), (Full Auto), (Aperture priority), (Shutter priority) or (Manual); Sony cameras (Program), (Full Auto), (Aperture priority), (Shutter priority) or (Manual); In all camera's shooting modes listed above, Di600 will fully work in TTL (ETTL, ETTL-II for Canon, i-TTL for Nikon and ADI, P-TTL for Sony ) automatic-flash system.
Set the camera’s shooting mode, select focal length and take pictures with Di600 on your camera. Di600 is a supplement to help you in taking a creative and live picture. Almost all tasks are automatically done by the camera and you just control the camera only.
Joy of Flash Photography TTL flash power compensation With the latest TTL flash control system, the flash power level is always automatically controlled by the camera for the most appropriate exposure. If you wish, you can soften or weaken the flash light, or give more light to the subject without changing the environmental or background exposure effect. The Di600 can make it possible to quickly adjust the exposure for each partucular flash picture as needed.
Fill-in flash and Light diffusing panel For short distance or portrait flash photography, if the light is not too sharp or too strong to the subject. Use fill-in reflector flash or diffuse the light. If the subject is close (within 2 meters), turn the flash head 90° upward and pull out the fill-in reflector as shown in the picture. Take a picture as usual. A blink of fill-in flash freshens up the subject in natural image.
Bounce lighting When lighting a subject in front of the wall, an unnecessary sharp shadow may appear on the wall behind the subject resulting in a disappointing picture. Bounce the light off the ceiling or wall to soften the light on the subject, and the shadow will fade. Turn the flash head up. It turns upward to 45° >60° >75° >90°. Or tilt the flash head sideway to left 30° >60° >90° or to right 30° >60° >90° >120° >150° >180°. Or mixing it upward/ sidways, you can set it in multiple directions as shown.
Flash Power Lock When the back ground of the main subject is too bright, the camera’s exposure reading system adjusts the flash light intensity for such back ground condition and it results in the main subject being under-exposed. Or in case the main subject is not placed in the center of the viewfinder, the flash picture may result the aimed targeted subject being under or over exposed. You can lock the correct flash exposure for the targeted subject in such a condition.
For Nikon Version only Following functions are available on Nikon cameras. Refer to camera owner's manual for details. Slow shutter synchronization The flash is controlled at a slow shutter speed to the correct exposure for both the main subject and back ground in low light conditions or at night. Red-eye reduction To prevent the subject's eyes from appearing red, Di600 fires three controlled flashes just before the picture is taken. Red-eye reduction can be combined with slow sync.
Manual Exposure Flash In some occasions, or for special expression, you may need your own flash exposure instead of the automatic controlled exposure. You can set Di600 for non-automatic flash mode, and select the desired flash power from 6 different levels When the flash unit is turned on, it is automatically set for TTL (E-TTL II / E-TTL for Canon, or i-TTL for Nikon, or ADI / P-TTL for Sony) automatic flash mode. In this mode, the mode select indicator does not light. Press the mode select button.
Wireless slave Flash Di600 has a wireless remote flash system as a slave unit. You can enjoy creative flash photography with multiple lightings from the various directions. 3 slave modes are provided, Slave Digital (SD: green color) for digital pre-flash system; Slave Film (SF: blue color) for analogue flash system and Wireless ( :purple color) for wireless remote channel 1 group A digital flash. SD: In this mode, Di600 synchronizes to the pre-flash system.
Setting slave flash Di600: Switch Di600 on and while the ready lamp is on, press the mode select button to select desired mode. The mode select button turns to TTL (no light)— Manual (red)—SD (green)—SF (blue)----Wireless TTL slave(Purple) and back to TTL. When flash is set to SD or SF mode, the first lamp of flash power level is lighten. This lamp shows the 1/32 manual power level. Press the flash power level select button at marked + to select different power of 1/16→1/8→1/4 →1/2 and Full.
Shooting the subject: Set the camera for flash shooting mode. Point at the subject and shoot. The slave flash will synchronize to the master flash and gives additional lighting from the different direction you desired. Energy saving system for stand-by mode will not work when it's in slave mode. Automatic shut off function is however in effect. It automatically turns-off when not in use over 60 minutes.
TTL Exposure level custom setting TTL exposure level is accurately calibrated for standard balance in accordance with Nissin’s standard. If any adjustment is however required, or if you like to set your preferable level, it can be adjusted for about ±0.75 (3/4) Ev. This adjustment can only be set when the flash is off. Insert 4 AA batteries in the battery compartment. Light Blue Press the pilot button and On/Off switch both together and hold for 3 sec.
Specifications Sony ADI/P-TTL Canon EOS Nikon iTTL Usable cameras digital SLR cameras digital SLR cameras digital SLR cameras Guide No. 44/145 at 105mm focal length (ISO 100 m/ft) Illumination coverage 24-105mm (16mm with diffuse panel) (Automatically set for the lens focal length) Power source 4 x size AA alkaline batteries (Size AA Ni-MH or lithium batteries usable) Battery life Energy saving 200-1500 flashes according to the mode (with alkaline batteries) Switch to Stand-by mode in 2 minutes.
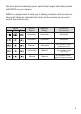
Guide Numer table Guide No. at manual exposure mode (ISO 100 in meters) Zooming Position Flash Power Level Full 1/2 1/4 1/8 1/16 1/32 24mm 25 18 13 9 6 5 28mm 28 20 14 10 7 5 35mm 32 22 16 11 8 6 50mm 35 25 18 13 9 6 70mm 38 27 19 14 10 7 85mm 41 29 20 14 10 7 105mm 44 31 22 16 11 8 Trouble Shooting The flash unit does not start charging. Batteries are not correctly installed >>> Install batteries to correct direction.
Warranty In case of the following reason of the defect, it may void the warranty. Please refer the respective warranty condition for details which depends on the country of purchase. 1. The product is not used in accordance with the instruction of the owner’s manual. 2. The product is repaired or modified by the one who is not an authorized repair service. 3. When the product is used with the cameras not applicable, lens, adaptors or such accessories produced by the third party. 4.
Nissin Japan Ltd., Tokyo http://www.nissin-japan.com Nissin Marketing Ltd., Hong Kong http://www.nissindigital.com Design and Specifications are subject to change without prior notice. 600.Rev.0613.1.