
Manual

Nitrous Express Fire & Ice Pressure Controller
PN:SPEED00020
Figure 1
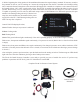
Figure 2
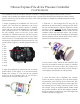
Figure 1
1. Before beginning the installation the Fire & Ice
Control (FIC) unit must be calibrated to the correct
bottle pressure. All NX systems operate at 1050PSI.
Check with your nitrous kit manufacturer to determine
their operating pressures. To calibrate the unit remove
the four retaining screws on the face of the black
controller box. Carefully remove the unit face to expose
the internal workings of the control unit. In the lower
center of the box is an adjusting knob, carefully adjust
the setting to correspond to the correct pressure for your
nitrous system. (Figure 1). All NX Systems must be set
on 9.
0=850
1=875
2=900
3=925
4=950
5=970
6=990
7=1010
8=1030
9=1050
The installation of the NX Fire & Ice Pressure Controller is a simple and straightforward procedure, however
anytime you are dealing with dangerous high-pressure cryogenic gases and electrical connections extreme caution
must be exercised. If you do not have the proper tools or the experience to complete this installation please consult a
professional for help.
3. With the “T” bolt changed the FIC may now be
attached to the nitrous bottle by inserting the FIC under
the now extended bracket. (Figure2) Tighten the clamp
securely to ensure complete surface contact between
the bottle and the FIC. Be sure the FIC makes full and
complete contact with the bottle surface. Do not place
the FIC over the bottle decal or anything else that might
prevent complete contact with the bottle surface. This is
essential for satisfactory unit performance.
4. Now you are ready to mount the FIC controller. This
unit must be mounted within the length of controller
wiring harness, do not cut or splice any wiring! If you
wish to view the control unit status from the cockpit a
remote display unit PN00021 is sold separately.
5. Close the bottle valve completely and carefully
remove the nitrous supply line from the bottle nipple.
Liquid nitrous oxide can cause severe freeze burns, take
care to slowly vent any liquid nitrous in the supply line
by loosening the line slowly until the pressure in the
line escapes. Using the supplied thread sealant install
the pressure transducer into the blue adaptor manifold.
Install the adaptor manifold onto the bottle nipple and
reconnect the nitrous supply line.
2. Begin the installation by removing the rear, or bottom,
bottle bracket T bolt (Figure 1) on the nitrous bottle.
Replace the existing “T” bolt with the one supplied
in the Fire & Ice Controller (FIC). If your kit uses a
different style of clamp order PN 11106.